Read Passionate About Pizza: Making Great Homemade Pizza Online
Authors: Curtis Ide
Tags: #Baking, #Cookbook, #Dough, #Pizza
Passionate About Pizza: Making Great Homemade Pizza (2 page)

Pour the warm liquid in a large mixing bowl and sprinkle in the sugar and the yeast; stir gently for a few seconds (don't worry if the yeast and sugar are not completely dissolved right away). Let stand until foamy, about 10 minutes. You should begin to see the yeast multiply; it will produce bubbles and clumps that rise to the surface of the liquid. Waiting for the yeast to become bubbly is not necessary if you are very familiar with yeast baking and you know your yeast is active. Add 1/3 of the total amount of flour, the oil, and the salt. Mix thoroughly until it is smooth with no lumps. Add the remaining flour and mix well. The dough should come together and be fairly dry. You may need to add up to an additional 1/2 cup or so of flour if the dough is very wet or sticky.
Kneading
The purpose of kneading is to develop the gluten in the flour. As it develops, the gluten protein transforms and creates long chains of protein. These chains form a matrix that holds the dough together; the gluten matrix also holds the bubbles created by the yeast, allowing the dough to rise. Squashing, stretching, or squeezing the dough against a surface accomplishes kneading. The friction produced by pushing the dough against the surface and the dough itself is what develops the gluten in the flour.
You will see a transformation occur as kneading progresses. What started out as just a mixture of flour and liquid will turn into smooth, supple, and elastic dough.
Kneading can be done by hand or by using a heavy-duty electric mixer, food processor, or bread machine. I recommend that even if you plan to use your electric mixer or food processor most of the time, you should try kneading the dough by hand a few times to get the feel of the process. This will make you more successful when using the mixer because you will know when the kneading is complete.
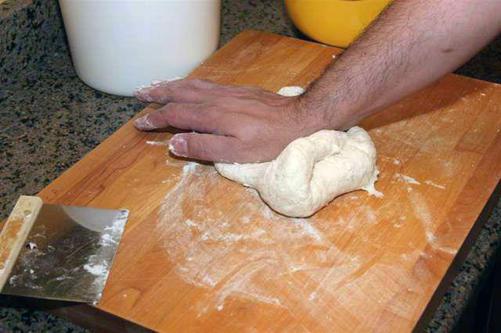
You can knead on any flat work surface, such as a counter. Put the dough on a lightly floured work surface. Place one hand on top of the other and use the heel of your bottom hand to push the dough across the work surface, squashing the dough between your hand and the work surface.
Fold the dough over onto itself from one side to the other, turn it ninety degrees, draw it back towards yourself, and then push it across the work surface again. Sprinkle a little flour over the dough if it sticks to your hand or the work surface too much, remembering that it is okay for the dough to be a little sticky.
Repeat this action over and over, adding only as much flour as it takes to keep the dough from sticking to your hands too much. If you keep adding flour, you will have to knead longer and the dough will come out heavy. A dough scraper can be used to facilitate the process without continually adding flour.
Work quickly and do not be delicate; slap and push the dough around to develop its gluten. To keep your arms from getting tired, use your weight by leaning onto your hands so that your weight does most of the work. Continue kneading only until the dough is smooth and elastic and no pieces of raw white flour show.
The kneading process should take five to ten minutes. You will notice a transformation in the dough as you knead it. The streaks of raw flour merge together and are no longer visible. The dough becomes more resilient, holds together well, and turns a uniform color and texture; it should spring back when pressed. The kneading is finished when the transformation is complete throughout the dough. The dough will then be somewhat stretchy, like silly putty. Shape the dough into a ball for rising.
Rising
Rising allows the yeast to multiply; the yeast creates little bubbles of gas that make the dough increase in volume. After the pizza is shaped, the gas bubbles expand further to give the dough its nice texture; it will be light, not dense.
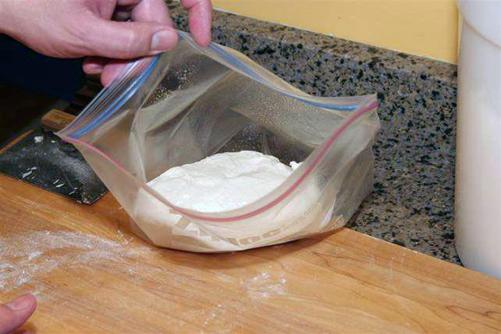
It is very convenient to use zip-seal plastic bags to hold rising dough. First, spray the inside with non-stick cooking spray, then pop the dough ball into the bag, and seal it. You can wrap the bag in a towel to hold the heat. Be sure to use a bag that allows the dough to double in size. I use a gallon-size bag for a three to four cup dough recipe.
If you prefer, you can let the dough rise in a bowl. Lightly oil a mixing bowl with olive oil. If you are using the same bowl in which you mixed the dough, do not worry about cleaning the bowl, just wipe out the loose flour and bits of dough before oiling it. Place the dough in the bottom of the bowl, and then turn it over so that both sides of the dough are oiled. Cover the bowl with plastic wrap then place a towel over it; the yeast gives off a little heat while the dough is rising and the towel keeps this heat in. Place the bowl in a warm, draft-free place and let it rise until it has doubled in volume (about one hour for regular yeast, thirty minutes for quick-rise yeast). The dough has completed rising when it has about doubled in volume and two fingers poked into the dough leave an impression.
Gentle heat makes rising go faster but be careful not to let the dough get hotter than lukewarm or the yeast may die. Rising too long is okay, but not letting the dough rise enough will make it hard to stretch and dense.
Preparing Toppings
Preparing toppings for pizza is straightforward. Follow the recipe or recipes you have chosen for your toppings. Typically, you can make the sauce and prepare the toppings while the dough is rising. I hope that you will not be caught missing any critical ingredients. If so, try to improvise and adjust your plans. Most times, you will find a reasonable contingency plan.
Timing your activities can be tricky. Ideally, the toppings would be finished right when you need them. In practice, this seldom happens so perfectly. Therefore, you might need to let the toppings sit for a while as the dough rises or rests. You may choose to prepare your toppings well in advance and store them. Either way, you should store the toppings in some safe manner.
Letting the Dough Rest

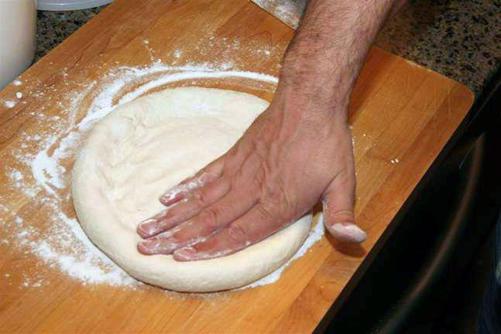
After the dough has risen, punch it down with one fist, take it out of the bowl or bag, and knead it briefly, without adding any flour, to release the large air bubbles (about one minute). Shape it into a flat disk about one inch thick; this is the start of the classic circular shape of the pizza. Sandwich the dough between two layers of plastic wrap so that no air can get to the dough; this keeps the dough from drying out and forming a skin. Let it rest briefly on the work surface for five or ten minutes (up to a maximum of twenty minutes) before shaping it.
Punching down refers to putting your fist into the dough to deflate it after it has risen. This quickly gets most of the air out of it so it is easier to handle.
Why is it necessary to let the dough rest? After the dough has been punched down and kneaded, it will be fairly elastic. If you try to shape the pizza then, you will be frustrated because the dough keeps springing back into shape. Magically, though, if you let the dough sit for a few minutes, it holds its shape after being stretched, rolled, or pushed into shape. Why does this happen? Well, this
rest
allows the gluten in the dough to relax a little so that it is not too springy. Generally, you want to shape the dough into a flat disk or rectangle before letting it rest to give you a slight head start on the final shaping.
If you do not let it rest long enough, the dough may be too elastic to shape easily; the longer it rests (within reason - up to a maximum of twenty minutes) the softer the dough will be and the easier it is to shape. If you want to throw the dough around a lot, do not let it rest for more than a couple of minutes. If you are going to really throw the dough around, you can let it rest in the refrigerator; the coolness imparted by the refrigerator helps keep the dough from stretching too much.
Shaping Pizza
Once the dough has rested, it is ready to be shaped into the familiar form of a pizza. Almost any type of dough can be shaped using the techniques described here.
This is when you will notice the consistency of the dough. Very dense dough will take more effort to roll, stretch, or press into shape. A less dense, sometimes called slack, dough will shape more easily. Adding more flour to dough during mixing can create more dense dough. Similarly, more slack dough can be created by adding more liquid during mixing. Once you know your preferences, you can adjust the measurements of your favorite recipes.
Hand Stretching Thin-style Pizza
Hand stretching is the classic method used in most traditional pizzerias. The steps that follow are my well-tested adaptation of the basic method. You will be placing the stretched dough on a pizza peel, so you should get it ready before you start stretching. Sprinkle some cornmeal on the pizza peel as described in the Pizza Peel Technique section.
When you are ready to begin stretching, hold the rested dough in plastic wrap flat in the palm of one of your hands. Sprinkle a small amount of flour on the work surface where you are going to stretch the dough. Gently peel the top layer of plastic back with your other hand. Sprinkle a small amount of flour over the now exposed dough and gently smooth it over the entire surface, taking care not to squash the dough. Turn the dough over onto the work surface so that the floured side is down. Gently peel the remaining plastic wrap off the dough and flour the entire surface as before. Frequent dustings of flour throughout this entire process are very important; without them, the dough will be too wet and soft to stretch. You cannot really over-dust the dough; the extra flour may fall off and pile up on the work surface, but you will figure out the right amount with practice.