B003YL4KS0 EBOK (11 page)
Authors: Lorraine Massey,Michele Bender

HALO GOOD-BYEIn the past, you probably shampooed the top of your hair first. It is usually the first place to get rinsed, too, so conditioner was washed out before it did its job. No wonder we curly girls have been f.b.i. (frizz-bewildered individuals) for years. We need to reverse this sequence: Have the top of your head be the last place you apply cleanser and the last place you rinse out conditioner. And say good-bye to your frizz halo forever.
4
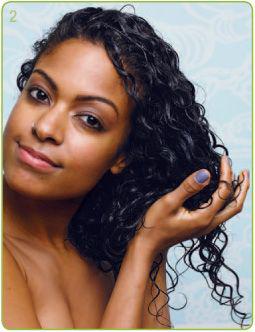
Take a generous palmful of your conditioner (see
page 36
), evenly distribute it between your hands, and graze it downward on the outer layer (aka the canopy) of your hair as if you were icing a cake. If needed, apply more conditioner through the hair at each side of your head, using your fingers as a comb. The point is to distribute the conditioner evenly through your hair’s landscape so no curl is left behind. Now your hair should feel smooth and silky—like wet seaweed.
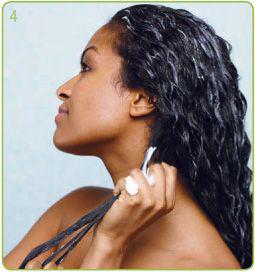
5
Apply a dollop of conditioner (about the size of a quarter) under the hair at the nape of your neck, the spot most prone to tangles and knots. The hair there breaks easily, so be patient and gentle when trying to release any tangles or knots with your fingers. (Ripping equals frays and frays equal more knots.) Then, using your fingers, comb through your hair from underneath, removing any loose hairs. Remember, it’s normal to lose about a hundred strands a day!
6
Before rinsing your hair, stand away from the shower flow. Cup your hands under the water and splash water over your hair a couple of times. I call this a trickle or baptism rinse; it ensures that the canopy of the hair, which is constantly exposed to the environment and thus very dry, can have the right amount of conditioner to stop it from frizzing. Over time, you’ll know instinctively whether to rinse out any more conditioner at this point. If you do rinse, just let the shower spray fall over your head for a few seconds to evenly distribute the conditioner without removing it.
1
Step out of the shower and tilt your head forward. Loosely cupping a microfiber towel, paper towel, or an old cotton T-shirt, gently squeeze upward toward the scalp to remove excess water and encourage curl formation (see
page 37
). (It should sound very squishy.) Repeat this motion all around your head. If you like your curls to be fuller, do this until the hair no longer drips; if you want more gravity to your curls, leave in more water.
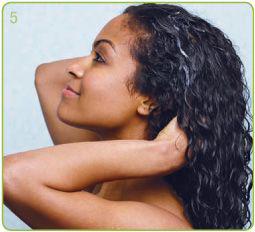
2
With the head still tilted forward, let your curls fall freely. Place a palmful of gel in one hand and evenly distribute it to the other hand. Apply the gel evenly throughout the landscape of the hair, making sure you cover all your curls. Starting at the ends, scrunch sections of hair up toward the scalp (visualize that you’re pushing a spring together with both hands, and then releasing it). This method will cultivate or enhance the curl formation.
3
Slowly raise your head to an upright position, look up at the ceiling, and gently shake your hair so your curls fall
into their natural position. If it’s a humid day or you have a high halo frizz factor, take an additional quarter-sized amount of gel and rub it in both hands. Then very gently graze the gel over the top layer of hair so the cuticle will be smooth.
GET A GRIP: THE CLIPPING TECHNIQUEThe roots of curly hair can sometimes dry flat because of the weight of the wet hair pulling downward. This is especially the case with longer hair. Clipping hair at the roots relieves the wet hair of its own weight as it dries, so you add lift and get a more even curl pattern from roots to ends. This also helps hair dry faster. Here’s how to use clips:
1
Place clips along the part where the roots meet the scalp. If you place the clip farther down the hair, you’ll add more weight and make the roots flatter. Don’t be afraid of doing it wrong; it’s really very simple if you don’t overthink it. Using a clawlike motion, lift a small amount of hair from the top of your head. (The hair should be gently pulled perpendicular to the scalp, not forward or backward.) Open the clip, slide it in at the base of the hair and leave it. Make sure the hair is as tight as when you pinched it and that the clip is close to the scalp. You will need about six clips to lift the top of your hair—in front, at the crown, and between those two points. Now leave your hair alone and let it dry.
2
For a little more advanced clipping, you may want to target areas where your hair tends to get flat when it dries, like the sides of the head at the area where the head curves near the crown (where a cowlick would be). As hair gets longer, this flat spot is more apparent, and if you color your hair, it’s where your roots show first. Use a side mirror to help you find your target for clipping. After some practice, you’ll be able to do this without looking.3
Once your hair dries completely, use care and patience to remove the clips because hair swells during drying and can wrap around the clip the way ivy wraps around a tree trunk. To take clips out, anchor the piece of hair gently with one hand, then with the other hand, open the clip and slide it out.4
Sometimes you may want to leave the clips in for extra styling lift all day. If the clips are the same color as your hair, no one can see them hidden in your curls once your hair dries. For a greater lift, add gel to the clips.Clipping and Diffusing Tutorials (1:29)

SPOT CLEANSINGSpot cleansing your hair can be done as often as you like. Just spray lavender mist (see
chapter 8
,
page 83
, for the spray recipe) on a soft but durable damp paper towel and wind it around your fingertip. Place your paper towel-clad finger on the scalp. With firm, circular motions, rub out all dirt particles as you would a stain on a shirt. For wigs, extensions, and weaves you can use the same paper towel-covered finger technique, by gliding over the surface and moving downward while lightly pressing. This cleaning method is also great to use when you are traveling or camping.

4
To give the curls on the top of your head a little volume, you need to “lift and clip” the hair at the roots. This method releases the top layer of hair from its own weight, allowing it to dry faster and in an even curl pattern from roots to ends. (For the clipping technique, see
page 41
.) Don’t interrupt the curls while they’re drying or they’ll frizz up.
5
If you don’t have time to air-dry your hair, you can use a diffuser (see
page 55
), hooded dryer (they’re surprisingly inexpensive and portable), or, if you’re on the go, just put the heater on in your car. This creates the same kind of drying microclimate that you’d get from a hooded dryer.
6
When your hair is completely dry, remove the clips
very
gently, to prevent them from ripping hair. Lean over, place your hands on your scalp, and with the tips of your fingers, very lightly shake your hair at the roots to open up the curls. Stand upright, and very gently lift your fingers off the scalp,
not
raking them through your hair (which can cause frizz).
Note:
Skip this step if you like a more contained curl.

CURL CONFESSIONBeth Pilar
co-owner of How Sweet It Is cake shop, New York CityWhen I was seven, I was obsessed with Dorothy Hamill’s haircut—that shiny bowl cut with bangs that she sported when she skated her way to an Olympic Gold Medal. I begged my mom to let me get a similar cut, and though she gently tried to discourage me (because she knew it wouldn’t work with my very curly hair), I persisted. Finally, she gave in and took me to the salon. I showed the hairstylist the Dorothy Hamill photos that I’d cut out of magazines. The stylist and my mother exchanged glances, as if they were agreeing to let me get this haircut just to show me it wouldn’t work. And they were right.
To replicate that famous bowl cut, I had to blow-dry my hair each morning. (Yes, a seven year old blow-drying her hair each morning before school!) It would look good initially, but after twenty minutes, it was all downhill. I’d return home from school with a short, frizzy mess. I was so mad at my hair, wondering why it wouldn’t do what I wanted after so much hard work.
In fifth grade, my family moved from the city to a suburb. As if switching schools midyear wasn’t traumatic enough, I was devastated to find that all the girls wore their hair in long, straight ponytails—something I coveted to no end. Then I met Kim, a classmate, who, along with her sister, had the best hair. Every day at 6:30
A.M
., I’d bike to Kim’s house, where she’d slather my hair in products, blow it straight, and slick it into one of those long ponytails. Still, there was always something gnawing at me—this anxious feeling that my hair could change with the weather or, worst of all, at swim class! I actually love swimming, but the thought of how my hair would look after class made it a horrible experience.In junior high, a friend who had hair I thought was like mine, got an adorable short, wavy-curly haircut. I decided to give up my long, straight ponytail and do the same. My friend’s haircut was cute; mine was horrible. It looked like a giant Brillo pad sitting on my head.
Finally, during a hippie phase in college, I let my hair go natural and loved it. Now I regret all the time and agony I wasted wrestling with my curls. But I also learned a bigger lesson: Don’t try to make yourself fit an image that doesn’t make sense for you.
This is who I am, curly hair and all!