Chinese Brush Painting (5 page)
Read Chinese Brush Painting Online
Authors: Caroline Self,Susan Self

A book holder is convenient for keeping the lesson instructions in front of you as you paint. The holder should be large enough to hold the book firmly upright.
Chinese painters work with screens in front of them. These face screens can be decorated and very beautiful, but that is not why they are used. Screens help artists focus on their paintings. For you, the book works like a screen. It keeps you from looking beyond the table at other things, so you can focus on your painting. According to Chinese thought, evil and distracting spirits travel in straight lines. When you place something in front of your face, such as a face screen or book, the spirits cannot distract you while you are working.
When you cut sheets off a roll of rice paper, the edges tend to curl. Flat stone or metal weights help to keep the corners flat as you paint.
Holding an egg in your palm can train your hand and wrist to stay relaxed while you are holding the brush and keep your fingers from touching your palm. You can use a real egg, an artificial egg, or a crumpled piece of paper. Make sure that it fits the size of your palm.
A flat stone is used to train your arm to stay level when your wrist is bent upward to make a stroke.
Folder for Paintings
You will make many practice papers as you learn to use the brush. You don’t have to keep all of them, but it’s a good idea to keep the best paper from each exercise you do in this book as a record of your progress. You can safely store the good papers that you want to keep in a folder. It can be as simple as a folded piece of tagboard or two pieces of cardboard taped together.
Getting Ready to Paint
Set the Table
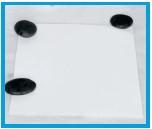
Cover the table with the felt pad or the cotton table cover and place a piece of newsprint on it. Anchor three corners of the paper with weights.
If you are right-handed, set up the items on the table as shown in the picture on page 12. If you are left-handed, move the water and mixing dishes to the left.
Prepare the Paint and Water
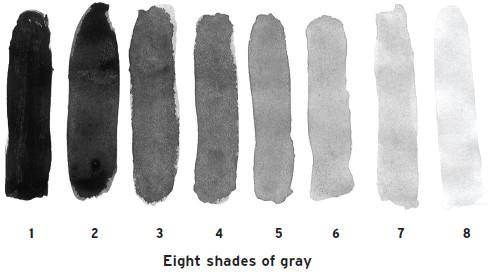
In 600 A.D., art schools in China tested the artist’s ability to mix sixteen different shades of gray ranging from black to clear water. We will only be using about eight shades of gray. You make the gray shades by taking black paint and diluting it.
Dilute
means “add water.”
Each time you get ready to paint, you need to prepare fresh paint and water.
1.
Fill the water containers half full of water.
2.
Into the smallest dish, pour a small amount of black paint. This will be used for mixing different shades of gray paint.
3.
Using the teaspoon, put two teaspoons of water into each of the remaining three mixing dishes.
4.
In a large dish, make a dark mix matching shade
2. Dip the tip of the brush into the dish of black paint to pick up paint. Transfer the brush to the mixing dish and swish the paint around well in the water to dilute the paint evenly. Test the color on the testing plate or on the paper towel. If it is not as dark as shade 2, add more black and mix and test again. Repeat the process until the test color matches shade 2.
5.
Make a medium mix for shade 4 in the second large dish using the same method. For this shade, you need less paint for the same amount of water. Test the color against the chart.
6.
In the last dish, use the same method to make a medium light mix to match shade 6.
You can use the testing dish to test the brush color and to mix small amounts of diluted gray. Use the following method to dilute the medium light mix into a lighter mix:
1.
Take a brush full of clean water.
2.
Scrape the water into the empty dish.
3.
Dip the tip of the brush into the medium light mix dish.
4.
Mix the medium mix into the clear water to make a very pale shade.
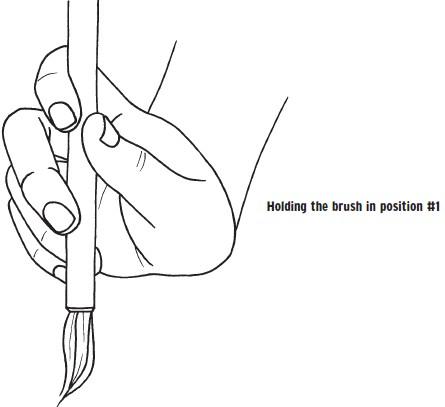
Holding the Brush
Holding the brush in the Chinese style is important because it makes it easier to do the strokes.
1.
Pick up the large brush with your thumb and your first finger.
2.
Put your second finger next to your first on the brush. These two fingers are on the top of the brush.
3.
Place your third finger under the brush and let your little finger sit next to it. This is position #1. This basic position of the brush allows you to paint in every direction.
Position
#
1
is also called the “vertical position.”
Vertical
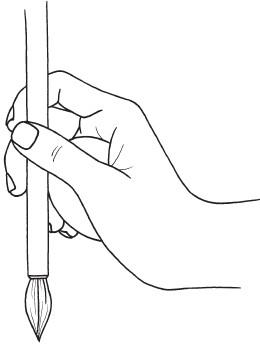
means that the brush is standing straight up. Most of the control of the brush comes from the second finger on top of the brush and the third finger beneath the brush.
The thumb and first finger mainly keep the brush from falling over. Hold the brush correctly and notice how the second finger tilts the brush back and the third finger pushes it forward. These two fingers work against each other to move the brush into different positions. To get used to this new style, hold the brush as directed and move your wrist around in a circle first one way and then the other. Bend your wrist upward and downward, holding the brush firmly between the second and third fingers. Keep your hand and wrist relaxed.
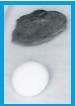
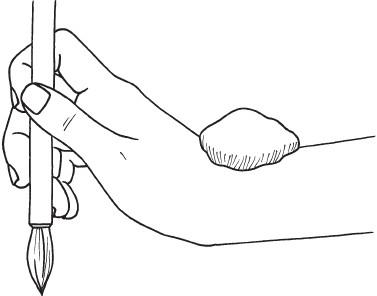
Exercise with an Egg
In China, children who are learning to use the brush hold a raw egg in their palm to keep the palm open and relaxed, so their hand does not get cramped. If they press too hard, the egg breaks and makes a mess, and they have to clean it up and start over.
1.
Hold an egg in your palm as shown, or squeeze a large wad of paper tightly so it will fit in the palm of your hand.
2.
Hold the brush correctly and move your wrist around in all directions, trying not to squeeze the egg.
3.
In the basic position, you hold the brush in a vertical position with your wrist bent back and upward. Practice moving into this position ten times, until it feels comfortable.
Exercise with a Rock
Another exercise is to use a rock to keep your arm from rolling sideways when you bend the wrist upward. How good are you at balancing things on your wrist?
1.
Place a flat rock on your arm where your wrist and arm meet. This area should stay level when your wrist bends up so the rock will not fall off.
2.
Try putting the rock on your arm and moving your wrist up ten times without letting the rock fall off.
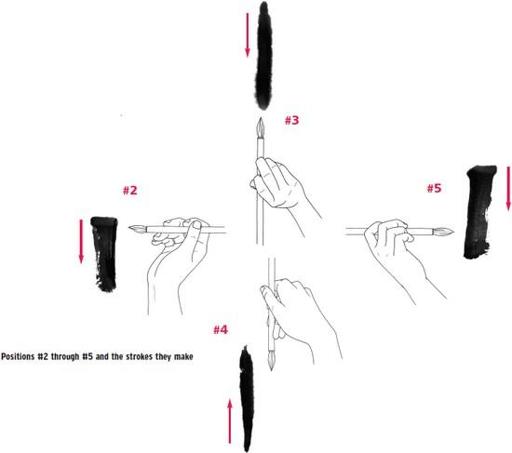
Five Positions
The basic position, position #1, is used the most. In addition to the basic position, painters use four other positions for holding the brush to make various strokes.
Positions #2 and #5 are horizontal positions.
Horizontal
means that the brush is held sideways. Positions #2 and #5 make broad paint strokes. On the paper, the brushstroke has an even edge on the side where the hairs attach to the brush and a ragged edge on the other side, at the tip of the brush. Position #3 makes a thin-to-thick vertical stroke. Position #4 makes a thin-to-thick vertical stroke.