Sew Birthday Fun
Authors: Mandy Shaw


Get Ready to Stitch
Birthdays
Techniques
About the Author
Acknowledgments
Suppliers
All full-size
templates can be found at:
www.stitchcraftcreate.co.uk/patterns
Copyright
Get Ready to Stitch
If the great celebration ideas in this book and the beautiful photography have inspired you to get creative, but you are new to stitching, this chapter will give you all the advice you need to begin with confidence. There is helpful advice on choosing fabrics and threads, essential tips on working the appliqué designs, as well as hand embroidery stitch diagrams for both left- and right-handers. All the projects contain a variety of sewing techniques to teach you new skills and perhaps brush up on ones you already know.

The fabrics I have used for the projects in this book have a retro Fifties feel with lots of spots, checks and stripes. I used a colour palette of pastels and primary colours which, I hope you will agree, gives a fresh, bright look that will appeal to all ages.
If you are new to making things from fabric you are in for a great treat. You have so much to look forward to as you build your fabric collections, from sourcing fabric shops, to stashing your buys on little shelves or in a special drawer. I love to work with 100% cotton to give a clean, crisp textured look to my makes. It is advisable to wash and press your fabrics before you sew in case the colour runs. Fabrics are often treated with a sort of starch dressing to make them easier to sew; after washing and drying, you may find that giving your fabrics a little spray starch will aid sewing.
I adore working with felt as it does not fray; it is lovely to sew, and especially to blanket stitch. There are various qualities of felt, which perform differently with wear; always buy felt that has a percentage of wool in it – the higher the better – as this will help to prevent the felt’s surface from going bobbly over time.
Vintage fabrics are a favourite of mine – embroidered cloths, lace hankies, cotton monogrammed linens and similar treasures can be sourced from internet auctions, car boot sales and secondhand shops; you never know what you will discover.
Use a fabric spray adhesive to attach wadding (batting) to your fabric. Follow the manufacturer’s instructions and spray the wadding (batting) not the fabric.
As the projects call for different styles of stitching, I have used different types of embroidery thread. Stranded cotton (floss) is good for fine work but can be used to embroider thicker lines too, while coton à broder is sometimes too thick for the detailed work required on some projects, so mix and match as you choose.
A favourite of mine, this single strand thread has a matt finish. It is available in different widths in several colours. I prefer No.16 which is quite thick and ideal for blanket stitching, outlining, backstitching, and quilting. Although shops rarely stock the whole range, they can be ordered.
This is available in skeins consisting of six strands which can be pulled out individually for use. It is most usual to use two strands in the needle, but for fine detail use just one, and for a chunkier stitching line use three or more.
This is a machine sewing thread that looks like wool and sews up a treat to give a hand blanket stitch appearance. You will need to use a larger size 16/100 needle; make sure you use a good-quality one as cheaper needles may have burrs that will shred the thread. For the bobbin thread, use an ordinary thread. Maderia Lana can also be used to hand quilt and embroider, and you will need to use a large-eyed, good-quality needle.
When making up your projects, always use a good-quality sewing thread in a colour to match your chosen fabrics.
Invest in a pack of good-quality mixed embroidery needles. These have large eyes and are very sharp, piercing the fabric and allowing the thread to be pulled through with very little friction. How do you know what size needle to use? If after three attempts the needle won’t thread, change to one with a larger hole. My personal favourites are sashiko needles size 12.
Appliqué takes its name from the French verb
appliquer
, meaning to apply. The technique involves cutting fabric to shape and attaching it to a background fabric to create a surface decoration. The fabric shapes are held in position with fusible webbing and secured and embellished with hand or machine stitching.
Fusible webbing is an iron-on fabric adhesive that can be purchased in a roll or in pre-cut pieces and it looks like paper. One side is paper-backed and can be drawn on (so you can trace the motif you want) and the other has a thin membrane of glue that melts when heated by an iron to attach it to fabric. It is easy to use if you follow these simple step-by-step instructions.
1. Trace the motif you want onto the paper (smooth) side of the fusible webbing. Cut roughly around the drawn motif rather than following the drawn line accurately at this stage.
2. Iron the fusible webbing onto the wrong side of the appliqué fabric making sure that the fusible webbing is glue (rough) side down. The glue on the back of the fusible webbing melts when heated so be very careful to iron the paper side or else it will stick to your iron.
Always remember, the smooth side of the iron goes to the smooth side of the webbing.
3. Once the fusible webbing has been attached to the appliqué fabric you can cut out the motif accurately on the drawn line.
4. Carefully peel off the backing paper and position the appliqué motif onto the fabric it is to be applied to. Iron to fix in place.
5. Always cover the edge of the appliqué with a stitch to seal the edges. This can either be done by hand or by machine.

Many templates provided for the project appliqués are drawn in reverse (like the robin from the Christmas Pennant) so that they will be the right way round when you come to fuse and sew them.
There are several different types of fusible webbing on the market. Here is my guide to the brands you are most likely to encounter. Whichever you choose, always take the time to read the manufacturer’s instructions before using.
Bondaweb.
A fine brand that sews through really well, but in storage the fusible film has a tendency to peel off the paper, so only buy sufficient for each project. A hot steam iron is used to fix the adhesive.
HeatnBond Lite.
The adhesive film on this product is a little thicker than Bondaweb, so it stores really well. It fixes with a silk setting and if you use a hot iron by mistake it will render the adhesive useless, so take care.
Lite Steam-a-Seam 2.
This product has the ability to stick your appliqué in place temporarily until you are ready to iron it, so no pieces of appliqué will come flying off on your journey to the iron.
- Use sharp fine scissors to cut out your appliqué shapes to give you a clean cut edge to sew over.
- Always use an appropriate needle for your thread – my personal favourite is John James embroidery size 7– and adapt the size of your stitch to the scale of the appliqué motif.
- If you prefer needle turned appliqué, add a 6mm (
1
⁄
4
in) seam allowance to the pieces, and use a fine matching thread and needle.
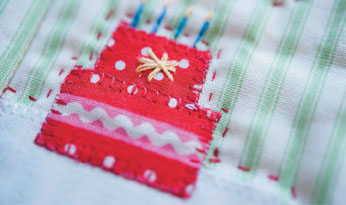
Before ironing the appliqué design in place, lay out the individual pieces to help you to establish the fusing order. For example, in the case of the birthday party table setting (Seven More Sleeps) the tablecloth is laid down first, then the cake is laid on top, and the braid for the cake band is added last.
- Use a new needle: for best results use a sharp denim variety size 90/14 or 80/12, although for fine appliqué use a finer 70/10.
- Reduce your top tension a little – no bobbin thread should show on the top. Practise on identical fabric and layers first.
- Use bobbin fill or cotton thread in the bobbin; if there is a hole in the bobbin case arm, thread your cotton through it to improve tension.
- Use the machine’s needle-down facility to prevent stitches slipping.
- Use an open-toed embroidery/appliqué presser foot that has a cut-away on the underside to accommodate the raised appliqué.
- To start pull thread up to the top, sew a couple of stitches on top of each other, then cut the thread, to prevent threads tangling beneath.
- On curves, stop on the outside edge needle down, raise the presser foot and turn the fabric – stop and start as necessary.
