The Amish Canning Cookbook (5 page)
Read The Amish Canning Cookbook Online
Authors: Georgia Varozza

8. Wash your canner and tools
so they’re ready for the next time. Make sure everything is bone dry before closing up the canner and storing it.
PRESSURE CANNING—A STEP-BY-STEP GUIDE
P
rocessing times will vary depending on the particular food you are canning, but the steps you take to end up with safely processed jars will always be the same. And no matter how much you can or how long you’ve been doing so, having these instructions in front of you each time will ensure that you don’t forget an important step and run the risk of improperly canned food or jars that fail to seal. This is especially important when pressure canning.
1. Inspect your canner
, making sure all parts are in good working condition. There should be no dents or warping of the canner base. If the rack that sits on the bottom of the pressure canner has corroded from prior usage, buy a new one. Wash your canner and lid. Make sure the gasket that sits under the edge of the lid is still fitting well and hasn’t dried out or cracked. Stick a toothpick or pipe cleaner into the vent pipe on the lid to make sure it is clear. To check that the vent is clear, you can hold the lid up to the light and look through the vent pipe—there should be a tiny hole that you can see through. Your canner’s guide will also have inspection suggestions, and if you find that you need replacement parts, don’t use your canner until you have replaced them.
2. Inspect and wash your jars, lids, and screw bands
. Make sure your jars aren’t chipped or cracked, the lids have a complete ring of sealing compound around the edge, and the bands aren’t bent or rusted. Wash jars in hot soapy water, or use a complete regular cycle in your dishwasher, leaving the jars in the closed dishwasher until ready to use. If hand washing them, rinse the jars after washing and place them in a pot with water to cover. Simmer them in the water until ready to use. Alternatively, you can place your jars on a cookie sheet and place them in a 175-degree oven until needed.
Lids need to be washed with hot soapy water, rinsed, and placed in another pot with water to cover. Simmer the lids also, but don’t let the water boil, as this could compromise the sealing compound and result in a sealing failure.
Wash and dry the bands and set them aside until needed, or put them in the pot of water with the lids.
3. Place canner on stove.
Place the canner rack into the bottom of the canner and then fill your pressure canner with water to about 3 inches deep (somewhere around 3 to 4 quarts usually suffices, depending on the size of your canner). Place the canner on your largest burner. Turn on the heat so the water is hot but not boiling.
4. Fill jars.
Fill one jar at a time. You will complete the filling process steps below and cap the jar before moving on to the next jar and repeating the process:
a.
Fill the jar with food and any liquid used
. Pack the jars well, but don’t smash the food.
b.
Measure headspace
. Headspace is the space between the jar’s top rim and the top of the food or liquid. In general, you will leave 1 inch of headspace for low-acid foods (meat, vegetables, poultry, beans, and fish); ½ inch of headspace for high-acid foods such as tomatoes and fruits; and ⅛–¼ inch of headspace for juices, jams, jellies, and pickles.
c.
Remove air bubbles
. Run a plastic knife or air bubble tool around the sides of the jar to dislodge bubbles. Don’t neglect this step even if you think there are no air bubbles present. If you forget this step, don’t worry—your food will still be safe, but occasionally bubbles will cause jars to not seal or, worse, to break in the canner and then you’ll have a mess on your hands. Generally, I’ll insert the knife along the side of the jar and then gently press toward the middle. I do this about 3 or 4 times, inserting the knife at a new spot each time.
d.
Clean jar rims
. A wet paper towel works great for cleaning jar rims. Run the wet paper towel or a wet washcloth around the top of the jar. You want to make sure there are no pieces of food or spices clinging to the top edge because the sealing compound must be in contact all the way around the jar top in order for the jar to seal properly.
e.
Screw on lids and bands
. Place the lid on the jar, sealing side down in contact with the jar rim, and then screw on the band. You want to screw it on quite snug, but don’t overtighten it—there’s no need to crank down as hard as you can. The general rule is to tighten the band “finger-tip tight.”
f.
Place filled jar in canner, making sure the rack is in place
. Using the jar lifter, place your filled jar into the canner on the rack. You always need to use a rack because it lifts the jars off the bottom of the canner so they don’t break.
5. Prepare the canner for processing.
When your entire load is in place, put the lid on the canner, making sure that the handles line up so the lid can lock. (The instruction manual that came with your canner will guide you to properly closing the lid on your particular model.) Turn the heat to medium-high.
Do not yet put the pressure regulator on the vent pipe!
6. Exhaust the air from the canner.
Heat the canner and contents until a steady flow of steam escapes from the vent pipe in the lid. You can’t always see the steam escaping, but you can hear it and feel it. But be careful! Putting your hand too close to the escaping steam will burn your hand. Let the steam escape through the vent pipe for 7 to 10 minutes. It’s okay to reduce the heat, but make sure the steam continues to vent during those 10 minutes.
7. Place the pressure regulator on the vent pipe.
Once the pressure regulator has been placed on the vent pipe, you can turn the heat up fairly high. As pressure builds inside the canner, you will see the pointer in the gauge start to move. When the pressure registers the correct psi, you can lower the heat to maintain the correct pressure as follows:
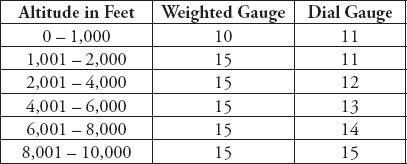
Note: You can determine what your altitude is by going to
www.earthtools.org
and finding your location anywhere in the world.
8. Processing.
When the correct pressure has been reached, set your timer according to the recipe directions. Check your gauge often to verify that the pressure never goes down below the correct psi. If it does, you’ll need to begin the timing all over again. Once the psi reaches the correct level you can turn down the heat a bit to maintain the psi. Make small adjustments to see what happens to the pressure instead of turning the burner way down all at once.
9. Cooling period.
When the processing time is complete, turn off the heat and move the pressure canner to another burner to cool.
Do not remove the weighted gauge from the vent pipe or unfasten the lid!
Allow the pressure inside the canner to come down to zero on its own. When the pressure reads zero, wait another 5 minutes before you remove the weighted gauge and then carefully remove the lid, making sure to lift in such a way that the steam escapes away from your face. Use oven mitts and work carefully.
10. Remove jars from canner.
Using oven mitts and your jar lifter, place the jars on a towel or wooden cutting board, spaced about an inch apart so the air can circulate around them. Do not tighten the bands. Let the jars continue to cool naturally until they are completely cool.
Note regarding use of Tattlers:
If using Tattler reusable lids, you
must
tighten down the screw bands immediately upon taking the jars out of the canner. Make sure you use oven mitts because the contents are boiling hot. Give the screw bands a good hard crank.
11. Check jars for proper seal.
You know the jars are sealed when the small dome area in the middle of the lid pops down. This can happen with a loud popping noise (very gratifying!), or it can be a slower process, but once the dome is pulled down, the jar is sealed. If, after several hours, you notice the dome in the middle of a lid is still up (meaning the jar hasn’t sealed), it’s a good idea to put that jar in the refrigerator and use the food within several days. Or you can reprocess the food using a new lid.
After about 12 hours, check each jar to make sure it has a good seal: Remove the bands and then press on the lid to make sure the center is tight and concave (curved slightly downward). Carefully lift the jar by the edge of the lid with your fingers. The lid should hold. Next, wipe the jars with a damp cloth to clean them. Write on the lid or attach a label to the jar that indicates what’s inside. It’s also a good idea to add the date so you can eat your older jars of food first.
Note regarding use of Tattlers:
Because Tattler lids are made using a hard plastic, the lids won’t pop down so there’s no visual indication that a seal has been made. After about 12 hours, or once the jar of food has thoroughly cooled, you will need to remove the screw band and then gently lift the jar by the rim to check for a proper seal. If the seal has been made, you will be able to lift the jar by the plastic seal without it coming off.
A WORD ABOUT TATTLER REUSABLE CANNING LIDS
T
attler reusable canning lids and rubber rings can be used for about twenty years before you need to replace the rubber rings—and the food-safe plastic lids can last even longer. They can be used with water-bath or pressure canning and are especially useful when canning high-acid foods such as pickles because the hard plastic lids won’t corrode over time.
The white plastic lids are thicker than the usual two-piece lids, and the gaskets are quite thin and narrow. You use a regular screw band of the type that comes with Ball and Kerr jars to place the lids on your canning jars. (These can be purchased separately wherever canning supplies are available.)
When using Tattlers, you don’t have a visual indication that a seal has been made until you actually remove the screw band and lift the jar to see if the seal was made. This means that the food sits in the jars until completely cool whether or not a seal has been made. This shouldn’t be a problem, but if you discover that a jar hasn’t sealed, immediately refrigerate the contents, reprocess, or eat it.
My Personal Learning Experience Using Tattlers
When I started reading about Tattler reusable lids, I was curious—the notion that I might never need to buy lids again was appealing because I can hundreds of jars of food every year, and it didn’t take much math to figure that I could save money in the long run by using them. So I set about to buy some boxes of lids and gaskets and began to experiment.
As it happened, my canning project on the day I first used Tattlers was ground beef. I can a lot of meat because I appreciate having ready-made meal ingredients for those evenings when I’m in a hurry to put food on the table or when I’m tired and want my version of “fast food.” But meat is also something that I no longer produce for myself—I must spend some of my hard-earned money to buy the meats that I consume, quite unlike the fruits and vegetables I can grow virtually free.
Another point to be made at this juncture is that I have been canning—a lot—for 40 years and I became a master food preserver 15 years ago. I know my canning stuff. So I figured that I wouldn’t have any problem tackling Tattlers.
How wrong I was.
I filled 9 pint jars with ground beef and then placed the Tattlers on the jars according to the package directions, which read, “Screw band on jar loosely. Center lid on jar and hold in place with finger while tightening the metal screw band finger-tip tight.
Do not overtighten
. Product must be allowed to vent during processing.”
Those directions seemed straightforward when I read them, but I quickly realized that “finger-tip tight” was subjective. What, I wondered, did “finger-tip tight” actually entail? Not easily daunted, I screwed the lids on, placed the jars in my pressure canner, and processed them. I was feeling pretty smug, thinking about all the money I planned on saving over the next twenty years.
Processing complete. Screw bands immediately tightened, per instructions. Cooling period over. Now came the exciting part—to remove the screw bands and test for a seal. It never occurred to me that I could run into any difficulty…but I did. I had slightly more than a 40 percent failure rate. That amounts to four of my nine jars not sealing. I was flabbergasted and more than a little frustrated.