The Baking Answer Book (17 page)
Read The Baking Answer Book Online
Authors: Lauren Chattman
Tags: #Cooking, #Methods, #Baking, #Reference

A
If your baked goods overbrown consistently, you might inadvertently be baking at a higher temperature than you mean to, if your oven runs hot. Test it by putting an oven thermometer inside and using that as a guide rather than your oven’s gauge. If things seem to be baking unevenly — cakes burning on one side or 6 out of 12 muffins rising higher than the rest — then you may have a hot-spot problem.
Q
What are hot spots?
A
Ideally, the cookies on your baking sheet should bake at the same rate whether they are on the right, left, or middle of the baking sheet. In reality, many ovens have hot spots, even on the middle rack, making it necessary to rotate your baking pans for even cooking.
To test for hot spots, heat your oven to 350°F (180°C) and place slices of baguette on either side in the back, on either side in the front, and in the middle. Wait 10 minutes and compare how the bread slices have browned. This will give you a good idea of how evenly your oven bakes and where it bakes more quickly. Some people recommend using a baking stone at all times in the oven, because the stone will absorb the heat of the oven and then radiate it evenly, minimizing
hot spots. But be sure if you try this to test the oven temperature with an oven thermometer with the baking stone in place. These stones are so effective at absorbing heat that they may cause your oven to run 25 to 50°F (4–10°C) hotter than it would without a stone.
Q
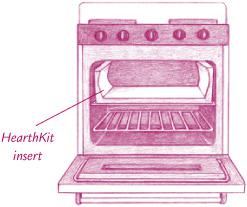
If my oven heats unevenly, will installing a HearthKit oven insert help?
A
Made of the same ceramic material as baking stones, the HearthKit is a 3-sided oven insert that distributes heat throughout the oven evenly, similar to the way the walls of a brick oven work. If your oven heats unevenly, with hot spots, the HearthKit will solve this problem, producing evenly baked cakes and cookies with no pan rotation at all. It is an expensive solution, but may be worthwhile if you are also devoted to baking hearth breads and pizzas regularly. Note that the insert takes up quite a lot of space and will have to be removed when it’s time to bake a very large item on the bottom rack, such as a Thanksgiving turkey or a Christmas roast.
Q
Do I always need to rotate my pans?
A
Pan rotation is necessary only if your oven isn’t the same temperature back to front, side to side. Unfortunately, most ovens don’t maintain a uniform temperature throughout their interiors, making pan rotation necessary for most of us. If you are one of the lucky few with a perfectly even oven or if you use a convection oven that circulates air to maintain even temperature throughout, then don’t worry about rotating your pans. If you know you have hotter and cooler spots, then rotating is a good idea.
It’s never a good idea to overload your conventional oven (convection ovens can handle many more pans), because too many pans will inhibit the circulation of hot air, causing uneven baking. But most ovens can handle two or three pans at once, with proper rotation to ensure even baking. Make sure that pans have at least an inch of clearance between each other and the walls of the oven. If you are baking on two different racks, try to stagger the pans so that one isn’t sitting directly below another, blocking the heat.
It’s important not to rotate your pans too early during baking. Before baked goods have begun to set, their structure is fragile and their rise provisional. Air bubbles that are still expanding in the heat of the oven may shrink on contact with the cold air rushing in. Shaking a pan of unset batter even gently in the first minutes of baking may cause it to collapse. So wait until your baked goods have begun to set but are not yet brown before rotating.
In general, the back of the oven is hotter than the front. If you have only one pan in the oven, rotate it 180 degrees once during baking. If you have two pans on the same shelf, rest one on the oven door while you rotate the other and shift it to the other side of the oven. Then rotate the first pan and place it on the side opposite from where it was. If the pans are in the bottom and top thirds of the oven respectively, don’t forget to rotate them 180 degrees when you switch their positions.
Some people like to bake two batches of cookies at once. To do this, place the racks in the top of the lower third and the bottom of the upper third of the oven before preheating. Stagger the baking sheets so they are not directly on top of one another.
Q
I’d like to winnow my collection of potholders and oven mitts. How many do I really need?
A
Generally speaking, oven mitts provide more protection of the hands and arms than potholders, while potholders provide some versatility, functioning as trivets for hot pans on the countertop. At the minimum, I’d have a pair of mitts and two potholders. Although not essential, a heatproof handle cover is nice to have for times when you are transferring a hot handled pan to the oven. Remember, however, that heatproof handle covers should be removed before you close the oven door. To avoid burns, it’s definitely a good idea to go through your collection periodically and get rid of any fire-damaged or threadbare ones.
Q
I’m in the market for new potholders and oven mitts. Which ones are the best — silicone, Kevlar, leather, or good old padded cotton terry?
A
A confusing array of high-tech, expensive potholders and oven mitts have recently come onto the market. Are they worth the money? As far as protecting hands from heat, inexpensive padded cotton will allow you to hold a hot pan long enough to get it from the oven to a cooling rack. (Avoid thin cotton potholders, though, as they won’t offer any more insulating protection than a folded kitchen towel.)
Potholders made of more expensive materials offer more. Silicone provides superior and extended protection from heat. With a pair of silicone mitts, you could hold a very hot pizza pan for minutes on end without feeling a thing. The question is, do you really need to hold a hot pan for minutes on end?
Silicone mitts can also come into contact with an open flame for several seconds without catching fire. Silicone is also easier to keep clean than traditional cotton, since it can be thrown into the dishwasher and comes out looking like new. Many bakers, however, object to silicone’s relative inflexibility. The material is so heavy and stiff that it is sometimes difficult to feel whether or not your hands are in contact with the pan. Its bulk may present a problem when you are transferring delicate or small items — a thin tart baked in a pan with a removable bottom, for example — if it bumps up against them without your feeling it.
Padded Kevlar, the material used to make bulletproof vests, is an intriguing material for oven mitts, and works very well in
protecting against heat. Like silicone, it won’t burn after brief contact with flames. Mitts and potholders made of padded Kevlar are machine washable, but will become stained after months or years of use.
Leather and suede might look handsome and durable, but they offer less protection from heat than silicone, Kevlar, or heavy padded cotton. I got rid of a pair after a few burns and spills. Although the pair of leather potholders I purchased said they were machine washable, they bled dye even after repeated washings.
Q
I just baked a fruit pie that bubbled over and made a real mess on the bottom of my oven. What is the best way to clean it?
A
The cleaning method will depend on the type of oven you own. If possible, follow the manufacturer’s instructions for cleaning. If the previous tenants failed to leave you with the oven manual, don’t panic. First determine if you have a self-cleaning, textured, or non-self-cleaning oven, and then proceed according to the following instructions.
Most newer ovens have a self-cleaning feature. When in use, the oven door will automatically lock, and then the oven will heat to 900°F (482°C), burning off any leftover spills. No chemicals are necessary. The cleaning doesn’t take long, but to protect owners from burns the oven door remains locked for about three hours, until the oven cools to a less dangerous temperature. If you have a particularly messy oven spill, you
should wipe it up with a damp sponge when the oven cools. If you don’t do this, there may be some smoke during the self-cleaning cycle. To save on energy and time, use the self-cleaning feature right after baking, making use of the residual heat.
Other ovens are “textured” or “continuous cleaning.” This means they are lined with a rough-textured porcelain layer that spreads out and burns off food residue during regular baking. Continuous cleaning ovens do a good job with greasy and fatty messes, but may not burn off sticky sugar as effectively as self-cleaning ovens. You should still avoid using abrasives such as scouring pads and oven cleaners, which will destroy the textured layer. Instead, wipe away remaining food stuck to the bottom and sides with a damp cloth when your oven is cool.
If you have a regular old non-self-cleaning, non-continuous-cleaning oven, you’ll need some oven cleaner and a little elbow grease. First, remove the oven racks and place them in soapy water to soak. Then follow the instructions on your oven cleaner. Some will direct you to preheat the oven to 200°F (95°C), turn off the oven, spray the interior, let stand, and then wipe with a damp sponge and dry with a clean cloth. Some will work overnight in a cool oven. Many home cooks, environmentally aware and bothered by the fumes given off by commercial oven cleaners, use a homemade paste of baking soda and water to clean their ovens. Spread the paste over the dirty surfaces, avoiding the heating elements, let stand overnight, and use a sturdy metal spatula to remove the dried paste in chunks. Wipe with a sponge and then a soft, dry cloth.
Q
Cleaning my oven is such a pain! Should I invest in an oven liner before I bake another messy pie?
A
Teflon-coated mats that fit on the bottom rack of an oven, catching spills, can be put through the dishwasher for easy cleaning. Follow the instructions on the package for placing the mat correctly. They normally rest on the floor of the oven, catching spills and crumbs, but, in some cases, the manufacturer will recommend placing the mat on the lower rack. Or you could simply do what my mother did before Thanksgiving or whenever she knew she’d be baking or roasting something messy: Place a sheet of heavy-duty aluminum foil on the bottom rack of the oven, tossing it and replacing it with a fresh one as necessary.
Microwave Sticky Toffee Pudding Cake
This traditional English dessert is the perfect cake to make in the microwave, because it is supposed to be sticky on the surface, rather than crisped or browned. Unlike conventional ovens, which perform similarly when set at the same temperature, microwave ovens can perform quite differently from each other. Depending on an oven’s manufacturer, size, power, age, and a host of other variables, this cake can take anywhere from 3 to 8 minutes to bake. Use visual clues rather than a timer to judge its doneness: The surface of the cake should appear dry, and a cake tester inserted into the center will come out with just a few crumbs clinging. The cake will continue to bake with residual heat as it rests.
SERVES 6 TO 8
FOR THE SAUCE:
1¾ cups heavy cream
¼ cup (½ stick) unsalted butter
½ teaspoon salt
FOR THE CAKE:
½ cup (1 stick) unsalted butter
½ cup packed light brown sugar