The Baking Answer Book (33 page)
Read The Baking Answer Book Online
Authors: Lauren Chattman
Tags: #Cooking, #Methods, #Baking, #Reference

HOW TO USE A PASTRY BAG
Using a pastry bag is like other simple activities that don’t come naturally until suddenly, after a lot of tries, they do — riding a bicycle comes to mind. Like most novices, I made a major mess the first few times I tried to pipe decorations onto a cake. When I squeezed the bag, frosting squirted out of the top rather than the tip. Buttercream coated the sides of the bag, making it slippery and difficult to control. I couldn’t seem to apply the right amount of even pressure to create the simplest border. Some of my shells were large, some were small, some had big gaps where the pastry bag spit out air instead of frosting. Now, of course, I can pipe miles of shell border as if I were a machine, and it’s hard to believe that at one time I couldn’t. Follow the simple tips below and, with some practice, piping will come naturally to you, too.
1.
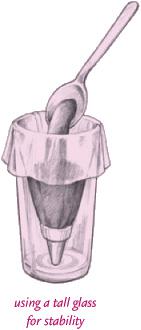
Place the piping tip in the bag and place the bag inside a tall drinking glass. Fold the top edge of the bag over the edge of the glass. Fill the bag halfway with frosting. If you add more than this you’ll have trouble twisting the bag closed without pushing excess frosting out of the top. Remove the bag from the edge of the glass and lift it out.
2.
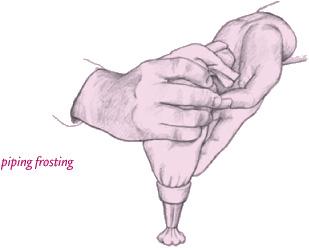
Push the frosting all the way into the bottom of the bag by holding the top of the bag closed with one
hand and sliding the fingers of your other hand downward. When you do this, try to compact the frosting so there are no large air bubbles. When the frosting is pushed to the bottom half of the bag, twist the empty top of the bag a few times, tightly, to seal it.
3.
Hold the bag in your right hand (or left if you are left-handed), grasping it with your thumb and forefinger at the point where it is twisted to hold the bag closed. With your three other fingers, squeeze the frosting from the bag. Use your other hand only to steady and guide the tip as you move it over the cake, not to squeeze the bag. Practice your design a few times on a plate or countertop before beginning to pipe onto the cake. You can always scrape the excess frosting back into the bag later if you need it.
4.
To refill the bag when you are getting low on frosting, fold down the top edge again and spoon in only as much frosting as you need, again making sure that the bag is no more than halfway full.
Q
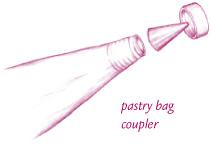
What does a coupler do?
A
A coupler consists of a plastic base and ring. You slip the base into the pastry bag as you would a tip, then slip the tip into the ring and screw the ring onto the base. The system will allow you to change tips without emptying and washing the pastry bag. It comes in very handy when you are making different designs in the same color. But if you are making pink rosettes and green leaves and vines, you will have to use two different bags — one for the flower tip and one, fitted with a coupler, to accommodate a leaf tip for the leaves and a plain tip for the vines.
Q
What’s the best way to store my cake?
A
Plain, unfrosted cakes may be stored at room temperature for up to five days, wrapped tightly in plastic so they won’t dry out. The exception is cheesecake, which must be stored in the refrigerator (also wrapped in plastic) for up to one week. A countertop cake keeper looks pretty and a plastic cake carrier is convenient for transporting a cake, but neither will prevent your cake from losing moisture the way that plastic wrap will.
Plain cakes, including cheesecake, can be frozen for up to two months, wrapped in a double layer of plastic and then in a layer of heavy duty foil to protect from freezer burn. Before freezing a cake, make sure it has cooled completely. Condensation from a cake that is wrapped in plastic when still warm will ruin the crust. Defrost frozen unfrosted cakes, still wrapped, on the countertop for several hours or overnight.
Frosted and filled cakes may need to be refrigerated depending on the frosting and filling ingredients. If the ingredients are nonperishable (frosting made with sugar and vegetable oil, or jam filling), then the cakes may be stored at room temperature for several days, in a cake keeper or under a large inverted bowl so as not to mar the frosting and decorations.
Cakes made with perishable frostings and fillings, anything containing dairy and eggs, must be refrigerated. Cakes frosted with buttercream can stand at cool room temperature for a day. Refrigerate these cakes unwrapped until the frosting is firm, and then drape them with plastic wrap and keep refrigerated for up to five days. Take the plastic wrap off as soon as you remove the cake from the refrigerator, when it is less likely to pull off the decorations and frosting. Bring a refrigerated cake to room temperature before serving. Freezing a frosted and filled layer cake is tricky. Butter cream frosting made with just sugar and butter freezes well, as does whipped cream. But custard, meringue, and fresh fruit fillings will shed moisture in the freezer, ruining the texture of the cake. When I want to get some work done ahead of time, I prefer to freeze unfrosted cake layers up to several weeks in advance, let them defrost completely, and then frost and decorate them.
CHAPTER 8
Pies, Tarts, Cobblers & Crisps
Pies, tarts, cobblers, and crisps represent from-scratch baking at its homiest and most friendly. Then why are so many bakers convinced that they don’t have the right touch to make a flaky piecrust or a tender cobbler biscuit? This chapter will answer questions about how to make great crusts and toppings, and how to pair them with the right fillings for desserts that meet an old-fashioned ideal.
Q
Which is better, a metal pie plate or a glass one?
A
Glass is the clear (sorry!) choice if you want a well-browned and crisp bottom crust. Not only does it retain heat more efficiently than metal, causing superior browning, but because it is clear you can easily see how the crust is coming along, and avoid the common pitfall of pulling your pie from the oven before the bottom crust is fully baked.
Some bakers prefer metal pans because they are lighter and easier to store. If you have a choice between metal pans, dark metal is better than a light, reflective metal for heat retention and browning.
If you must bake your pie in a disposable aluminum pan, do not despair getting a crisped bottom crust. Adjust an oven rack to the lowest position and place a baking sheet on the rack when preheating the oven. Place your pie plate on the preheated baking sheet. The extra heat from the sheet will help crisp crusts baked in even the flimsiest pans.
Q
Can pie recipes be made in tart pans and vice versa?
A
Although pies and tarts are certainly similar in that each consists of a pastry crust and a sweet or sometimes savory filling, there are crucial differences that make pan substitutions tricky. Pies are baked in deeper (generally about 1 inch) pans with sloped sides to accommodate abundant juicy
or moist fillings. While the crust is certainly an important element in a well-made pie, the filling takes center stage, flavorand texture-wise.
Tart pans generally have straight sides no higher than ¾ inch. They hold less filling than pie pans. With tarts, the crust shares the spotlight with the filling. Tart shells are often prebaked to a golden brown and then filled with rich unbaked fillings like pastry cream topped with fruit. A dessert made by filling a deeper pie shell with pastry cream would be overly rich and out of balance.
For a well-balanced result, it’s wise to make your pie or tart in the pan recommended in the recipe. If you must substitute pans, make sure to adjust the amount of filling, keeping in mind that pie shells hold proportionately more filling than tart shells. Also adjust baking times: Thicker pies take longer to bake through than thinner tarts.
I don’t recommend attempting a pan substitution in the case of a pie recipe with a double crust. Tart pans are too thin to accommodate two layers of pastry and a layer of filling.
Q
Is there a difference between pie dough and tart dough?
A
In general, people expect pie dough to be flaky and tender. Classic tart dough is more cookielike, with more sweetness than pie dough and either a crumbly texture like Scottish shortbread or some snap, like a classic sugar cookie.
Q
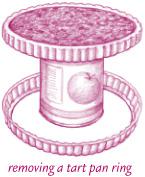
I’m always afraid when removing my tart from the sides of the pan that I will drop it because the bottom of the tart pan is so slippery and unsteady on my palm. Is there a better way to unmold a tart?
A
Try this: Place a 28-ounce can of tomatoes, beans, or whatever, on the countertop and set the tart on top. Gently push the ring downward and off of the tart. Then slide the tart, still on the pan bottom, onto a serving platter.
