Bread Machines For Dummies (15 page)
Read Bread Machines For Dummies Online
Authors: Glenna Vance,Tom Lacalamita

One cup of flour can weigh from 3 1/4 ounces to 5 1/2 ounces depending on how it is measured, the blend of wheat, and the weather on the day you measure. Yeah, blame it on the weather; both humidity and temperature affect the weight of flour.
Some home bakers will tell you they never use a thermometer, but we find thermometers indispensable. When you use a thermometer to check the temperature of liquids before you put them into the bread pan, you take the guesswork out of the process and replace it with a quality-control method. Believe me, it's much better to know for sure than to guess. We suggest liquid temperatures of 75° to 85° for all yeast bread cycles except the one-hour cycle. For the one-hour, 115° to 125° works best.
.jpg)
Do not use an instant-read thermometer to measure the temperature of the inside of your oven. It will melt.
Many bakers tell if their baked bread is done when they tap the bottom of the loaf and hear a certain thud. We compare this to fortune telling: Sometimes it's right on, but not always. You will know for sure that the bread is done if you use an instant-read thermometer to check the internal temperature. A baked loaf of bread should be between 190° and 200°F.
Place the stem in boiling water. The thermometer should read 212°. If it doesn't, note the difference and allow for that when you use it. Some quality models have a tiny nut on the back side of the dial which can be turned if the thermometer needs adjusting. If you have one that can be adjusted, and your thermometer does not register 212° in boiling water, use pliers to turn the nut until it reads correctly.
If you do not have a thermometer, the second-best liquid temperature is room temperature.

Instant-read thermometers are sold in the housewares section of department stores, at hardware stores, in kitchen-gourmet shops, restaurant-supply houses, and mail-order catalogs. A couple are shown in Figure 7-4.
Figure 7-4: | 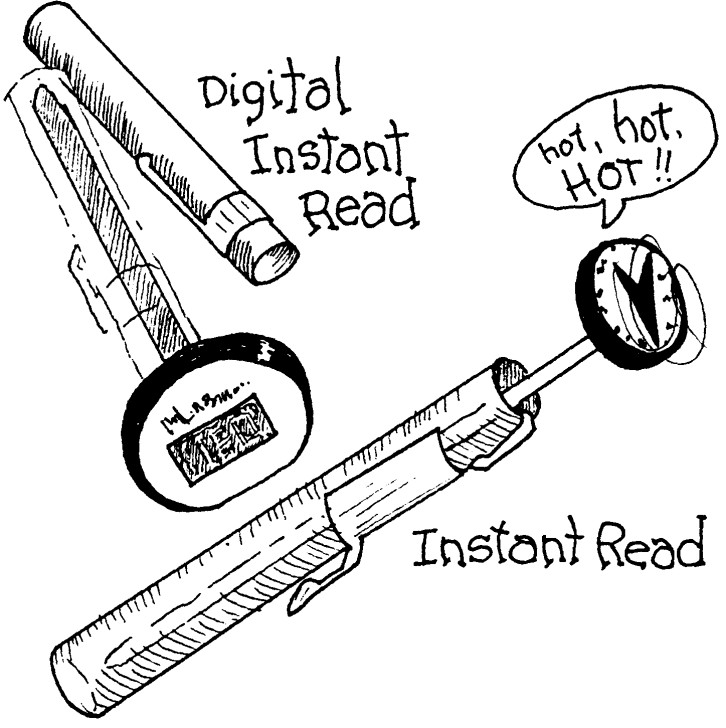 |
All of the recipes in
Bread Machines For Dummies
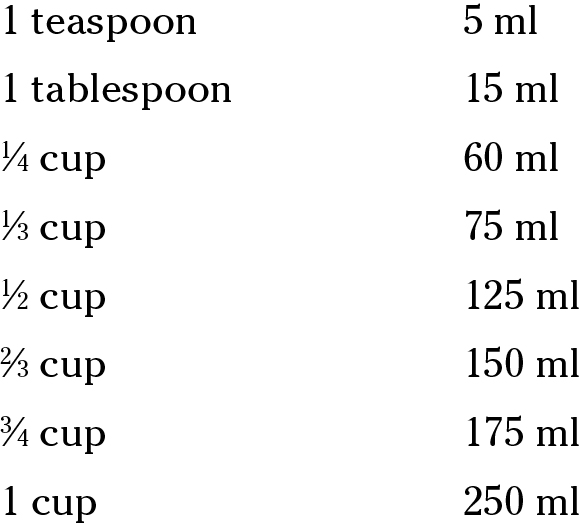
use U.S. standard measurements based on teaspoons, tablespoons, and cups. We want you to be able to enjoy these recipes if you use the metric system, so we have included this conversion chart. All measurements given in our bread-machine recipes are volume measurements. If you are measuring in the metric, use milliliters and liters.
The following conversion chart is meant only as a guideline. The measurements given are not exact, but have been rounded up or down for easier measuring.
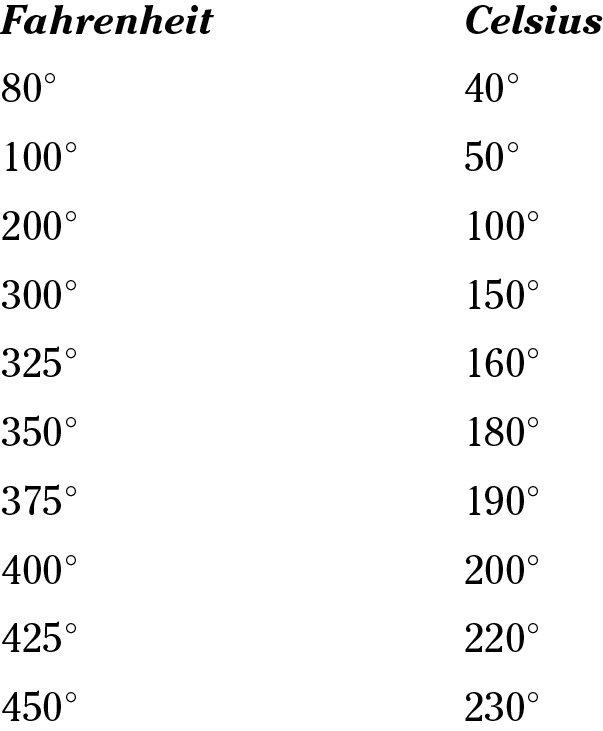
The recipes in this book use the Fahrenheit system. The following chart can help you make conversions to Celsius.
Working with Dough
In This Chapter
![]() Using the bread machine to make dough
Using the bread machine to make dough
![]() Going beyond a rectangle: Shaping breads
Going beyond a rectangle: Shaping breads
![]() Glazing your bread for effect
Glazing your bread for effect
![]() Forming rolls
Forming rolls
M
ost of the time when working with your bread machine, you will simply put your ingredients into the pan, place the pan in your bread machine, select the cycle, and push start. Your machine takes these raw ingredients and what seems like a miracle, turns them into delicious breads fit for casual eating or fine dining.
However, one of the greatest pleasures of owning a bread machine is being able to make an endless variety of hand-shaped breads and rolls. The machine does all the work of mixing and raising the dough. You do the fun part of forming the shape to fit your fancy.
If you mastered Play-Doh as a kid, you can handle yeast dough. While it's true that hand shaping bread dough is quite easy, you may wonder what's going on the first time you try something simple like rolling out a pizza dough. You roll it out and the dough moves right back, almost to the same size it was. The elasticity of the dough seems to be working against your intentions. Relax â the dough that is. You can relax too, because you are going to control that dough, learn how to handle that dough's springiness, and be able to shape it anyway you so desire.
Always remember to set the bread machine on the Manual or Dough setting when you plan to hand shape the dough and bake it using a conventional oven. On this setting there is no signal to add fruit or nuts, so if you want them in your dough, you can either put them in at the beginning of the cycle with the other ingredients or near the end of the kneading cycle. If you are concerned that the fruit will be too crushed if you add it early or not evenly distributed if you add it late, then add the fruit (or nuts) by hand after the cycle is complete.
At the end of the dough cycle, some bread machines automatically punch the dough down with a few turns of the kneading blade. If you have a machine that does not do this, all you have to do to accomplish the same thing is select a cycle and press start. Allow the kneading blade to only make a few turns, just enough to punch all the gas bubbles out of the dough, and stop the machine immediately. Of course, you can just dump the dough out onto a lightly floured surface and punch all the air out with your hand, but the machine does such a good job â use it. The punching down process dispels any gas that might cause an irregular texture or unwanted air pockets and it invigorates the yeast in the dough.
The bread machine does a great job of developing elasticity in the dough. You want the dough to be able to stretch, so that as the yeast activity produces gases the dough will expand. But when you're trying to shape the dough first and then have it expand, this dough-spring can be a great frustration.
The first impulse is to put more pressure on the rolling pin and roll harder which, as you probably know, produces little if any difference. The trick is to roll or pat the dough out a bit, then let it set there for a minute or two. The dough will relax and you can roll it a bit further, then let it relax again. Repeat the rolling/hesitation process until the dough is the size you want it. You can use this technique for pizza dough, cinnamon rolls, bread sticks, or any shape that has to be made by first rolling or patting out the dough.
Once you have your dough prepared, you probably want your loaf to have a pleasing shape. Here's how you do it:
 Round loaf:
To shape a round loaf, cup hands around the sides of the dough and rotate in a circular motion on a lightly floured surface until you have formed a ball, as shown in Figure 8-1. Place the dough on a greased cooking sheet; cover, and allow to rise.
Log shape:
To form a log shape, roll or pat dough to a 12-x-6-inch rectangle. Starting with the longer side, roll up tightly, pressing the dough with the heel of your hand with each turn. If it is necessary to elongate the loaf or even it out, start with your hands together at the center, and move them apart as you gently roll and stretch the dough, applying pressure as you move. Place the loaf on a cooking sheet that you've greased and covered with corn meal; cover the dough and allow it to rise.

We no longer use a damp towel to cover the rising dough. It would often stick to the dough as it was removed and cause the bread to be misshapen. Now, we use the plastic bags that we've carried our groceries home in. This plastic does not stick to the dough and yet it covers it so that the dough doesn't dry out while it is rising, We cut open the plastic bags so that they will completely cover the shaped dough.
French bread:
Real French bread, or baguettes, as they are called in France, is thin and long. On a lightly floured surface, roll or pat the dough to a 10-x-6-inch rectangle. Fold the rectangle of dough in half lengthwise. With the side of your hand, form a deep crease down the center of the dough. Fold the dough over the crease, as shown in Figure 8-2. Securely pinch the seams together to form a tight cylinder. Roll the baguette over so that the seam is on the bottom. Quickly rotate the baguette back and forth a few times working your hands from the center out to the ends. This motion will stretch the dough to the desired shape and length and form pointed ends. Be sure to keep the work surface lightly floured so that the dough does not stick to it. Place the dough on a cooking sheet that is greased and covered with cornmeal; cover the dough and allow it to rise.
Donut shape:
The donut shape begins with a round ball. Form the ball as you would form a round loaf. With your fingers, press down right into the center of the dough until your fingers reach the lightly floured surface. Then use both hands to stretch the donut-shaped loaf so that the hole is between 3-and-4-inches in diameter. Place the dough on a greased baking sheet, in a Bundt pan, or in a tube pan; cover the dough and allow it to rise.
Crescent shape:
To form a crescent shaped loaf, start with an oval about 1-inch thick. Fold the oval in half lengthwise so that the edges do not meet. Using the heel of your hand, press the top edge to firmly seal it into the dough on the bottom. Curve the dough into a crescent shape. Place it on a greased cooking sheet; cover the dough and allow it to rise.
Pan loaves:
Roll or pat each loaf into a flat rectangle 1 inch thick, making sure the width is 2 inches shorter than the length of the bread pan. (For example, if your bread pan measures 9-x-5-inches, you would be sure to roll the dough so that it is 7 inches wide.) Starting with the shorter side, roll up tightly, pressing the dough with the heel of your hand into the roll with each turn. Pinch the edges and ends to seal the dough into a loaf. Place in greased bread pans. This procedure is shown in Figure 8-3.
Braid:
Divide the dough into three parts. On an unfloured surface, roll each third into 12 to 14 inch ropes. Lay all three ropes side by side. Starting at the center, loosely braid towards each end; pinch the ends together and tuck under to seal, as shown in Figure 8-4.
Figure 8-1: | 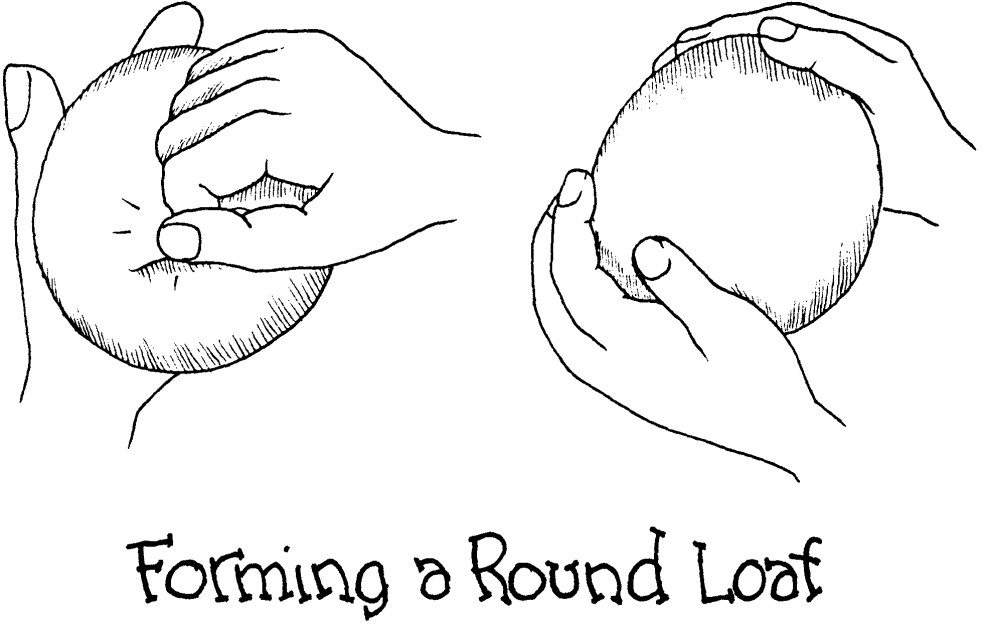 |
Figure 8-2: |  |
Figure 8-3: | 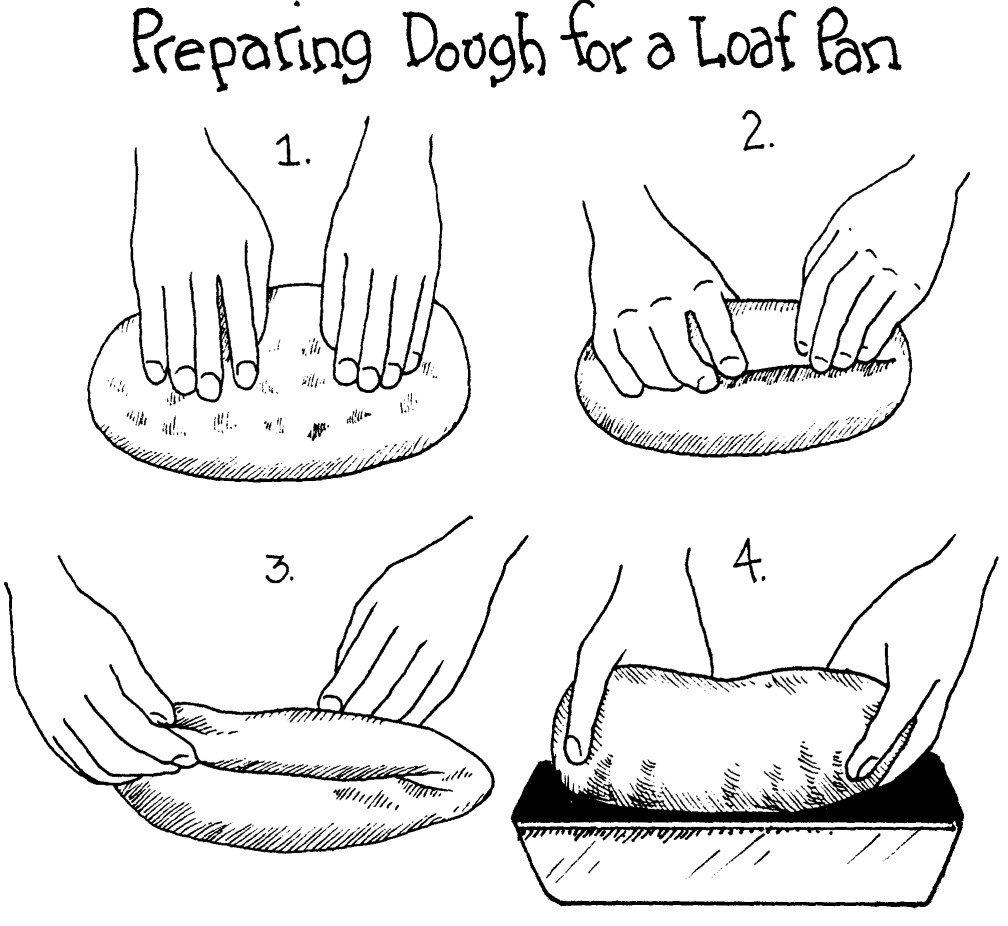 |