Grow a Sustainable Diet: Planning and Growing to Feed Ourselves and the Earth (5 page)
Read Grow a Sustainable Diet: Planning and Growing to Feed Ourselves and the Earth Online
Authors: Cindy Conner
Tags: #Gardening, #Organic, #Techniques, #Technology & Engineering, #Agriculture, #Sustainable Agriculture

You don’t have to stick with rectangles for your garden beds. My smaller garden began with rows of 4′ wide beds in 1984. The next year I redesigned it, imagining it would be filled with flowers and herbs and look nice when we pulled in the driveway. I had started the larger garden for my main vegetable production. The new design for the small garden, which I found in a book, was not practical for me. That redesign might have been nice if I had more time to work with it, but our fourth child was born the following year. With a busy family life, I was doing well just to keep up with vegetable production in the larger garden. Just because it is in a book, doesn’t mean it will work for you. That goes for this book also. What I want to do here is to teach you to think. Yes, by all means, try my ideas and see if they work for you. If not, maybe just a little tweaking is all you need, but you need a starting point: a frame of reference.
A few more years went by and eventually we needed to have more driveway space to allow for parking and turning around. The road we live on had become too busy to back out into safely. I enrolled in a landscape design class being taught at the local high school to help with this planning. Mapping out the area on graph paper helped me decide that the place to add the new parking area was beside the small garden and would interfere with the garden path that went through the middle. When I moved the path over a few feet, everything changed. I put in a curved path that took me from the backyard to the barnyard. From there, other paths fell into place, for a time (see
Figure 2.4
). Every few years I find some reason or other to make changes in that garden, but that backyard-to-barnyard path stays put. If you have a path in your yard, put a garden around it. Decide where you would naturally be walking with a purpose and plan your beds around that.
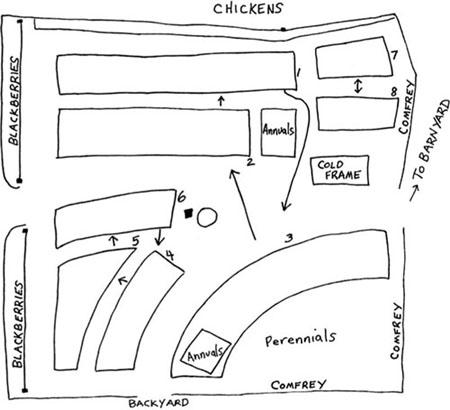
Figure 2.4. Garden Map 1992

Figure 2.5. Garden Map 2009
That garden has always had some areas for flowers and herbs, in addition to the vegetable beds. The redesign had three 100 ft
2
beds for vegetables that rotated together and three 50 ft
2
vegetable beds that rotated, along with a couple of smaller spots for vegetables and a coldframe. Along the north side is the chicken pen fence. When I divided the chicken pen into different areas, one for composting, I decided to make a gate from the garden into the compost area of the pen. For easier access, I needed a new path. This new design gave me an opportunity to put in some keyhole beds (
Figure 2.5
). It had seven 50 ft
2
beds in rotation, including one for compost. I added apples to cordon in the southeast corner. As they grew they were trained along horizontal supports to form a fence.

Figure 2.6. Garden Map 2013
A few years later I needed space for the solar dryers I’d built so we wouldn’t have to move them to mow. In addition, although the keyhole beds were okay, the 4′ wide beds were easier for me to manage. This called for another redesign. I’ve now made a space for the solar dryers in this garden and converted the two keyholes beside the path to the chicken composting area to 4′ wide beds. The keyhole bed on the other
side of the garden is also gone. I no longer devote a bed for compost in this garden. With access to the chicken composting area right at hand, that’s where the compost materials go. The 3′ × 6′ coldframe needed to be rebuilt. The new one is 4′ × 8′. Bed #1 is smaller now and out of the rotation. Strawberries are planned for that spot. That upper right corner is still evolving — food forest style. A grape vine is going in, for sure, and some other perennials.
Only you can decide what size to make your garden beds. A uniform area in each bed, no matter what shape, makes it easier to plan rotations and to anticipate seed needs and yields, which I’ll talk about in coming chapters.
Now, I want you to draw another map. This time make it a map of your whole property. Your house, driveway, and outbuildings will be in it.
You
will be in it. You will be considering all of it when you grow your sustainable diet. I call this map your permaculture plan. You will remember that in
Chapter 1
I defined permaculture as a design system whereby all the energies within a system are used to maximum efficiency. On this map you can identify niches for certain things that are just the right size and microclimate, even if they aren’t in your main garden area. A protected area for a fig tree or a spot for herbs by the back door are examples of this. You can also use this map to help identify places to store equipment and crops. The
Earth User’s Guide to Permaculture
is a good resource to consult when making a map such as this.
We usually look out at our property from our houses. In order to really look at your property with new eyes, go to different corners of the property and look from there. Take plenty of pictures. Go over to your neighbor’s house and look from there. Your home and gardens will definitely look different from their yard. You might also discover that the junk you put behind your shed so you wouldn’t see it is in full view of the neighbors when they sit on their deck. When you are cleaning out your gutters, take a camera up that ladder with you and take pictures of your property from above. We have a sandbox that we maintain for young
visitors and it has a roof over top for children to climb up to. Atop that sandbox is my favorite place to photograph my garden at various times of the growing season.
Observe your property at different times of the year. If you live in an area that gets snow, take pictures as the snow melts. Where does it melt first? That’s your warm spot. Where does it linger after everywhere else looks like spring is coming? That is not the place to plant your early spring crops. As the sun gets higher in the sky, trees and buildings will cast shorter shadows. I have my solar dryers in a great place in the garden, but by September the big maple tree in the backyard begins to cast a longer shadow and I have to move the dryers to catch a full day of sun. On the other hand, if you thought all you had was shade in your yard because of the trees, look again once the leaves have dropped. You might be able to plant a winter garden in the sun, having greens for your table during the cold months. By the way, make sure the trees are on your permaculture plan.
When I first planned my large garden, compost bins made of pallets lined the north side. It made sense because it was easy access when I brought in compost materials from elsewhere, primarily leaves and animal bedding. Once I got serious about sustainability, I realized I wanted to limit outside inputs and began growing my own compost materials, which meant adding grains to my garden. Everything was now being moved around within the garden, rather than being hauled in. Before I knew it, I didn’t have to bring the garden cart in anymore. As the biomass from the beds was harvested, it was carried to the compost piles and finished compost was delivered to the beds in buckets.
After seeing how well my butternut squash grew over my compost pile, I began to rethink how I managed compost. There was obviously fertility leaching away under those compost piles on the north side of the garden and I wanted to harvest it to feed my crops. I got rid of the bins and planned my compost to become part of the garden rotations. The compost piles are now on garden beds, with butternut squash growing over the pile that was built the previous fall. That pile matures over the summer, underneath the squash plants, and is ready to spread in September and October. Any compost that needs to be held longer is
turned to the next bed in the fall and the new piles are built on that new compost bed. With the compost bins gone, I bumped out the fence on the north side and have a hazelnut (filbert) hedge there. I also found room on that north side for a garden washing station, two more garden beds, an apple tree, basket willow, and a spot I’ve reserved to dig a small pond when I find the time (see
Figure 2.3
). With my compost, just as with the lunch at the Haiti gathering that I told you about in
Chapter 1
, it only took looking at the project in a new way. Stay open to the possibilities and new ones will present themselves, right before your eyes. All you have to do is recognize them as such. The more you make yourself part of the plan, the easier it will be to identify these things.
You can start with graph paper, a ruler, pencils, and an eraser. You’re going to need that eraser. Your maps will reflect what you put into them. If you are mapping out your beds, you will definitely need to measure carefully and be accurate. If you are making a map of your property, you decide how exact you need to be. If you know the length of your stride, pacing off your boundaries might be enough. I remember in my high school marching band we had to all take the same size step. Whatever yours is will be your measure. If you do a really good job on this map, it will be more help to you later.
I’ve found a 100′ tape measure to be a wonderful tool to have. It has a fiberglass tape with inches on one side and decimal designations on the other. The end has a hole that I put a screwdriver through to anchor it in the ground when I don’t have anyone on the other end to hold it. Although in a perfect world it would be clean and dry always, it survives nicely if it is occasionally wound up wet or dirty, since the tape is not enclosed. You can find one at building supply stores. A ruler is good, but an engineer’s scale is even better, particularly if you are drawing on plain paper, rather than graph paper. If you really like this sort of thing you could sign up for a landscape drawing class somewhere, but graph paper, pencil, eraser, and a ruler will get you started.
It is helpful to choose a reference spot when making your maps. It might be your house or a fence that’s already there. It may even be just a post. I’ve found it extremely helpful to have a metal fencepost at the corners of each section in my large garden. If I need to realign the beds I can quickly run a string and know where the corners are. If you don’t already have a fence or post in your garden, now is the time to plan it in. Besides being a point to measure from, posts and fences give birds landing spots to check out the area for insects to eat.