Read iOS Programming: The Big Nerd Ranch Guide, 3/e (Big Nerd Ranch Guides) Online
Authors: Aaron Hillegass,Joe Conway
Tags: #COM051370, #Big Nerd Ranch Guides, #iPhone / iPad Programming
iOS Programming: The Big Nerd Ranch Guide, 3/e (Big Nerd Ranch Guides) (100 page)

Since a ubiquity container is a secure resource, Apple needs a guarantee that an application really should be allowed to access that resource. Setting up the entitlement for the ubiquity container was the first step, but there is one more: you must create a new provisioning profile and then use that entitlements-aware profile to sign the application.
Thus, we need to create another App ID and provisioning profile for
Nerdfeed
. Log into Apple’s iOS Provisioning Portal. Select the
App IDs
item from the lefthand side of the portal and then click
New App ID
(
Figure 30.3
).
Figure 30.3 Creating a new App ID

On the next screen, name the App ID
Nerdfeed
. Choose
Use Team ID
from the pop-up button. In the
Bundle Identifier
section, enter
com.bignerdranch.Nerdfeed
. Click
Submit
.
You will be taken back to the list of all App IDs in your profile. Locate
Nerdfeed
and click the
Configure
link next to it. On the next screen, check the box for
Enable for iCloud
(
Figure 30.4
) and click
Submit
.
Figure 30.4 Selecting an App ID

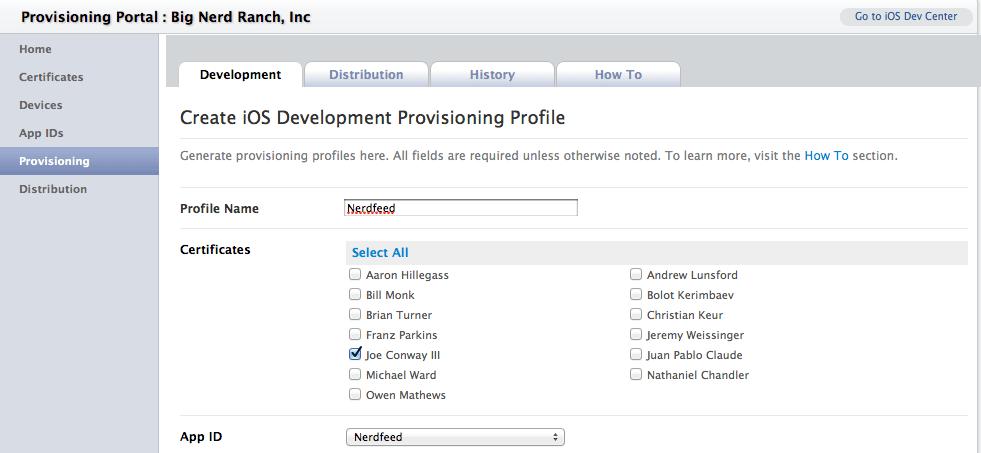
Next, click on the
Provisioning
item on the lefthand side of the portal and select
New Profile
. Configure the profile to have the name
Nerdfeed
and select the
Nerdfeed
App ID from the pop-up button, as shown in
Figure 30.5
. Make sure to check the boxes for your certificate and the devices you plan to deploy to. (It doesn’t hurt to add more devices and certificates than necessary.)
Figure 30.5 Nerdfeed provisioning profile
Click
Done
, and you will be taken back to the list of all provisioning profiles in your portal. Locate the
Nerdfeed
profile and click the
Download
button next to it. (If it says
Pending
next to the profile, refresh the page.)
Locate this provisioning profile in the
Finder
and drag its icon onto the
Xcode
icon. This will add the provisioning profile to the list that
Xcode
maintains.
Now you need to add this profile to your device. Open the
Organizer
window from the
Window
menu. Select
Devices
from the tab on top of the window and then
Provisioning Profiles
from the
Library
heading in the lefthand table.
With the device plugged in, drag the
Nerdfeed
profile from the
Library
in the organizer to the device in the lefthand table (
Figure 30.6
).
Figure 30.6 Adding a provisioning profile to a device

Now that this device has the new provisioning profile, it can run applications that have been signed with it. Repeat these steps for any device that you plan to run
Nerdfeed
on.
Time to sign your application. Select the
Nerdfeed
project from the project navigator and then select the
Nerdfeed
target. In the
Build Settings
tab, locate the
Code Signing Identity
field. Change this property to the
Nerdfeed
provisioning profile (
Figure 30.7
). The
Nerdfeed
application is now signed with the
Nerdfeed
provisioning profile.
Figure 30.7 Changing an application’s provisioning profile

(If you cannot select the
Nerdfeed
provisioning profile from this list, it is because the
Nerdfeed
application doesn’t have the bundle identifier
com.bignerdranch.Nerdfeed
. Make sure that the provisioning profile App ID matches the bundle identifier of
Nerdfeed
exactly – including case.)
Now that
Nerdfeed
is signed with the new provisioning profile, it can write to and read from the
com.bignerdranch.Nerdfeed
ubiquity container. Build and run the application to the device you have provisioned. The behavior of the application won’t change, but when it runs, you will get confirmation that you have properly set up the ubiquity container and associated provisioning profiles correctly. Finally, we can begin writing the code.
So far, you know that iCloud keeps files in a ubiquity container in the cloud and that iOS devices with access to that ubiquity container pull down copies of that file and push back any edits. However, Core Data does something a little different.
Core Data is an interface to a single SQLite library file, so you might think we would store this file in the cloud. But this is a bad idea because a SQLite file can be very large and changing the data inside the file would require uploading
the whole file
to the cloud and downloading the whole thing to each device.
Instead, the SQLite file that Core Data talks to remains on the device’s local filesystem, and Core Data stores a
transaction log file
in the cloud. When a change is made with Core Data, the change occurs in the local SQLite file and is noted in the transaction log file. Other devices pull the transaction log file down and use the information in it to modify their own SQLite file.
When setting up a Core Data persistent store, you can specify that it read from a transaction log stored in a ubiquity container. In
BNRFeedStore.m
, add the following code to
init
.
{
self = [super init];
if (self) {
model = [NSManagedObjectModel mergedModelFromBundles:nil];
NSPersistentStoreCoordinator *psc =
[[NSPersistentStoreCoordinator alloc] initWithManagedObjectModel:model];
// Find the location of the ubiquity container on the local filesystem
NSFileManager *fm = [NSFileManager defaultManager];
NSURL *ubContainer = [fm URLForUbiquityContainerIdentifier:nil];
// Construct the dictionary that tells Core Data where the
// transaction log should be stored
NSMutableDictionary *options = [NSMutableDictionary dictionary];
[options setObject:@"nerdfeed"
forKey:NSPersistentStoreUbiquitousContentNameKey];
[options setObject:ubContainer
forKey:NSPersistentStoreUbiquitousContentURLKey];
NSError *error = nil;
NSString *dbPath =
[NSSearchPathForDirectoriesInDomains(NSDocumentDirectory,
NSUserDomainMask,
YES) objectAtIndex:0];
dbPath = [dbPath stringByAppendingPathComponent:@"feed.db"];
NSURL *dbURL = [NSURL fileURLWithPath:dbPath];
if (![psc addPersistentStoreWithType:NSSQLiteStoreType
configuration:nil
URL:dbURL
options:options
error:&error]) {
[NSException raise:@"Open failed"
format:@"Reason: %@", [error localizedDescription]];
}
context = [[NSManagedObjectContext alloc] init];
[context setPersistentStoreCoordinator:psc];
[context setUndoManager:nil];
}
return self;
}
Build the application to check for syntax errors, but don’t run it quite yet.
Notice here that you created an
NSURL
instance with
URLForUbiquityContainerIdentifier:
. This method of
NSFileManager
returns the location of the ubiquity container on the device. The argument passed to this method is a container identifier string. While you could pass the container identifier string you set up in the previous section, it is easier to pass
nil
. Passing
nil
automatically constructs the container identifier using the application’s bundle identifier, in our case,
com.bignerdranch.Nerdfeed
. (Technically, you have to pass a slightly different string. There’s more about this in
the section called “For the More Curious: iCloud Backups”
.)
Next, a dictionary is created with two key-value pairs. The first key,
NSPersistentStoreUbiquitousContentNameKey
, is the name of the transaction log in the ubiquity container. This name must be unique within the ubiquity container. It is used in conjunction with the
NSPersistentStoreUbiquitousContentURLKey
that identifies the location on the filesystem of the ubiquity container. In simple terms, it creates a transaction log file named
nerdfeed
in the directory that
ubContainer
represents. (Technically, it’s a little more complicated.) This dictionary is passed as the options for
addPersistentStoreWithType:configuration:URL:options:error:
.
We have set up Core Data to store its SQLite file in the application sandbox and its transaction log in a ubiquity container. Whenever a device modifies its SQLite file with Core Data, the changes are automatically written to the transaction log in the ubiquity container and synchronized with iCloud.
However, other devices do not automatically update their SQLite file with the changes in the transaction log. To make this happen,
BNRFeedStore
needs to watch the transaction log for changes. When a change occurs, the store will merge those changes into its own version of the Core Data SQLite file.
Fortunately, this is pretty easy: whenever a change occurs, the notification
NSPersistentStoreDidImportUbiquitousContentChangesNotification
is posted to the
NSNotificationCenter
. The store can register as an observer for this notification. In
BNRFeedStore.m
, modify
init
to register for this notification.
{
self = [super init];
if (self) {
[[NSNotificationCenter defaultCenter]
addObserver:self
selector:@selector(contentChange:)
name:NSPersistentStoreDidImportUbiquitousContentChangesNotification
object:nil];
model = [NSManagedObjectModel mergedModelFromBundles:nil];
This notification will be posted whenever the transaction log is changed by another device. If
Nerdfeed
isn’t running on a device when the transaction log is changed, this notification will be posted as soon as the device starts running
Nerdfeed
again.
When this notification is posted, Core Data needs merge the changes into its local SQLite file. To merge the changes, all we have to do is pass the
NSNotification
object that represents this notification directly to the Core Data context. In
BNRFeedStore.m
, implement the message sent to
BNRFeedStore
when this notification occurs.
{
// merge changes into context
[context mergeChangesFromContextDidSaveNotification:note];
}
Nerdfeed
now appropriately handles a Core Data SQLite file that lives in the cloud. But there are a few more changes we can make to get things running more smoothly.
First, when the change notification is posted, the store updates its records, but
Nerdfeed
’s user interface is not immediately updated. A store should always notify controllers when it changes the data it returned to them, so
BNRFeedStore
will post a notification whenever it merges changes from the iCloud transaction log. In
BNRFeedStore.h
, declare a new string that will serve as the notification name.
@class RSSItem;
extern NSString * const BNRFeedStoreUpdateNotification;
@interface BNRFeedStore : NSObject
This declares a new global variable named
BNRFeedStoreUpdateNotification
. The
const
after the star (
*
) says that once this variable is initialized to point at an object, it cannot be changed to point at any other object. The
extern
says that this variable is declared in this file but will be defined elsewhere. That elsewhere is
BNRFeedStore.m
. In
BNRFeedStore.m
, define this variable.
NSString * const BNRFeedStoreUpdateNotification = @"BNRFeedStoreUpdateNotification";
@implementation BNRFeedStore
Whenever
BNRFeedStore
merges the changes in Core Data, it will post this notification. The
ListViewController
will register as an observer for this notification and update the table view when the notification is received. However, there is a small issue:
BNRFeedStore
is told to perform the merge on a background thread, so the notification will be posted and received on a background thread as well. This will sometimes cause a delay between the merge in Core Data and the updating of the table view.
Thus, we want to post the
BNRFeedStoreUpdateNotification
on the main thread. In
BNRFeedStore.m
, post this notification on the main thread in
contentChange:
.
{
[context mergeChangesFromContextDidSaveNotification:note];
[[NSOperationQueue mainQueue] addOperationWithBlock:^{
NSNotification *updateNote =
[NSNotification notificationWithName:BNRFeedStoreUpdateNotification
object:nil];
[[NSNotificationCenter defaultCenter] postNotification:updateNote];
}];
}
Now, in
ListViewController.m
, register as an observer of this notification in
initWithStyle:
.
{
self = [super initWithStyle:style];
if (self) {
[[NSNotificationCenter defaultCenter] addObserver:self
selector:@selector(storeUpdated:)
name:BNRFeedStoreUpdateNotification
object:nil];
In
ListViewController.m
, implement
storeUpdated:
.
{
[[self tableView] reloadData];
}
You could build and run the application now, but there is one more minor change to make. Currently, the SQLite file is stored in the
Documents
directory of
Nerdfeed
’s sandbox. This is okay except for one case: if another iCloud user logs in on this device, this user will have the same read list as the previous user because the SQLite file is stored in a location that is specific to the application not the iCloud user.
To make the SQLite file user-specific, we can move it into the ubiquity container but mark it so that it will not get stored in the cloud. We can tell iCloud to ignore a file or directory in a ubiquity container by suffixing it with
.nosync
. In
BNRFeedStore.m
, update
init
to create a
feed.nosync
directory and put the SQLite file in that directory.
[options setObject:@"nerdfeed" forKey:NSPersistentStoreUbiquitousContentNameKey];
[options setObject:ubContainer forKey:NSPersistentStoreUbiquitousContentURLKey];
NSError *error = nil;
NSURL *nosyncDir = [ubContainer URLByAppendingPathComponent:@"feed.nosync"];
[fm createDirectoryAtURL:nosyncDir
withIntermediateDirectories:YES
attributes:nil
error:nil];
// Specify the new file to store Core Data's SQLite file
NSURL *dbURL = [nosyncDir URLByAppendingPathComponent:@"feed.db"];
if (![psc addPersistentStoreWithType:NSSQLiteStoreType
configuration:nil
URL:dbURL
options:options
error:&error]) {
[NSException raise:@"Open failed"
format:@"Reason: %@", [error localizedDescription]];
}