iOS Programming: The Big Nerd Ranch Guide, 3/e (Big Nerd Ranch Guides) (34 page)
Read iOS Programming: The Big Nerd Ranch Guide, 3/e (Big Nerd Ranch Guides) Online
Authors: Aaron Hillegass,Joe Conway
Tags: #COM051370, #Big Nerd Ranch Guides, #iPhone / iPad Programming

- The two buttons should stay with their respective corners and
not
resize.
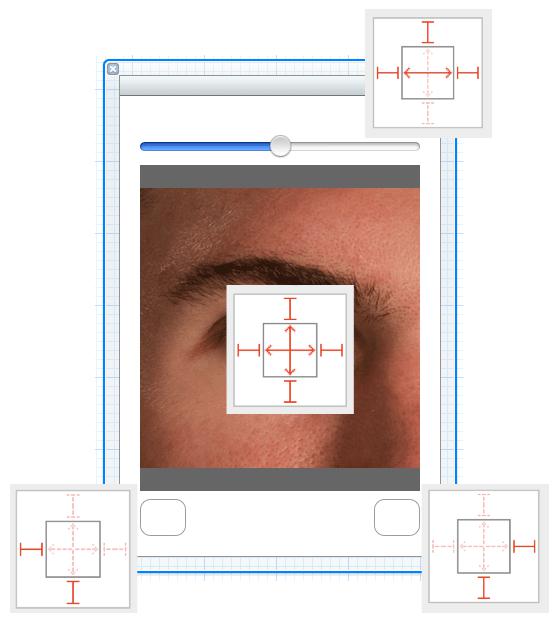
Now select each view and set the autoresize mask appropriately.
Figure 8.7
shows the correct arrangement of struts and springs for each view.
Figure 8.7 Autoresizing mask for views

Finally, to finish this application, you need to create an instance of
HeavyViewController
and set it as the
rootViewController
of the window. In
RotationAppDelegate.m
, add the following lines of code to
application:didFinishLaunchingWithOptions:
. Make sure to include the import statement at the top of the file.
#import "HeavyViewController.h"
@implementation RotationAppDelegate
- (BOOL)application:(UIApplication *)application
didFinishLaunchingWithOptions:(NSDictionary *)launchOptions
{
self.window = [[UIWindow alloc] initWithFrame:[[UIScreen mainScreen] bounds]];
// Override point for customization after application launch.
// Get the device object
UIDevice *device = [UIDevice currentDevice];
// Tell it to start monitoring the accelerometer for orientation
[device beginGeneratingDeviceOrientationNotifications];
// Get the notification center for the app
NSNotificationCenter *nc = [NSNotificationCenter defaultCenter];
// Add yourself as an observer
[nc addObserver:self
selector:@selector(orientationChanged:)
name:UIDeviceOrientationDidChangeNotification
object:device];
HeavyViewController *hvc = [[HeavyViewController alloc] init];
[[self window] setRootViewController:hvc];
self.window.backgroundColor = [UIColor whiteColor];
[self.window makeKeyAndVisible];
return YES;
}
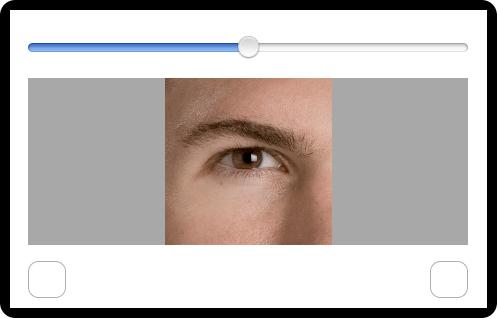
Build and run the application. It should autorotate when you rotate the device, as shown in
Figure 8.8
. (You can also run the application in the simulator and rotate it from the
Hardware
menu or use the keyboard shortcuts Command-Right Arrow and Command-Left Arrow.)
Figure 8.8 Running rotated

When a view is autorotated, it changes its size (the width becomes the height and vice versa). This is why the mask is called an auto
resizing
mask. Another time a view’s size must change is when the size of the device does. For instance, if
HeavyRotation
was a
universal application
(that runs on both the iPad and iPhone device families), then the interface for the iPad version would have to fit the larger screen size.
When a universal application launches on the iPad, the window is resized to fit the larger screen. Thus, the subview of the window (the view controller’s
view
) and its subviews are also resized. The autoresizing masks will do the same job here as they do when rotating the device to preserve the interface of the application.
Let’s make
HeavyRotation
a universal application to see this happen. Select the project from the project navigator. Then, select the
HeavyRotation
target from the editor area. Select
Universal
from the
Device Family
pop-up menu, as shown in
Figure 8.9
.
Figure 8.9 Universalizing HeavyRotation

From the
Scheme
menu next to the Run button, choose either the iPad simulator or an iPad device if you’ve got one plugged in (
Figure 8.10
). Then build and run. Notice that the interface automatically resizes itself appropriately for the larger window.
Figure 8.10 Changing simulator

The autoresizing mask can also be set programmatically by sending the message
setAutoresizingMask:
to a view.
UIViewAutoresizingFlexibleHeight];
This says that the view will resize its height when its superview’s height changes; this is the same as checking the vertical spring in a XIB file. It also says that the left margin is flexible – which is the same as
un-
checking the left strut. In a XIB file, this autoresizing mask would match the one shown in
Figure 8.11
.
Figure 8.11 Autoresizing mask with flexible left margin and flexible height

Back in the code, notice the
|
operator in the argument of
setAutoresizingMask:
. That is the bitwise-OR operator. Each autoresizing constant is equal to a power of two. (You can find all the
UIViewAutoresizing
constants in the
UIView
class reference page in the documentation.) For example, the flexible left margin constant is 1 (2
0
), and the flexible height constant is 16 (2
4
). The property
autoresizingMask
is just an
int
and, like all values on a computer, is represented in binary. Binary numbers are a string of 1s and 0s. Here are a few examples of numbers in base 10 (decimal; the way we think about numbers) and base 2 (binary; the way a computer thinks about numbers):
10
= 00000001
2
2
10
= 00000010
2
16
10
= 00010000
2
27
10
= 00011011
2
34
10
= 00100010
2
In decimal representation, we have 10 different digits:
0 - 9
. When we count past 9, we run out of symbols to represent the number, so we add a new digit column. A digit in the second column is worth 10 times more than a digit in the first column; a digit in the third column is worth 10 times more than the second column and so on. The same general idea is true for binary numbers, except we only have two digits (
0
and
1
), so we must add a new digit column each time we would normally use a 2. Because of this, each digit in binary is only worth two times more than the digit to the right of it. The rightmost digit is multiplied by 1, the one to the left of that is multiplied by 2, then 4, 8, and so on.
When talking about binary numbers, we call each digit a
bit
. We can think of each bit as an on-off switch, where 1 is
“
on
”
and 0 is
“
off.
”
When thinking in these terms, we can use an
int
(which has space for at least 32 bits) as a set of on-off switches. Each position in the number represents one switch – a value of 1 means true, 0 means false. Essentially, we are shoving a ton of
BOOL
s into a single value. We call numbers used in this way
bitmasks
, and that’s why the autoresize settings of a view are called the autoresizing mask.
A number that only has one bit set to 1 (the rest are 0) is a power of two. Therefore, we can use numbers that are powers of two to represent a single switch in a bitmask – each autoresizing constant is a single switch. We can turn on a switch in a bitmask using the bitwise-OR operation. This operation takes two numbers and produces a number where a bit is set to 1 if either of the original numbers had a 1 in the same position. When you bitwise-OR a number with 2
n
, it flips on the switch at the
n
th position. For example, if you bitwise-OR 1 and 16, you get the following:
10
, UIViewAutoresizingFlexibleLeftMargin)
| 00010000 (16
10
, UIViewAutoresizingFlexibleHeight)
----------
00010001 (17
10
, both UIViewAutoresizingFlexibleHeight
and UIViewAutoresizingFlexibleLeftMargin)
The complement to the bitwise-OR operator is the bitwise-AND (&) operator. When you bitwise-AND two numbers, the result is a number that has a 1 in each bit where there is a 1 in the same position as
both
of the original numbers.
10
, FlexibleHeight and FlexibleLeftMargin)
& 00010000 (16
10
, FlexibleHeight)
----------
00010000 (16
10
, YES)
00010001 (17
10
, FlexibleHeight and FlexibleLeftMargin)
& 00000010 ( 2
10
, FlexibleWidth)
----------
00000000 ( 0
10
, NO)
Since any non-zero number means
YES
(and zero is
NO
), we use the bitwise-AND operator to check whether a switch is on or not. Thus, when a view’s autoresizing mask is checked, the code looks like this:
{
// Resize the height
}