iOS Programming: The Big Nerd Ranch Guide, 3/e (Big Nerd Ranch Guides) (64 page)
Read iOS Programming: The Big Nerd Ranch Guide, 3/e (Big Nerd Ranch Guides) Online
Authors: Aaron Hillegass,Joe Conway
Tags: #COM051370, #Big Nerd Ranch Guides, #iPhone / iPad Programming

Homepwner
’s detail view will not appear in Spanish until you change the language settings on the device. In
Settings
, change the language settings to
Español
(
General
→
International
→
Language
) and then relaunch your application. Select an item row, and you will see the interface in Spanish.
In many places in your applications, you create
NSString
instances dynamically or display string literals to the user. To display translated versions of these strings, you must create a
strings table
. A strings table is a file containing a list of key-value pairs for all of the strings that your application uses and their associated translations. It’s a resource file that you add to your application, but you don’t need to do a lot of work to get data from it.
Whenever you have a string in your code, it appears like this:
To internationalize a string in your code, you replace literal strings with the function
NSLocalizedString
.
NSLocalizedString(@"Hello!", @"The greeting for the user");
This function takes two arguments: a key and a comment that describes the string’s use. The key is the lookup value in a strings table. At runtime, the
NSLocalizedString
function will look through the strings tables bundled with your application for a table that matches the user’s language settings. Then, in that table, the function gets the translated string that matches the key.
Now you’re going to internationalize the string
“
Homepwner
”
that is displayed in the navigation bar. In
ItemsViewController.m
, locate the
init
method and change the line of code that sets the title of the
navigationItem
.
{
// Call the superclass's designated initializer
self = [super initWithStyle:UITableViewStyleGrouped];
if (self) {
UINavigationItem *n = [self navigationItem];
Once you have a file that has been internationalized with the
NSLocalizedString
function, you can generate strings tables with a command-line application.
Open
Terminal.app
and navigate to the location of
ItemsViewController.m
. My command looks like this:
At this point, you can use the terminal command
ls
to print out the directory contents and confirm that
ItemsViewController.m
is in that list.
To generate the strings table, enter the following into
Terminal
and hit return:
This creates a file named
Localizable.strings
in the same directory as
ItemsViewController.m
. Drag this file into the project navigator. When the application is compiled, this resource will be copied into the main bundle.
Oddly enough,
Xcode
sometimes has a problem with strings tables. Open the
Localizable.strings
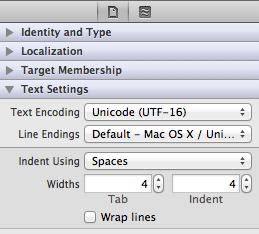
file in the editor area. If you see a bunch of upside-down question marks, you need to reinterpret this file as Unicode (UTF-16). Show the utilities area and select the file inspector. Locate the area named
Text Settings
and change the pop-up menu next to
Text Encoding
to
Unicode (UTF-16)
(
Figure 17.5
). It will ask if you want to reinterpret or convert. Choose
Reinterpret
.
Figure 17.5 Changing encoding of a file

The file should look like this:
"Homepwner" = "Homepwner";
Notice that the comment above your string is the second argument you supplied to the
NSLocalizedString
function. Even though the function doesn’t require the comment argument, including it will make your localizing life easier.
Now that you’ve created
Localizable.strings
, localize it in
Xcode
the same way you did the XIB file. Select the file in the project navigator and click the plus button in the utilities area. Add the Spanish localization and then open the Spanish version of
Localizable.strings
. The string on the lefthand side is the
key
that is passed to the
NSLocalizedString
function, and the string on the righthand side is what is returned. Change the text on the righthand side to the Spanish translation shown below.
"Homepwner" = "Dueño de casa"
Build and run the application again. The title of the navigation bar will appear in Spanish. If it doesn’t, you might need to delete the application, clean your project, and rebuild. (Or check your user language setting.)
Practice makes perfect. Localize
Homepwner
for another language.
The real work of adding a localization is done for you by the class
NSBundle
. For example, when a
UIViewController
is initialized, it is given two arguments: the name of a XIB file and an
NSBundle
object. The bundle argument is typically
nil
, which is interpreted as the application’s
main bundle
. (The main bundle is another name for the application bundle – all of the resources and the executable for the application. When an application is built, all of the
lproj
directories are copied into this bundle.)
When the view controller loads its view, it asks the bundle for the XIB file. The bundle, being very smart, checks the current language settings of the device and looks in the appropriate
lproj
directory. The path for the XIB file in the
lproj
directory is returned to the view controller and loaded.
NSBundle
knows how to search through localization directories for every type of resource using the instance method
pathForResource:ofType:
. When you want a path to a resource bundled with your application, you send this message to the main bundle. Here’s an example using the resource file
myImage.png
:
ofType:@"png"];
The bundle first checks to see if there is a
myImage.png
file in the top level of the application bundle. If so, it returns the full path to that file. If not, the bundle gets the device’s language settings and looks in the appropriate
lproj
directory to construct the path. If no file is found, it returns
nil
.
This is why you must delete and clean an application when you localize a file. The previous un-localized file will still be in the root level of the application bundle because
Xcode
will not delete a file from the bundle when you re-install. Even though there are
lproj
folders in the application bundle, the bundle finds the top-level file first and returns its path.
NSUserDefaults
Many applications include preferences that users can set. Whether users are picking the size of the text or storing usernames, there is a standard way of enabling iOS application preferences. In this chapter, you’re going to use the
NSUserDefaults
class to add a preference to your
Whereami
application. This preference will specify the map type of the
MKMapView
.
Every
MKMapView
has a
mapType
property that specifies whether it shows roads, satellite imagery, or both. You will allow the user to change this property by adding a
UISegmentedControl
that toggles the map type. The user’s choice will be saved as a preference, and the next time the application is launched, the preferred type of map will be displayed.
Open the
Whereami
project. Then open
WhereamiViewController.xib
and add a
UISegmentedControl
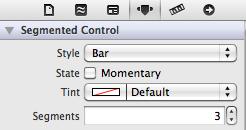
to the interface. Change its style and number of segments to what is shown in
Figure 18.1
.
Figure 18.1 UISegmentedControl attributes

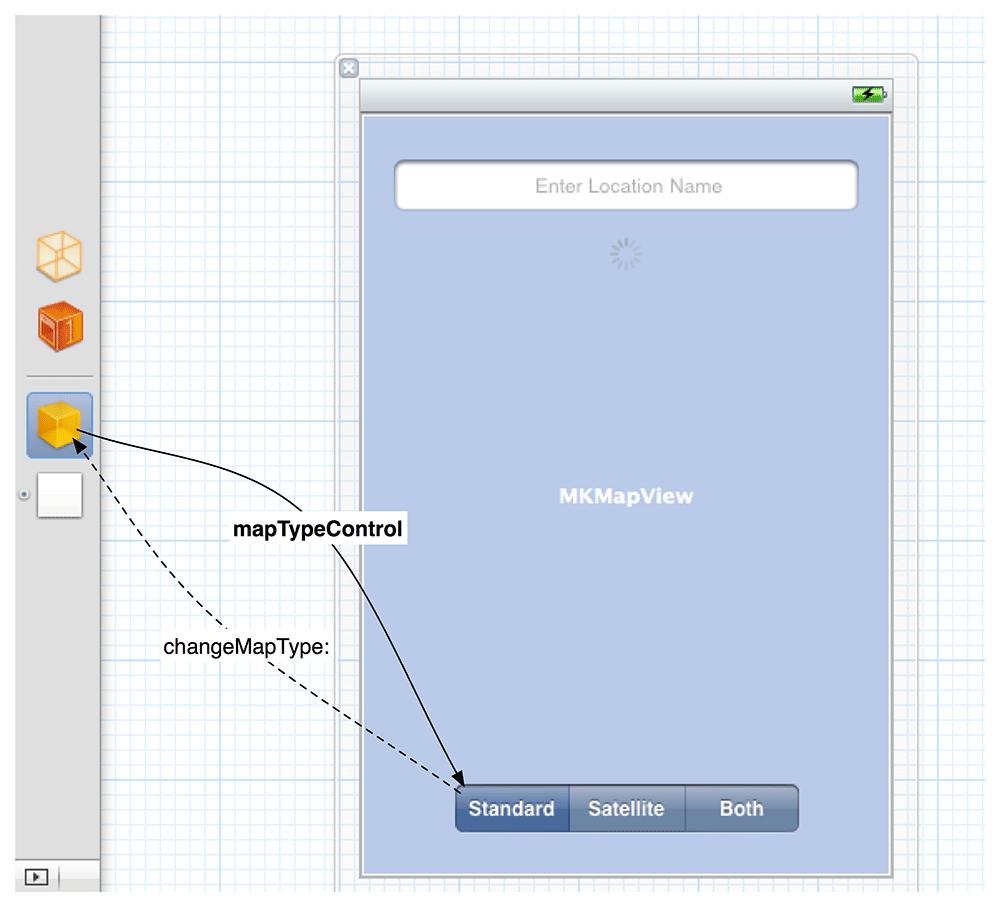
Make an outlet and an action connection between this object and the
WhereamiViewController
(
Figure 18.2
). The outlet will be a weak instance variable.
Figure 18.2 Adding to Whereami’s interface

After making connections,
WhereamiViewController.h
should look like this:
}
- (IBAction)changeMapType:(id)sender;
In
WhereamiViewController.m
, implement
changeMapType:
.
{
switch ([sender selectedSegmentIndex])
{
case 0:
{
[worldView setMapType:MKMapTypeStandard];
} break;
case 1:
{
[worldView setMapType:MKMapTypeSatellite];
} break;
case 2:
{
[worldView setMapType:MKMapTypeHybrid];
} break;
}
}
Build and run the application and change the map type. However, if you quit the application (and kill it from
Xcode
), it won’t remember the preference on the next launch.