Mother of Purl (10 page)
Authors: Edith Eig,Caroline Greeven

To make a buttonhole of 2 or more stitches:
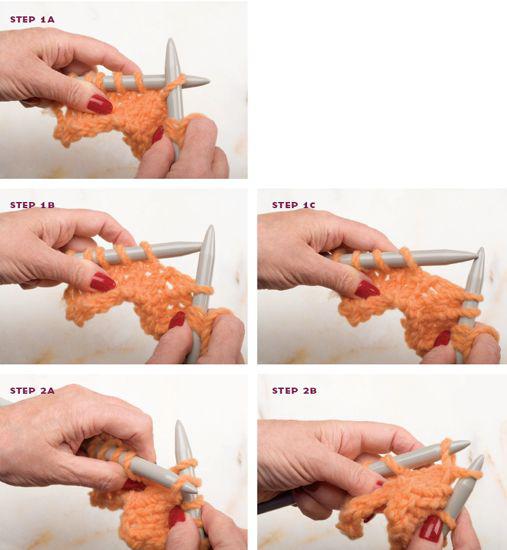
STEP 1:
Leaving the yarn untouched on the right–hand side, slip the first 2 stitches of the left–hand needle purlwise.
STEP 2:
With your left–hand needle, lift the first stitch over the second and slip it over, then repeat this process one more time.
STEP 3:
Place the remaining stitch back on the left–hand needle. Turn your work.
STEP 4:
Placing your right–hand needle between that stitch and the next stitch on the left–hand needle, draw a loop, twist it, and place it on the right–hand needle. You now have replaced the first bound stitch of your buttonhole. Repeat this process until all your stitches have been replaced.
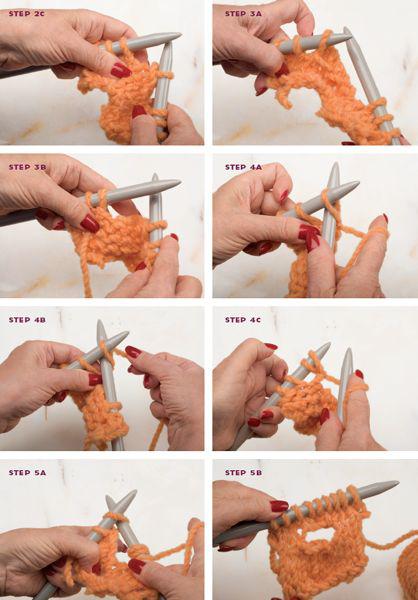
STEP 5:
Turn your work and continue knitting or ribbing until your next buttonhole has to be made.
[
EDITH KNIT TIPS
]Adding Length or Shortening a Finished Sweater
After you’ve completed your sweater, you realize your garment has turned out either too long or too short. If it’s too short, determine whether it can be blocked to the correct size. If this doesn’t work, you can still salvage it with a seemingly dramatic but really quite simple technique.
You’ve sewn your sweater together, blocked it, and it is still two inches too short. Here’s what you need to do. Take a knitting needle and insert it into a stitch a couple of rows above the ribbing. Gently pull at the stitch to create a loop and then cut the loop in half. Gently tug at the top and bottom of the sweater, which will separate neatly along the “pull line.” Use a smaller–size knitting needle than the one used to knit the garment, pick up the stitches on the main body, transfer to the original–size needle, and start knitting. Though it may seem odd, knitting doesn’t have an up or down direction. Even though you are now knitting in the opposite direction, your new stitches won’t look any different from your original ones. Knit until the body of the sweater is your desired length, then change your needle size, work your ribbing, and cast off.
If your sweater is too long, you’ll follow the same process, taking into account that you will need to add the ribbing so you will need to shorten accordingly.
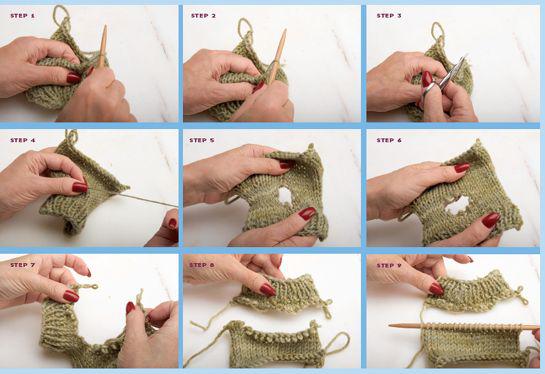
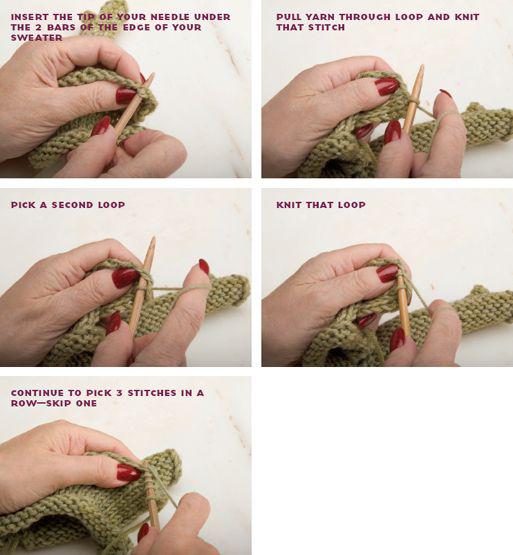
TO THE RESCUE
Knowing how to reknit sections of your sweater, as I just described to you, is an invaluable skill. Recently, a client of mine, Laura, went on a family weekend to a log cabin in a state park. Bliss! She took her knitting, parked herself by the lake, and worked on a beautiful angora sweater for her daughter. That night an animal sneaked into the cabin and dined on the sweater, leaving a huge hole in the sleeve. When she showed up at my shop on Tuesday she was hysterical. Her hard work was wasted and her daughter was disappointed. They don’t call me the guru for nothing! I showed her how to separate the sleeve as shown on the previous page, then pick up her stitches and reknit the sleeve. Crisis averted.
If you are making a vertical border on a cardigan, I suggest that after you have finished the bottom border for the front, you leave the first inch on a holder then continue in pattern for the rest of the sweater. When you are ready to make the border, place the stitches that are left on hold for that border back on your needles and proceed in the stitch of your choice. When making a vertical buttonhole, split your work in half, attach another ball of yarn, and work the two sides separately for the desired length of the buttonhole, then cut one of the balls of yarn and join the two pieces back together. Repeat this process for the desired number of buttonholes. When the border is finished, simply sew it to the body of the sweater.
[
EDITH KNIT TIPS
]Buttonholes for Men and Women
Here’s a simple phrase to remind you which side the buttonholes go on for a man’s garment vs. a woman’s: “Buttonhole on right side as women are always right!”
For V–neck borders, you will need a 24–inch circular needle. When designing a V–neck sweater, you will need an odd number of stitches in order to divide your work equally. Put the center stitch on a plastic safety pin when shaping the neck, placing a stitch marker on either side of that center stitch. To make the border, start at the right back shoulder; pick up and knit your stitches in the same manner as for the crew neck. When ribbing your border, the stitch in the center will always be worked as a knit stitch, and it is on either side of that stitch that you will decrease by either knitting or purling two stitches together to form a mitered edge, the slant that forms the neck shaping.
PERFECT FINISHING
I love to see my knitters discover their abilities and explore their imaginations. There is nothing more satisfying than seeing a knitter find the art in their craft.
As important as it is to master the basics of knitting—knit, purl, make one—none of your hard work will add up to anything if you don’t understand how to finish your knitting correctly. In this chapter, I’ll show you how to sew the pieces of your sweater together, block, or shape, the final garment.
There is a reason why finishers charge a lot of money to put a sweater together. Anyone can knit the pieces of a sweater, but not everyone has the eye for detail or the patience needed to finish it well. Finishing can take a lot of time, so be aware that it may take as long to finish your sweater as it took to knit it. Don’t try to rush this last but equally important process. Instead, take as much pride and pleasure in finishing your garment as you did in knitting it.
Once you have finished knitting the pieces of your sweater, your final steps will be to seam them together and block the finished garment. Don’t rush either of these steps. Quality seaming will take you a while, but it’s critical if you are going to achieve a smooth and refined end result.
As with every technique in knitting, there are various ways to sew a sweater together, but I teach several specific skills to my knitters that cover just about any seaming situation. To seam the main pieces of the sweater, I generally recommend “weaving,” which is also referred to as the mattress stitch. I prefer to weave, but it’s not always possible. I recently made a suit out of a fine yarn that I found very difficult to weave together because the yarn was uneven. So I used another method, “backstitching.” To put the shoulders together, I used the three–needle bind–off and omitted the process of staggered cast–offs that most patterns call for.
[
EDITH KNIT TIP
]To Block—Before or After?
There is a certain amount of debate in the knitting world about whether to block your sweater before or after you sew it together. I view blocking a garment as an opportunity to refine the fit and shape of your sweater–something you can only do when the sweater is seamed and you are able to try it on.
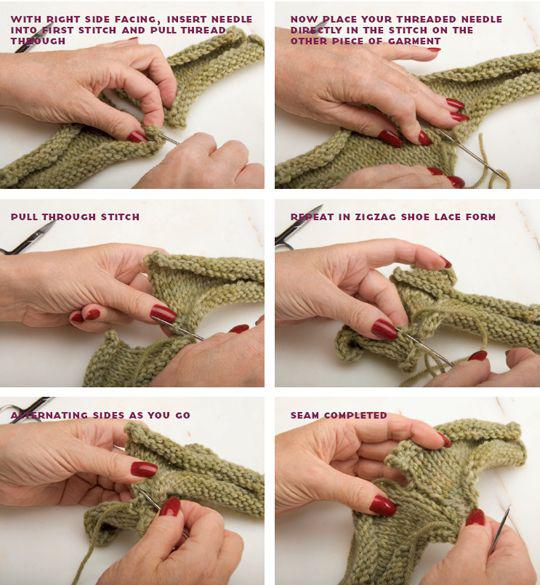
Weaving
.
Weaving, or the mattress stitch, is the most common seaming technique and resembles the zigzag of shoe lacing. It’s easy, invisible to the eye, and leaves a neat seam on the inside. To weave you need to place the front piece and the back piece side by side, with the right side facing up. One side will almost certainly be shorter or tighter than the other, so don’t be afraid to pull and adjust it if necessary.
As you weave the sides, you will notice that there are evenly spaced bumps on every other row. The goal is to have every bump fit neatly into the space opposite it. You’ll apply the shoe–lacing motion, interlocking
one piece to the other. When you’ve worked a few rows, pull your seaming thread taut; the knitting should neatly align, leaving an almost invisible seam on the wrong side.
[
EDITH KNIT TIPS
]Knit and Sew with Different Yarns
Don’t sew your sweater together with the yarn you used to knit it. Every so often, a knitter will come in with a beautiful sweater that he or she has painstakingly sewn together—incorrectly. When I help take it apart, I make a terrible discovery: despite my advice, the knitter has chosen to sew the sweater together with the same yarn used to knit it. I can’t stress this point enough: don’t do this. Using the same yarn to seam as you did to knit only leads to tears, because it can be almost impossible to see your stitches to undo them, plus you run the risk of cutting your hard labored work. Instead, I recommend using a tapestry wool in a matching shade to sew your garment together. When sewing your cotton, rayon, or silk sweater together, use either embroidery floss or pearl cotton.