Read Passionate About Pizza: Making Great Homemade Pizza Online
Authors: Curtis Ide
Tags: #Baking, #Cookbook, #Dough, #Pizza
Passionate About Pizza: Making Great Homemade Pizza (16 page)

Rolling is the easiest method of shaping a pizza. You use a rolling pin to create an even, round (or whatever shape you desire) pizza crust.
Using the palms of your hands, flatten the dough a little over its entire surface. Using a rolling pin, start at the center and roll outward across the circle until you reach the edge of the dough. The dough may pop and crackle as the rolling pushes bubbles towards the edge. Turn the dough a quarter turn or so, and roll from the center outwards again. Keep turning the dough and rolling outward it to obtain a circular shape that is much thinner and larger. If comfortable, you can roll at an angle from the center outward. Every two or three rolls, sprinkle on some flour, smooth it on, and turn the dough over to keep it from sticking to the surface. If the dough springs back into shape, let it rest a minute or two and then roll it some more. Keep rolling the dough until it is a circle approximately 1/8” thick. For very thin pizza, roll more to make it thinner. You can thin the dough down to 1/16 inch thick.

When the dough circle has reached the desired thickness or the expected size, you may want to make a rim around the edge of the dough; some people think this is required to turn the dough into a pizza shell. To make the edge, using your fingertips, fold and pinch a half-inch rim around the dough; place the flat fingers of one hand on the dough circle about an inch from the edge, then push the edge of the dough toward this hand with your other hand. This raised rim helps keep the pizza toppings from spilling out.
Circles are the common shape for pizzas, but ovals, squares, and triangles are fun too; be creative! You can use a knife or dough scraper to cut the rolled out pizza dough into the shape you want. If you are rolling it to a specific thickness you desire then it may come out bigger than your pizza peel, screen, or pan. If so, you can easily cut it to the size you need with a knife using the peel, screen, or pan as a guide.

You are finished shaping once the dough reaches the desired size and shape. Place the rolled out dough onto an oiled pizza pan or screen or onto a pizza peel sprinkled with cornmeal. Gently configure the dough into its final shape (remember not to squash the edge!).
Pressing Pizza Dough Into Shape

After the dough has risen, punch down the dough with one fist to deflate it, take it out of the bowl (or bag), and knead it briefly (about one minute) without adding any flour to release the large air bubbles. Make a dough ball then flatten it into a circle about one inch thick. If you prefer crust with large bubbles in it, you can skip kneading the risen dough; just put the risen dough right into the pan and deflate it as you press the dough into shape.
Spread a thin coat of oil over the surface of the pizza pan. The oil helps the dough to move easily within the pan as you press it. It also helps make the crust crunchy as it bakes in the pan. Place the dough in the center of the oiled pan. Cover the dough lightly with a kitchen towel or plastic wrap and let it rest for five or ten minutes (up to a maximum of twenty minutes) before shaping it.
This “rest” lets the dough rebound after you have punched it down and knead it. If you do not let it rest, the dough may be too elastic to shape easily; the longer it rests (within reason) the softer the dough will be and the easier it will be to shape.
You can coat your fingers and palms with a light layer of olive oil to help keep the dough from sticking to your hands. Dough that has already oil in it is less prone to stick to your hands so you might or might not need the oil on your hands.

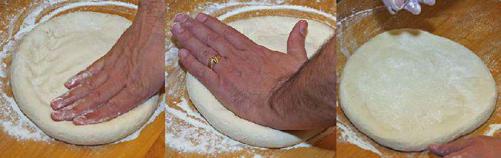
When you are ready to begin shaping, remove the towel. Starting in the very center of the dough circle, and using the flat of your fingers (i.e. fingers together with the palm of your hand elevated above the center of the dough circle), press the dough into the surface of the pan and out toward the edge of the pan. Work toward the edge of the dough circle until the dough covers the entire bottom of the pan and there is a slight rim of dough near the edge. When gets near the final size, use the tips of your fingers and dimple the entire surface of the dough. This will cause it to enlarge. Keep at it until the dough covers the pan and creeps up the edge a bit. If it springs back too much, let it rest a few minutes and try again. Try to maintain an even thickness of no thinner than 1/8 inch across the whole pan and make sure that the center of the dough is as thick as the rest.
After the dough reaches the edge of the pan, form a dough rim around the edge by pressing the dough into the corner and up the sides of the pan. To do this, bring the dough up the edges of the pan by squeezing the dough and the edge of the pan between your thumb and all four of your fingers.
If you want the crust to be very thick, you can let the shaped dough rise in the pan. Cover the pan with a kitchen towel and place it in a warm, draft-free place to rise. Let the dough rise for ten to twenty minutes. I have found that the dough rises during the first few minutes of cooking quite nicely. Consequently, I do not let the dough rise in the pan very often.
Hand-Stretching Pizza Into Shape
Hand stretching is the classic method used in most traditional pizzerias. The steps that follow are my well-tested adaptation of the basic method. You will be placing the stretched dough on a pizza peel, so you should get it ready before you start stretching. Sprinkle some cornmeal on the pizza peel as described in the “Pizza Peel Technique” on
page 73.
When hand stretching, gently stretch the dough into its final shape and remember not to squash the edge! You can make the puffed-up rim on the baked pizza bigger by leaving a wider rim around the dough as you shape it. You can also make the rim smaller by leaving a narrower rim. With practice, you will learn just how wide to make the dough rim in order to make the size of puffy edge that you prefer.
When you are ready to begin stretching hold the rested dough (still in plastic wrap) flat in the palm of one of your hands. Sprinkle a small amount of flour on the work surface where you are going to stretch the dough. Gently peel the top layer of plastic back with your other hand. Sprinkle a small amount of flour over the now exposed dough and gently smooth it over the entire surface, taking care not to squash the dough.

Turn the dough over onto the work surface so that the floured side is down. Gently peel the remaining plastic wrap off the dough and flour the entire surface as before. Frequent dustings of flour throughout this entire process are very important; without them, the dough will be too wet and soft to stretch. You cannot really over-dust the dough; it may get a little floury, but you will figure out the right amount with practice. The excess flour should fall off as you handle the dough.

Using the flat of your fingers (i.e. fingers together with the palm of your hand elevated above the center of the dough circle), press lightly about one inch from the edge of the flat circle to delineate where the puffy edge of the crust will be, continuing all the way around the dough circle. Do not press the outer edge of the dough at any time in the stretching process! That is how you form the pizza's puffed rim.