Passionate About Pizza: Making Great Homemade Pizza (15 page)
Read Passionate About Pizza: Making Great Homemade Pizza Online
Authors: Curtis Ide
Tags: #Baking, #Cookbook, #Dough, #Pizza


If you want to store the dough for a longer period, it is best to prepare it carefully. First, wrap the dough tightly in plastic wrap and make sure to seal it well. Second, place the wrapped dough into a zip-seal plastic freezer bag. I suggest that you use bags specifically made for freezer use. If you use the bags for letting the dough rise as I do, you will always have them handy! When you seal the bag, make sure you get as much of the air out of the bag as possible so that there is less chance for the moisture to seep out of the dough and cause freezer burn. If you have the luxury of a vacuum sealing unit, you can vacuum seal the dough in the bag or whatever container works best with your sealing unit.
Preparing Stored Dough for Use
Your dough has been stored for some time and you are now ready to use it. You have done well to plan ahead when you made the dough. Now, you will need to plan just a little bit further to prepare the dough for use. The dough needs to come up to room temperature before you can easily shape it. In other words, you need to warm up the dough. The colder the dough is, the longer it will take to reach room temperature.
Does it matter where you let the dough come to room temperature? Well, yes and no. You can set the dough almost anywhere you would allow food to sit. Keep the dough in its storage container. Just set the container in an out of the way place. You should keep it out of direct sunlight, away from direct heat, and away from where pets and children might mess with it inappropriately.
There is one thing to consider – dough that comes out of storage will be cold and moisture may condense on it or on its container. This is one reason to keep the dough in its container. Be prepared for a little water on and around the dough’s container. That way, any condensation will be on the outside of the container and not on the dough. Also, be sure to place the cold dough on a surface that the condensation will not hurt if it drips. The colder the dough and the higher the humidity in your kitchen the more likely that condensation will occur. Therefore, condensation is more likely to be an issue with frozen dough.
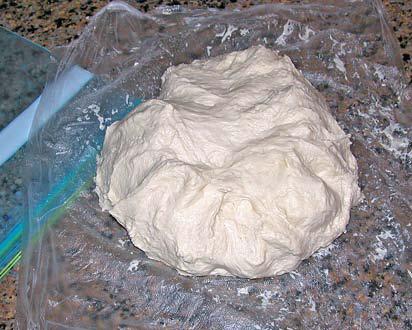
When dough is in the refrigerator, the yeast slows down but it does not actually stop. Refrigerated pizza dough will continue to rise while it is in the refrigerator. The dough will probably have grown in size and may have risen and fallen several of times. You will need to treat the dough as if it has just risen. Let it come up to temperature then peel the dough away from the bowl, plastic wrap, or plastic bag. Knead it briefly, then make a dough ball, and let it rest. It may be quite sticky! Wrap it in fresh plastic wrap or a new bag.
Preparing Refrigerated Dough for Use
The dough will be ready for use when it is near room temperature and the disk has rested just a few minutes. You can let the dough come partway up to room temperature then shape it into the disk and let it further come up to temperature as it rests, if you prefer.
Refrigerated dough may take 1 – 2 hours to reach room temperature. The exact time will depend on the temperature of your house, the humidity, and so on. As a result, it is difficult to give specific guidance on timing. You will need to try it and gain experience. If you do not give it enough time, it is no big deal; you will have cool dough that will stretch or roll out more slowly so just be patient and persistent. If you let it sit out too long, the yeast will begin actively working again and the dough will start rising even more. If the dough disk is not too large or bubbly, just start shaping it as is. If it is very bubbly then prepare it for resting as you normally do and give it a few minutes rest before shaping.
You can help the dough come up to temperature using the same techniques you would use to make dough rise quickly. Placing the dough in a warming drawer, on a warm clothes dryer, or in the microwave on the lowest setting (for a minute at a time) can help it warm up more quickly. However, it also makes it more likely that you will warm the dough past room temperature, so watch carefully if you use these methods. Remember to keep the heat gentle so you do not kill the yeast!
Preparing Frozen Dough for Use
If the dough has been in the freezer, it may take several hours to reach room temperature. The same caveats about the length of time mentioned above still apply but even more so. Once again, because freezer temperatures vary and the amount of the dough may vary, the amount of time it takes to thaw will vary. You will need to ensure that you take the dough from the freezer several hours before you plan to use it. The same suggestions about leaving it too short or too long apply to frozen dough, as well. If the dough retains any hard-frozen parts, it is not yet usable. In this case, you will have to wait a bit longer because you just cannot shape frozen dough.
When dough freezes, the yeast’s activity actually stops. Let it come up to temperature then peel the dough away from the plastic wrap or plastic bag. The dough may have risen just a bit while coming up to room temperature. If you see large bubbles, knead the dough briefly, then make a dough ball, and let it rest. It will be ready for use when it is near room temperature and the dough disk has rested just a few minutes. You can let the dough come partway up to temperature then shape it into a disk and let it further come up to temperature as it rests, if you prefer.
One way to thaw dough is to place it in the refrigerator for a day or two. This will bring it to refrigerator temperature much as you do for a frozen chicken or turkey. Once the dough is no longer frozen, you can bring it to room temperature in an hour or two just before you plan to use it. After the frozen dough has been in the refrigerator for a day or so, it will behave just as if you had refrigerated the dough in the first place. At that point, you can treat the dough just as if it was stored in the refrigerator using the techniques described above.
Accelerating the Thawing Process
What if you just do not have time to let the dough come up to temperature? Well, if the dough is frozen you might have time to whip up a new batch of dough and let it rise. No, really. I typically do not freeze my dough for just this reason; it takes less time to make a batch of dough and let it rise than it does to thaw frozen dough. That is especially true if you use the quick-rise techniques when making dough.
In case of emergency, you can use gentle defrosting techniques that you use for thawing other foods. You can place the sealed bag of frozen dough in cool water; the water will more quickly transfer heat to the dough. You can place the dough in a microwave oven and heat it on the lowest setting or defrost cycle. Regardless of the technique you use to speed the thawing process, please be careful not to heat the dough too quickly or you will cook it. This will kill the yeast and cook the gluten; neither of these is conducive to great homemade pizza!
Shaping Pizza
Once the dough has rested, it is ready for you to shape it into the familiar form of a pizza. You can shape almost any type of dough using any of the techniques described here.
This is the point at which you will notice the consistency of the dough. A very dense dough will take more effort to roll, stretch, or press into shape. Less dense dough, sometimes called more slack dough, will shape more easily. You can create dense dough by adding more flour to dough during mixing. Similarly, you can create slack dough by adding more liquid (or refraining from adding more flour) during mixing. Once you know your preferences, you can adjust the measurements of your favorite recipes to suit your desires.
You do not need to be too worried when you are shaping pizza. Just about any shape pizza will still be edible. You will be gaining experience and confidence as you make each pizza no matter how misshapen it is! In case things go wrong or even very wrong, you can start over once. More than that and the dough will not recover very well; it will turn out doughy and tough. You will have worked the dough while shaping it, you will also have added some flour, and you will have squeezed out some of the bubbles of gas that the yeast produced. Too much work makes the pizza crust tough. Therefore, restarting once after shaping the dough is okay but not more. To start over, gather the dough together, make a dough ball, flatten it into a disk, and then let it rest briefly.
Preparing To Shape

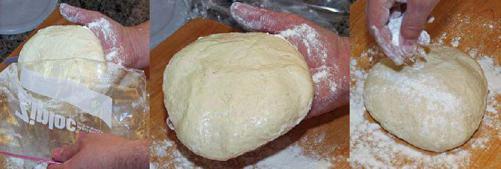
When you are ready to begin shaping, hold the dough in plastic wrap flat in the palm of one of your hands. Sprinkle a little flour over the work surface where you are going to roll out the dough. Gently peel the top layer of plastic back with your other hand. Sprinkle a small amount of flour over the now exposed dough and gently smooth it over the entire surface. Turn the dough over onto the work surface or your other hand so that the floured side is down. Gently peel the remaining plastic wrap off the dough and flour the entire top surface as you did for the first side.
Rolling Pizza Into Shape
