Passionate About Pizza: Making Great Homemade Pizza (3 page)
Read Passionate About Pizza: Making Great Homemade Pizza Online
Authors: Curtis Ide
Tags: #Baking, #Cookbook, #Dough, #Pizza

Using the flat of your fingers (i.e. fingers together with the palm of your hand elevated above the center of the dough circle), press lightly about one inch from the edge of the flat circle to delineate where the puffy edge of the crust will be, continuing all the way around the dough circle. Do not press the outer edge of the dough at any time in the stretching process! That is how the pizza's puffed rim is formed.
Again using the flat of your fingers, press and flatten the entire middle area of the dough circle right up to the edge you just defined. The dough will have a slight mound in the center; that is no problem. The center of the dough sometimes stretches more easily than the edges; the mound helps keep the center from getting too thin. Dust the dough (except for the edge) again with flour and turn the dough over, being careful not to handle the edge, and dust the other side. Now you are ready to begin stretching the dough.
Lift the dough off the work surface and drape the circle over both your fists with your fists in the center. Allow the weight of the dough to do the stretching at first, and then pull your fists apart a little to stretch it further. You want to stretch the dough slowly, rotating it across your fists, so that it maintains its circular shape throughout the process. After it has stretched a little, take one fist out, and then flip the dough over onto that fist so that the other side is facing up, and bring your other fist back under the dough. Continue stretching in this manner until the dough is about half its final size and uniformly thin.
Be careful not to stretch the center too much; it stretches very easily and can get too thin. Practice and the softness of the dough will dictate how long to continue this step. This initial stretching thins the dough in preparation for enlarging it to the final size of the pizza. If the dough is very soft, you can let the dough drape onto the work surface to keep its weight from stretching it too much.
Keep stretching and the dough will continue to enlarge. If the dough feels sticky to your hands or sticks to the work surface dust it with more flour. When the dough has almost reached its final size, you can stretch it to size while it sits on the work surface. Slide the fingers of both hands under the dough, some inches apart. With your thumb cupped around the edge so as not to squash it, pick up your hands so that your fingertips rise up a little and move your hands apart to stretch the dough. Move your hands around the dough and stretch as needed to get the dough into shape. Note the areas that may not have stretched evenly and adjust them; do not stretch the thin areas any further and stretch the thicker areas a little more.
Once the dough is stretched into shape, place it on the peel carefully so that it does not deform too much. You can slide your hands, wrists, and forearms under the stretched dough to support it, if you wish.
You can use a pizza screen in place of a pizza peel for hand-stretched thin-style pizza. Lightly oil the pizza screen before placing the stretched dough onto the pizza screen.
Prepare the pizza peel by spreading a small amount of flour over its surface and sprinkle a little cornmeal where the pizza will rest; the cornmeal and flour allow the completed pizza to slide off the peel easily. A wooden pizza peel will work best; metal peels or other kitchen implements may work, but it will probably be harder to slide the pizza into the oven without losing some toppings if you do not use a wooden peel.
Once the dough is close to the desired size, carefully lay the dough onto the prepared pizza peel. Gently configure the dough into its final shape (remember not to squash the edge!).
Rolling Thin-style Pizza
Rolling is the easiest method of shaping a pizza. You use a rolling pin to create an even, round (or whatever shape you desire) pizza
crust.
Using the palms of your hands, flatten the dough a little over its entire surface. Using a rolling pin, start at the center and roll outward across the circle until you reach the edge of the dough. The dough may pop and crackle as the rolling pushes bubbles towards the edge. Turn the dough a quarter turn or so, and roll from the center outwards again. Keep turning the dough and rolling outward it to obtain a circular shape that is much thinner and larger. If comfortable, you can roll at an angle from the center outward. Every two or three rolls, sprinkle on some flour, smooth it on, and turn the dough over to keep it from sticking to the surface. If the dough springs back into shape, let it rest a minute or two and then roll it some more. Keep rolling the dough until it is a circle approximately 1/8” thick. For very thin pizza, roll more to make it thinner. You can thin the dough down to 1/16 inch thick.
When the dough circle has reached the desired thickness or the expected size, you may want to make a rim around the edge of the dough; some people think this is required to turn the dough into a pizza shell. To make the edge, using your fingertips, fold and pinch a half-inch rim around the dough; place the flat fingers of one hand on the dough circle about an inch from the edge, then push the edge of the dough toward this hand with your other hand. This raised rim helps keep the pizza toppings from spilling out.
You are finished shaping once the dough reaches the desired size and shape. Place the rolled out dough onto an oiled pizza pan or screen or onto a pizza peel sprinkled with cornmeal. Gently configure the dough into its final shape (remember not to squash the edge!).
Starting Over
You can start over once. More than that and the dough will not recover well. You have worked the dough, a bit, while shaping it, you have added some flour, and you have squeezed out some of the bubbles of gas that the yeast produced. Too much work makes the pizza crust tough. One restart after shaping is okay, but not more.
Assembly
There is a bit of art involved in assembling a pizza. On the one hand, you can just put the sauce and toppings on the pizza. On the other hand, you can paint a picture that is pleasing to the eye, mouth, and hands. One key decision to be made is the order in which the toppings are assembled; the sauce, cheese, and toppings can be assembled in any order. Another decision to be made is how the toppings and cheese are disbursed across the pizza. One more decision to be made is the visual pattern that is being created.
One important thing to keep in mind is that the toppings will generally migrate to the center of the pizza. You can minimize this by placing slightly fewer toppings in the center of the pizza.
If you are using a pizza pan, the shaped crust is placed in the pan then the pizza is assembled right in the pan. If you are using a pizza screen, lightly oil the pizza screen and then place the shaped crust on the screen; the pizza is then assembled right on the screen. If you are using a backing stone, the pizza is assembled on a prepared pizza peel; once assembled, the pizza is slid directly onto the backing stone in the oven.
Spreading Sauce
- You can use the back of a large spoon or ladle to evenly spread the sauce over the pizza shell. Just pour the appropriate amount of sauce over the center area of the pizza shell. Using the rounded back of the spoon and starting in the exact center of the pizza, lightly trace little circles around the center of the pizza. As you make the circles larger and larger, the sauce gets carried out towards the edges of the pizza. It is fun; you kind of hide a spiral inside the middle of your pizza!
The most common order of assembly is sauce-first assembly. First goes the sauce, then the cheese, followed by the toppings and possibly spices. This results in a conventional pizza.
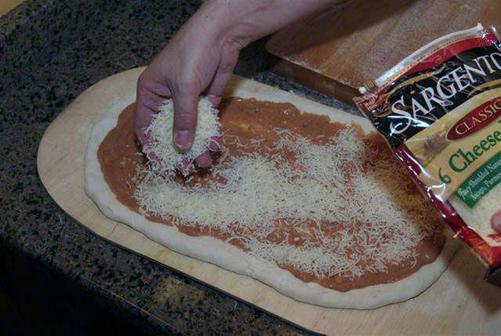
Lightly brush the dough with a small amount of olive oil (including the edge, if desired), spread an even layer of sauce over the pizza to within a half-inch of the edge of the dough. The layer of sauce should be just thick enough so that you do not see bare spots through the sauce, but be careful not to use too much sauce. Obviously, personal taste comes into play with the amount of sauce used. Spread the cheese evenly on top of the sauce. Distribute the toppings on the cheese in a pattern that is pleasing to the eye in a way that group the desired toppings together. Toppings can be diced, chopped, sliced, julienned, etc. giving a would-be pizza artist plenty of variety of shapes and colors in his palette. Sprinkle with herbs (optional) and Parmesan cheese, if desired. The sauce and toppings will migrate toward the center, so you should put a little less in the center; otherwise, the cooked pizza may be soggy in the center.
Pizza Peel Technique
The first time you try to put a pizza onto a baking stone using a pizza peel, it can be a little scary. My first time was not only scary, but also messy. I tried to use an improvised cookie sheet as a pizza peel; the dough stayed on the cookie sheet and the toppings and sauce landed on the baking stone. Since the pizza stone had been heated to 500 degrees Fahrenheit, the result was scorched toppings and a lot of smoke. It was hilarious, at least in retrospect!
The trick to using a pizza peel is to make sure that the pizza will slide freely on the peel before you try to put it onto the baking stone. You do this by having a thin layer of flour and a sprinkling of cornmeal on the pizza peel before assembling the pizza; err on side of too much flour and cornmeal rather than too little. The most important thing, though, is to get the pizza moving before the moment of truth. While holding the pizza peel just a few inches above the work surface, shuffle the pizza peel back and forth a little
without
trying to slide the pizza off. Even after years of making pizza I still get the pizza moving above the counter top rather than inside the oven just to be safe. After you get comfortable with the motion and feel of it, you can do this above the stone immediately before you slide the pizza off the peel.
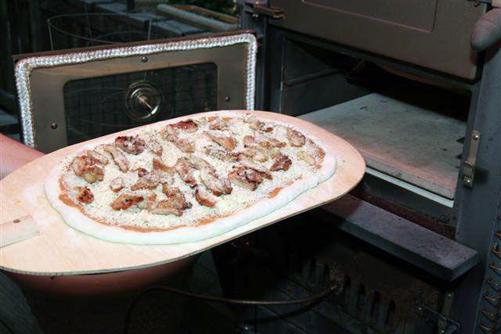
Once the pizza is able to move freely on the peel, you can easily slide it onto the baking stone by tilting the peel and shuffling the peel a bit to slide the pizza off. I have found that you are actually better off holding the pizza directly above the stone (as if you just intend to set the peel onto the stone) and focus on sliding the pizza peel out from under the pizza rather than trying to slide the pizza off the peel onto the baking stone.
My messy experience also suggests that a wooden pizza peel works better than any metal kitchen implement. They really are not that expensive, so go ahead, and buy one.
Once the pizza has been cooked, the bottom of the crust is fairly firm and generally does not stick to the stone. To remove the pizza from the oven, just slide the peel between the pizza and the stone while keeping the peel flat and parallel to the surface of the stone. Once the peel is fully underneath the pizza, lift the peel (with the pizza on it) up and out of the oven. Be careful not to touch the stone or any part of the oven or racks. The cooked pizza will slide more easily than the uncooked pizza did so be careful not to drop it!
Baking
