The Baking Answer Book (41 page)
Read The Baking Answer Book Online
Authors: Lauren Chattman
Tags: #Cooking, #Methods, #Baking, #Reference

To make a tart with a design on top, cut two disks and sandwich some filling between a plain one and one you’ve cut decoratively, sealing them together by brushing the edges of the bottom disk with beaten egg. Alternatively, you can cut and bake one disk, slice off the decorative top, fill the bottom with pastry cream and fruit, and place the top back on to cover the tart.
Q
I know that croissant and Danish dough have yeast. How does this change the way they need to be handled before baking? Does the dough need to rise before it is shaped into individual pastries?
A
Croissant and Danish doughs will begin to ferment slightly during the hours that they rest in the refrigerator between turns and after the turns are completed. But they do not rise at room temperature, the way bread dough does, before being shaped into individual pastries. It is only after the doughs are rolled out and shaped that the individual pastries should stand at room temperature for a few hours, loosely covered in plastic wrap. When they are puffy (they won’t double in size), they can be baked.
For the best croissants and Danish pastries, don’t rush them into the oven before the yeast has had time to do its work. Properly proofed (a baker’s term for allowing dough to rise), croissant and Danish dough will rise high in the oven. Underproofed, they will be heavy and tough.
Q
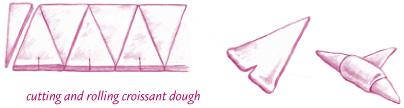
How do I cut and shape croissant dough into classic croissants?
A
French croissants are on the small side, unlike the giant croissants you often see in American bakeries and markets. To make these delicate, diminutive croissants, roll your dough into a 24-by 12-inch rectangle and use a paring knife or pizza wheel to cut that rectangle into two 24-by 6-inch
rectangles. Cut each strip into 10 triangles, each with a 4-inch base and 6-inch sides.
To shape a croissant, place it on a lightly floured work surface with the short base facing away from you and the point facing toward you. Gently pull each corner of the short base to stretch it to about 6 inches. Then roll the stretched edge toward you with one hand while gently pulling on the tip with the other hand. Place the rolled croissant on a parchmentlined baking sheet with the point tucked underneath. Curve the ends in slightly toward each other to make a crescent shape.
Q
How do I make pains au chocolat?
A
Pains au chocolat are small rectangles of croissant dough wrapped around some bittersweet chocolate. They’re easier to shape than croissants. Roll your dough into a 24-by 6-inch rectangle. Cut that rectangle into two 24-by 3-inch strips. Brush one edge of each strip with lightly beaten egg (this will prevent them from unfolding in the oven). Then spoon 1 tablespoon of chopped chocolate in a narrow line about 1 inch from the top of one of the strips. Roll the top edge over the chocolate and then fold the dough over once
more to create a three-layered roll. Trim the roll away from the longer strip with a sharp paring knife and transfer the assembled dough to a parchmentlined baking sheet, flattening it slightly with your hand. Repeat with the remaining dough, and then again with the remaining strip, for a total of 16 pastries.
Q
Can I freeze unbaked croissants and pain au chocolat to bake another day? Or is it better to bake and then freeze them?
A
Making croissant dough takes quite a bit of effort, and it’s difficult to make in small batches. Croissants definitely are best warm from the oven and will become stale within hours of baking. It would be a shame to make two dozen croissants and have to throw away even a few if there were a way to save them for another day.
If you have leftover baked croissants, put them in a resealable plastic bag and freeze them as soon as you know they won’t be eaten that day. Thaw them briefly on the countertop (15 minutes will do) and then reheat them for 5 minutes in a 350°F (180°C) oven. They won’t be quite as soft, moist, and fresh-tasting as when they were first baked, but you won’t get too many complaints, I bet.
It is possible to freeze unbaked croissants and then bake them when you need them, but again, quality may suffer. Unlike puff pastry, which freezes beautifully, croissant dough depends in part on yeast for its rise. Inevitably, some of the
yeast will not survive the low temperature of the freezer, so expect frozen croissants to rise less than freshly made ones. Transfer shaped croissants to a baking sheet and freeze them on the sheet until they are firm, about 1 hour. Then transfer them to a resealable plastic bag and freeze completely. There’s no need to defrost the frozen croissants before baking. Just add a few extra minutes to the baking time.
There is a third option that I prefer when it comes to freezing croissants. This is to partially bake them until they are just turning golden, let them cool to room temperature, and then freeze them. This way, they’ve already taken advantage of the yeast to rise to full height, but still retain some moisture, so when they are placed in the oven right from the freezer, they don’t completely dry out as they brown.
Q
I’ve heard that Danish are not really from Denmark at all. Is this true?
A
Pastries made from an egg-enriched, butter-laminated (or layered) yeast dough, are popular throughout Europe and North America, but their exact origin is debated. Danish were indeed introduced to America by bakers from Denmark, and excellent examples can be found throughout Denmark today, but food historians have traced the recipe to seventeenth-century France. From France, it is believed that the recipe spread to Italy and then Austria. Legend has it that during a baker’s strike in Copenhagen, Austrian bakers arrived in the city to fill the jobs, introducing this type of pastry to
Denmark, where it became very popular under the name Wienerbrod, or Vienna bread. Danish bakers, back at work, continued to produce it, and when some of these bakers emigrated to various corners of the earth, they continued to bake, and the pastries became known as “Danish.”
Q
How are Danish pastries different from croissants, other than in shape?
A
Danish pastries are more tender and cakelike and less crisp than croissants because the dough contains eggs. In addition to being shaped differently, Danish pastries are filled with a greater variety of fillings — fruit, pastry cream, and cheese, to name a few — and can be garnished with chocolate or white icing, candied fruit, and chopped nuts.
Q
What are the storage options for leftover Danish?
A
Danish, like puff pastries and croissants, are best eaten on the day they are baked. Use the guidelines on pages 293 and 294 for freezing unbaked, baked, and partially baked croissants.
Q
What is choux paste?
A
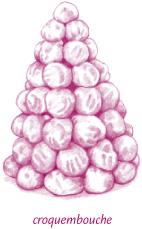
Although not widely used in American home kitchens as puff pastry, choux paste, or pâte à choux, also known as cream puff pastry, is one of the foundational doughs of pastry making. Éclairs, profiteroles, and classic French cakes such as Paris-Brest, croquembouche, and gâteau Saint-Honoré are made with choux paste.
The preparation of the dough is unique in that it starts on top of the stove. Flour, butter, and either milk or water are heated until the mixture resembles mashed potatoes. Off the heat, eggs are stirred in until the mixture is pastelike and soft enough to pipe through a pastry bag.
The pastry is piped into small balls or oblong shapes, and then baked until puffed and completely dry. When cooled, the pastries can be filled with pastry cream (for éclairs), whipped cream (for cream puffs), ice cream (for profiteroles), or Bavarian cream or mousse.
Although these items and the larger cakes made from choux paste may look fancy and difficult, it is actually much simpler and less time-consuming to make choux paste at home than it is to make puff pastry, croissants, or Danish.
Q
Are there any tricks to getting cream puff pastry to puff to its maximum size?
A
Follow the recipe when it tells you to “stir constantly.” Stirring the dough in the pan helps develop the gluten in the flour, which will give the dough a stretchy, elastic structure and allow it to expand in the oven to its full potential. Although you can cover the bowl of dough with plastic wrap and hold it at room temperature for an hour or two, the pastry will puff up best if used immediately after it is mixed.
Q
My cream puffs have little points on the ends from when I finished piping and pulled the pastry bag away. How can I get them to look round, not pointy?
A
Improving your piping technique may help. Hold the pastry bag about 1 inch from the parchment paper and squeeze out a round of pastry. When it is the size you want, stop squeezing the bag before you lift it away. Applying pressure as you lift will release a pointy bit of pastry from the bag. If there is still a little point on top of some of your puffs, dampen your index finger with cold water and just smooth it into the round. The shape of your cream puffs isn’t just an aesthetic concern; little peaks will burn black before the puffs are baked through.

Classic Cream Puffs
The simplest way to enjoy cream puff pastry is to pipe it into large balls, bake them, and fill them with sweetened whipped cream. Look over the following recipe, with its short list of ingredients and its easy instructions, and see if you don’t agree. The most complicated step is probably baking the puffs. To dry them out sufficiently while still getting a high rise, you start them in a hot oven, then turn the heat down. When you turn off the oven, open the door a little, and let them sit in the cooling oven for 10 minutes to dry them completely.
MAKES 12 SMALL CREAM PUFFS
½ cup whole milk
¼ cup (½ stick) unsalted butter
¼ teaspoon salt
½ cup unbleached all-purpose flour
3 large eggs
½ teaspoon vanilla extract
1½ tablespoons confectioners’ sugar, plus more for dusting
1.
Preheat the oven to 400°F (200°C). Line a baking sheet with parchment paper. Combine the milk, butter, granulated sugar, and salt in a medium saucepan and bring to a boil over medium heat.
2.
Remove the pan from the heat and stir in the flour all at once, using a wooden spoon. When the flour is incorporated, return the pan to the heat, turn it to medium-low,
and cook, stirring constantly, for 1 minute. The mixture will be thick.