The Cook's Illustrated Cookbook (278 page)
Read The Cook's Illustrated Cookbook Online
Authors: The Editors at America's Test Kitchen
Tags: #Cooking

MAKES 2 LOAVES
If you don’t have a baking stone, bake the bread on an overturned and preheated rimmed baking sheet set on the lowest oven rack. As you make this bread, keep in mind that the dough is wet and very sticky. The key to manipulating it is working quickly and gently; rough handling will result in flat, tough loaves. When possible, use a large rubber spatula or bowl scraper to move the dough. If you have to use your hands, make sure they are well floured. Because the dough is so sticky, it must be prepared in a stand mixer.
SPONGE
1 | cup (5 ounces) all-purpose flour |
¹⁄ | teaspoon instant or rapid-rise yeast |
¹⁄ | cup water, room temperature |
DOUGH
2 | cups (10 ounces) all-purpose flour |
1¹⁄ | teaspoons salt |
¹⁄ | teaspoon instant or rapid-rise yeast |
³⁄ | cup water, room temperature |
¹⁄ | cup milk, room temperature |
1. FOR THE SPONGE:
Combine flour, yeast, and water in medium bowl and stir with wooden spoon until uniform mass forms, about 1 minute. Cover bowl tightly with plastic wrap and let stand at room temperature for at least 8 hours or up to 24 hours.
2. FOR THE DOUGH:
Place sponge and dough ingredients in bowl of stand mixer fitted with paddle attachment. Mix on low speed until roughly combined and shaggy dough forms, about 1 minute, scraping down bowl and paddle as needed. Increase speed to medium-low and continue mixing until dough becomes uniform mass that collects on paddle and pulls away from sides of bowl, 4 to 6 minutes. Change to dough hook and knead bread on medium speed until smooth and shiny (dough will be very sticky), about 10 minutes, scraping down bowl and dough hook as needed. Transfer dough to large bowl, cover tightly with plastic, and let rise at room temperature until doubled in size, about 1 hour. (Dough should barely spring back when poked with knuckle.)
3.
Spray rubber spatula or bowl scraper with vegetable oil spray. Fold partially risen dough over itself by gently lifting and folding edge of dough toward middle. Turn bowl 90 degrees; fold again. Turn bowl and fold dough 6 more times (for total of 8 turns). Cover with plastic and let rise for 30 minutes. Repeat folding, replace plastic, and let rise until doubled in size, about 30 minutes longer.
4.
One hour before baking, adjust oven rack to lower-middle position, place baking stone on rack, and heat oven to 450 degrees. Cut two 12 by 6-inch pieces of parchment paper and dust liberally with flour. Transfer dough to floured counter, being careful not to deflate it completely. Liberally flour top of dough and divide in half with bench scraper. Turn 1 piece of dough cut side up and dust with flour. With well-floured hands, press dough into rough 12 by 6-inch rectangle. Fold shorter sides of dough toward center, overlapping them like business letter to form 7 by 4-inch loaf. Repeat with second piece of dough. Gently transfer each loaf, seam side down, to parchment sheets, dust with flour, and cover with plastic. Let loaves sit at room temperature for 30 minutes (surface of loaves will develop small bubbles).
5.
Slide parchment with loaves onto pizza peel. Using floured fingertips, evenly poke entire surface of each loaf to form 10 by 6-inch rectangle; spray loaves lightly with water. Slide parchment with loaves onto baking stone. Bake, spraying loaves with water twice more during first 5 minutes of baking time, until crust is deep golden brown and loaves register 210 degrees, 22 to 27 minutes. Transfer loaves to wire rack, discard parchment, and let cool to room temperature, about 1 hour, before slicing and serving. (Bread can be wrapped in double layer of plastic wrap and stored at room temperature for up to 3 days. Wrapped with additional layer of aluminum foil, bread can be frozen for up to 1 month. To recrisp crust, thaw bread at room temperature, if frozen, and place unwrapped bread in 450-degree oven for 6 to 8 minutes.)
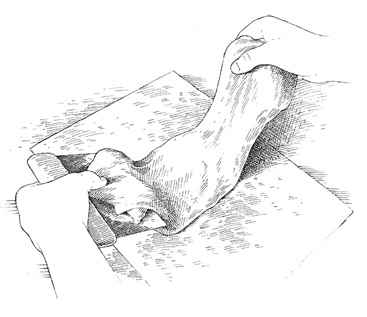
After pressing dough into rough 12 by 6-inch shape, grasp 1 end of dough with 1 hand and other end with bench scraper. Fold shorter sides of dough toward center, overlapping them like business letter to form 7 by 4-inch loaf.
![]() WHY THIS RECIPE WORKS
WHY THIS RECIPE WORKS
To make really good olive-rosemary bread, we needed a great homemade rustic bread—with a coarse crumb, chewy interior, and thick, burnished crust—and a way to add olives without ruining the bread. We started with our recipe for
RUSTIC ITALIAN BREAD
, but when we added olives, their moisture made the bread gummy, and the assertive olive flavor made it seem bland. To compensate, we added some whole wheat flour and reduced the hydration level (the weight of the water divided by the weight of the flour) from 68 to 63 percent. Honey added sweetness and brought out the olives’ savory flavor. Rolling the olives up in the dough before the first rise gave us a nicely textured loaf with evenly dispersed olives. Just about any good brined or oil-cured olives worked well (after a quick rinse to control saltiness). Surprisingly, it took a whopping 2 tablespoons of rosemary to achieve the demure background flavor we wanted.
MAKES 2 LARGE LOAVES
If you don’t have a stand mixer, you can mix the dough by hand following the instructions in
“TEST KITCHEN TIP NO. 119 HAND-MIXING METHOD FOR DOUGH”
. If you don’t have a baking stone, bake the bread on an overturned and preheated rimmed baking sheet set on the lowest oven rack. Almost any variety of brined or oil-cured olives works in this recipe, although we prefer a mix of both green and black olives.
1³⁄ | cups water, room temperature |
2 | tablespoons honey |
2 | teaspoons instant or rapid-rise yeast |
3¹⁄ | cups (19¹⁄ |
¹⁄ | cup (2³⁄ |
2 | teaspoons salt |
2 | tablespoons chopped fresh rosemary |
1¹⁄ | cups olives, pitted, rinsed, and chopped coarse |
1.
Whisk water, honey, and yeast together in bowl of stand mixer fitted with dough hook. Add flours to bowl and mix on low speed until cohesive dough is formed, about 3 minutes; cover bowl tightly with plastic wrap and let sit at room temperature for 20 minutes.
2.
Make well in center of dough and add salt and rosemary. Knead dough on low speed for 5 minutes, scraping down bowl and dough hook as needed. Increase speed to medium and continue to knead until dough is smooth and slightly tacky, about 1 minute. If dough is very sticky, add 1 to 2 tablespoons bread flour and continue mixing for 1 minute. Transfer dough to lightly floured counter and press into 12 by 6-inch rectangle, with long side facing you. Press olives evenly into dough, then roll dough toward you into firm cylinder, keeping roll taut by tucking it under itself as you go. Turn loaf seam side up and roll cylinder into coil. Transfer dough, spiral side up, to large, lightly greased bowl, cover tightly with plastic, and let rise at room temperature until it increases in size by 50 percent, about 1 hour.
3.
Spray rubber spatula or bowl scraper with vegetable oil spray. Fold partially risen dough over itself by gently lifting and folding edge of dough toward middle. Turn bowl 90 degrees; fold again. Turn bowl again; fold once more. Cover with plastic and let rise for 30 minutes. Repeat folding, replace plastic, and let rise until doubled in size, about 30 minutes.
4.
Transfer dough to lightly floured counter, being careful not to deflate. Divide dough in half, loosely shape each piece into ball, and let rest for 15 minutes. Flip each ball over and, starting from top, roll dough toward you into firm oval shape. Using palms, roll each oval (seam side down) from center outward until 12-inch loaf is formed. Poke any olives that fall off into bottom seam, then pinch seam closed. Transfer each loaf, seam side down, to 12 by 6-inch piece of parchment and cover with plastic. Let rise until doubled in size, 1 to 1¹⁄
2
hours. (Dough should barely spring back when poked with knuckle.)
5.
One hour before baking, adjust oven rack to lower-middle position, place baking stone on rack, and heat oven to 450 degrees. Slide parchment with loaves onto pizza peel. Using sharp serrated knife or single-edge razor blade, make one 3¹⁄
2
-inch-deep slash on diagonal along top of each fully risen loaf, starting and stopping about 1 inch from ends. Spray loaves with water and slide parchment with loaves onto baking stone. Bake for 15 minutes, spraying loaves with water twice more during first 5 minutes of baking time. Reduce oven temperature to 375 degrees and continue to bake until crust is deep golden brown and loaves register 210 degrees, 25 to 30 minutes. Transfer loaves to wire rack, discard parchment, and let cool to room temperature, about 2 hours, before slicing and serving. (Bread can be wrapped in double layer of plastic wrap and stored at room temperature for up to 3 days. Wrapped with additional layer of aluminum foil, bread can be frozen for up to 1 month. To recrisp the crust, thaw bread at room temperature, if frozen, and place unwrapped bread in 450-degree oven for 5 to 10 minutes.)
MAKES 16 ROLLS
1.
After final rise in step 3, transfer dough to lightly floured counter and gently stretch into 12 by 6-inch rectangle. Divide dough in half widthwise, then divide each half into 8 pieces (you should have 16 pieces). Loosely shape each piece into ball, cover with plastic wrap and let rest for 15 minutes. Loosely cup hand around each piece of dough (not directly over it) and, without applying pressure, move hand in small circular motions to form smooth, taut round. Arrange shaped rolls on 2 parchment paper–lined rimmed baking sheets and cover with plastic wrap. Let rise until doubled in size, about 1 hour. (Dough should barely spring back when poked with knuckle.)
2.
Thirty minutes before baking, adjust oven racks to upper-middle and lower-middle positions, and heat oven to 500 degrees. Spray rolls lightly with water and place baking sheets in oven. Bake for 5 minutes, spraying rolls with water twice more. Reduce oven temperature to 400 degrees and continue to bake until rolls are deep golden brown, 15 to 20 minutes, switching and rotating baking sheets halfway through baking. Transfer rolls to wire rack and let cool to room temperature, about 1 hour, before serving.
![]() WHY THIS RECIPE WORKS
WHY THIS RECIPE WORKS
The remarkably crisp crust of European-style dinner rolls keeps them in the domain of professionals, who use steam-injected ovens to expose the developing crust to moisture. We wanted a reliable recipe for rustic dinner rolls with a crisp crust and chewy crumb as good as any from an artisanal bakery. But when we tasted our first batch, we found a dense, bland crumb beneath a leathery crust. The flavor was easy to improve—we added whole wheat flour for earthiness and honey for sweetness. A little extra yeast improved the crumb slightly, but making the dough wetter was the best fix; the water created steam bubbles during baking, producing an airier crumb. Next we came up with a two-step process to mimic a steam-injected oven: First, we misted the rolls with water before baking. We started baking them in a cake pan at a high temperature to help set their shape. Then we lowered the temperature, pulled the rolls apart, and returned them to the oven until we had golden rolls with a perfect crust and crumb.