The Cook's Illustrated Cookbook (274 page)
Read The Cook's Illustrated Cookbook Online
Authors: The Editors at America's Test Kitchen
Tags: #Cooking

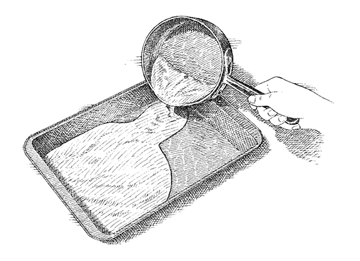
1.
Spread hot glaze in baking pan.
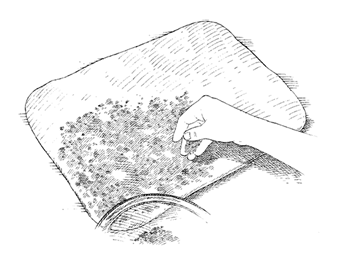
2.
Sprinkle dough with filling, leaving ³⁄
4
-inch border along top edge. If you don’t leave border, it will be harder to get dough to stick together when forming cylinder.
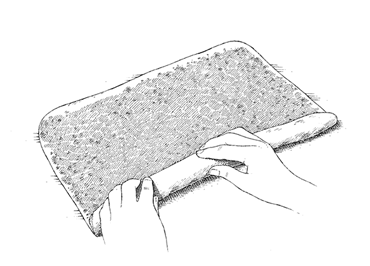
3.
Roll dough into tight cylinder. Do this slowly and with great care since an uneven cylinder will yield, squat, misshapen rolls.
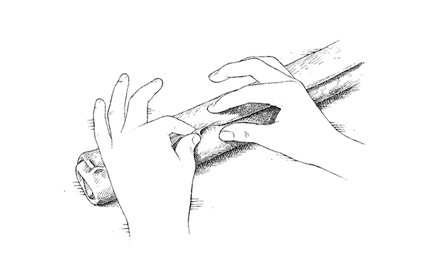
4.
Firmly pinch seam to seal. A secure seam ensures the filling stays put.
5.
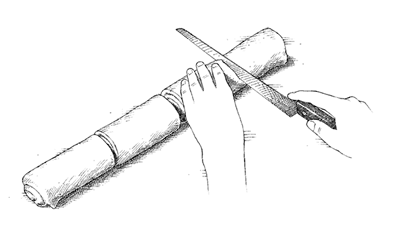
Using a serrated knife and gentle sawing motion, cut cylinder into 12 buns.
6.
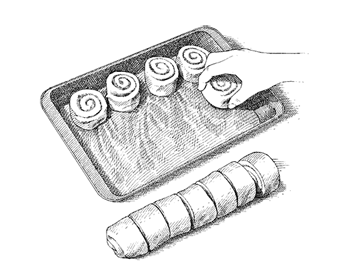
Arrange buns in prepared pan over glaze.
![]() WHY THIS RECIPE WORKS
WHY THIS RECIPE WORKS
Brioche is a particularly light and delicious pastry, but most home bakers avoid this flaky, buttery dough because preparing it with the traditional method—waiting for a sponge to rise, adding flour, rising the dough again, and chilling the dough—is very time-consuming. We wanted to shortcut and streamline the process to make a recipe that wouldn’t scare off home cooks. The process can be shortened considerably by eliminating the sponge in favor of a one-step mixing method and by either shortening or eliminating the first rise. Only the final rise before baking is essential to the texture and flavor of the bread.
MAKES ONE 8-INCH LOAF
This bread also makes excellent toast.
¹⁄ | cup whole milk, heated to 110 degrees |
2¹⁄ | teaspoons instant or rapid-rise yeast |
2¹⁄ | cups (11¹⁄ |
6 | tablespoons unsalted butter, cut into 6 pieces |
3 | tablespoons sugar |
¹⁄ | teaspoon salt |
2 | large eggs |
1.
Whisk milk and yeast together in medium bowl, then stir in 1 cup flour. Cover with plastic wrap and set aside.
2.
Pulse butter, sugar, and salt in food processor until mixture is soft and smooth, about 5 pulses, scraping down bowl as needed. Add eggs, one at a time, and process after each addition until fully incorporated (mixture may look curdled). Add remaining 1¹⁄
4
cups flour and yeast-flour mixture, pulse until mixture forms soft, smooth dough, then process continuously for 15 seconds (dough will be sticky at this point). Transfer dough to well-floured counter and knead by hand to form smooth and elastic ball. (Dough can be refrigerated for up to 24 hours.)
3.
Grease 8¹⁄
2
by 4¹⁄
2
-inch loaf pan, line bottom with parchment paper, then grease paper. Press dough into 8-inch square. Roll dough toward you into firm cylinder, keeping roll taut by tucking it under itself as you go. Turn loaf seam side up and pinch it closed. Place loaf seam side down in prepared pan, pressing gently into corners. Cover loaf loosely with greased plastic and let rise at room temperature until loaf rises about 1 inch over lip of pan, about 1 hour.
4.
Thirty minutes before baking, adjust oven rack to middle position and heat oven to 350 degrees. Using sharp serrated knife or single-edge razor blade, make 1 slash lengthwise along top of loaf, starting and stopping about 1 inch from ends. Bake until loaf registers 195 degrees and crust is golden brown, about 40 minutes. Transfer pan to wire rack and let cool for 5 minutes. Remove loaf from pan, return to rack, and let cool to room temperature, about 2 hours, before slicing and serving.
![]() WHY THIS RECIPE WORKS
WHY THIS RECIPE WORKS
For a chewy, tangy, deli-style rye bread that won’t go soggy or limp when piled with a stack of pastrami, we found the sponge method of preparing dough to be superior on several counts: Fermentation made for more flavor and a somewhat looser and less even texture (these being good things), and the bread made from a sponge also seemed to maintain more of its moistness during storage. While it’s not easy to find more than one type of rye flour in the grocery store, after testing several, we found bran-free light or medium rye flour to be best. Because rye flour is low in gluten, it needed to be combined with protein-rich all-purpose flour. The kneading time for rye bread is low compared with what wheat bread requires: only about five minutes. To get a shiny, brittle crust, the hallmark of traditional Jewish rye bread, we brushed the top and sides of each loaf with a glaze made from egg whites and milk.
MAKES 1 LARGE LOAF OR 2 SMALLER LOAVES
If you don’t have a stand mixer, you can mix the dough by hand following the instructions in
“TEST KITCHEN TIP NO. 119 HAND-MIXING METHOD FOR DOUGH”
. The rye flakes add flavor to the bread, but if unavailable, they can be omitted from the recipe.
SPONGE
²⁄ | cup rye flakes (optional) |
3 | cups (15 ounces) all-purpose flour |
2³⁄ | cups water |
2 | tablespoons honey |
1¹⁄ | teaspoons instant or rapid-rise yeast |
DOUGH
1¹⁄ | cups (7¹⁄ |
3¹⁄ | cups (12¹⁄ |
2 | tablespoons caraway seeds |
2 | tablespoons vegetable oil |
1 | tablespoon salt |
Cornmeal | |
1 | large egg white, beaten with 1 tablespoon milk |
1. FOR THE SPONGE:
Adjust oven rack to lower middle position and heat oven to 350 degrees; toast rye flakes, if using, on rimmed baking sheet until fragrant and golden brown, 10 to 12 minutes. Let cool to room temperature. Using stand mixer fitted with dough hook, mix flour, water, honey, yeast, and rye flakes, if using, on low speed until mixture forms thick batter; cover bowl tightly with plastic wrap and let sit until bubbles form over entire surface, at least 2¹⁄
2
hours. (Sponge can stand at room temperature overnight.)
2. FOR THE DOUGH:
Add all-purpose flour, 3¹⁄
4
cups rye flour, caraway seeds, oil, and salt to sponge and knead on low speed until smooth yet sticky, about 5 minutes, adding remaining ¹⁄
4
cup rye flour once dough becomes cohesive. With moistened hands, transfer dough to well-floured counter and knead by hand to form smooth, round ball. Place dough in large, lightly greased bowl; cover tightly with plastic and let rise at room temperature until doubled in size, 1¹⁄
4
to 2 hours.
3.
Generously sprinkle cornmeal on baking sheet. Transfer dough to lightly floured counter and press into 12 by 9-inch rectangle, with long side facing you. (For 2 smaller loaves, divide dough in half, then press each piece into 9 by 6¹⁄
2
-inch rectangle.) Roll dough toward you into firm 12-inch (or 9-inch) cylinder, keeping roll taut by tucking it under itself as you go. Turn loaf seam side up and pinch it closed. Turn dough seam side down, and with fingertips, seal ends by tucking them into loaf. Place shaped loaf (or loaves) onto prepared baking sheet, cover loosely with greased plastic, and let rise at room temperature until dough looks bloated and dimply, and starts to spread out, 1 to 1¹⁄
4
hours.
4.
Thirty minutes before baking, heat oven to 425 degrees. Brush egg white mixture over sides and top of loaf (or loaves). Using sharp serrated knife or single-edge razor blade, make six or seven ¹⁄
2
-inch-deep slashes on dough top(s). Bake for 15 minutes, then reduce oven temperature to 400 degrees and continue to bake until crust is golden brown and loaf registers 200 degrees, 15 to 20 minutes longer for small loaves and 25 to 30 minutes for larger loaf. Transfer loaf (or loaves) to wire rack and let cool to room temperature, about 2 hours, before slicing and serving. (Bread can be wrapped in double layer of plastic wrap and stored at room temperature for up to 3 days. Wrapped with additional layer of aluminum foil, bread can be frozen for up to 1 month. To recrisp crust, thaw bread at room temperature, if frozen, and place unwrapped bread in 450-degree oven for 6 to 8 minutes.)