Yoga for a Healthy Lower Back (27 page)
Read Yoga for a Healthy Lower Back Online
Authors: Liz Owen

Reclining Lower Back Meditation with Ocean Breath
Fold one blanket lengthwise and lay it down on your mat. Sit in front of the short end of the blanket with a few inches between the blanket and your hips. Bend your knees and place your feet flat on the floor. Place your hands on the floor behind your hips and slowly lie down, elongating your entire spine as you do so. Support your head on a second folded blanket. Take time to scan your body, especially your lower back, and make sure it's completely comfortable. If it is, straighten your legs along the floor and relax (
fig. 4.1
).
If your lower back isn't comfortable, however, lie down as you did in
Deep Hip Meditation
with your back flat on the floor, your knees bent and your feet flat on floor. Support your neck and head for extra comfort.
Direct the flow of your breath down through your chest into your lumbar spine and all the way into your hips as you inhale, and let it softly flow up from your hips to your chest as you exhale. Let it energetically caress and massage your lower back. Visualize your psoas and lower back muscles releasing tension and relaxing with each breath. Simply rest here for a few moments with mindful focus on the flow of your breath.
Visualize the flow of prana into your lower back, helping it come into its natural alignmentâa long, gentle, natural upward curve free of clenching or muscular gripping.
Deepen the flow of your breath into your lower back by bringing Ocean Breath, which you practiced in
chapter 1
into your practice on both your inhalation and exhalation. Ocean Breath, you may remember, is a soft, resonant, vibrational breath that comes from gently constricting the back of your throat.
When you practice it in this pose, remember the rule of thumb I use for breathing in my classes: “soft breath for a soft pose, strong breath for a strong pose.” Since this is a soft pose, create a subtle, soft vibration in your breath. Feel your deep inhalations lengthening and expanding your lower back, elongating the muscles, increasing the mobility in your joints, and gently stretching the myofascia. Visualize the soft, resonant vibration of your exhalation moving deeply into the muscle fibers, untying the physical knots in your muscles and allowing them to absorb fresh, new energy.
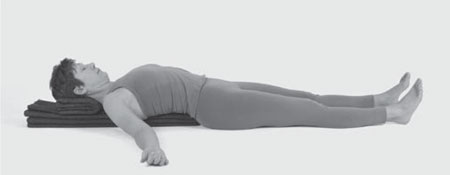
FIG. 4.1
As long as your body is comfortable, stay in Reclining Lower Back Meditation for five to ten minutes so you experience some therapeutic rest. Maintain Ocean Breath for as long as your breath's rhythm is smooth and soft. If your breath hardens or if you feel tension anywhere in your body, release Ocean Breath and rest in the pose with normal breathing.
Reclining Crescent Moon Pose
Lie on your back with your arms reaching over your head; take your hands all the way to the floor if you can. Engage the muscles of your legs and reach them away from your trunk. Your knees should face the ceiling and your feet and toes should point toward the ceiling. This is Reclining Upward Hand Pose.
Keeping your legs active and long, draw them to your left. Hold your right wrist with your left hand, and with an exhalation, draw your arms over to your left. Your shoulders, upper back, head, and hips should all remain on the floor. Reach your arms and legs as far to the left as both sides of your torso comfortably allow (
fig. 4.2
). Breathe into the right side of your waist and explore how this gentle stretch feels in your lower back. You will feel length in the muscles on the right side of your back and a gentle contraction on the left side. Use your breath to help open the right side of your trunk and lower back any amount, gently expanding it as you inhale and allowing muscles to release and relax as you exhale. Hold the pose for a few breaths and gently release your right arm. Bring your arms and legs back into Reclining Upward Hand Pose and repeat to your left.
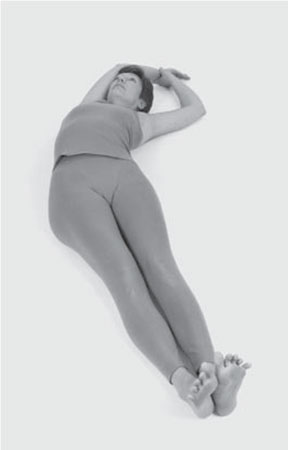
FIG. 4.2
Practice the pose to each side again, this time exploring the similarities and differences on the two sides. Is the stretch even on both sides? Is there more tightness on one side of the lower back than the other? Can you bend equally to the right and to the left, or is one side stiffer? Practicing this pose will give you information about the symmetry (and asymmetry) of your lower back.
If you have scoliosis, you will feel the obvious difference in the two sides due to the rotation of your spine. If you have a disk injury, you may feel that one side of the musculature is much tighter than the other. Even if you simply tend to hold stress and tension on one side of your body, the imbalance in your lower back muscles may be pronounced. Besides being an excellent tool for mindfully understanding your lower back, this is a helpful pose for releasing knots and scar tissue in the myofascia on the elongated side of your body.
Cow-and-Child's-Pose Flow
You practiced Cat/Cow Cycle in chapter 2 as a preparation for Big Hip Circles. In this sequence, Child's Pose takes the place of Cat Pose, because it brings your spine into a similar gentle upward arch in a more restful position. The movement from Cow to Child's Pose also gently massages your hip myofascia and abdominal organs, elongates the spinal muscles, and provides a moment of therapeutic rest before you move back into Cow Pose.
Step 1: Cow Pose
Start in Cow Pose; I'll review it here as a refresher. Kneel on all fours with your hands under your shoulders and your knees under your hips. Support your knees on a folded blanket and/or place a rolled towel under your ankles for comfort. Inhaling, lift your sit bones, collarbones, and the crown of your head upward while you draw your lower back down toward the floor. In this pose, you are bringing your lower back into extension, creating a concave (downward) arch in your lower back that elongates the front of your lumbar spine and its myofascia and increases the space between each vertebra. This allows the intervertebral disks to expand and open at the front of the spine. Move your middle and upper back in toward your front body also, so your whole back moves into
extension
. If your lower back is tight and overarched, take care to move slowly and gently into Cow Pose so you don't overdo the movement. Visualize each disk breathing and becoming a resilient and spongy cushion between the vertebrae.
Step 2: Child's Pose
Exhaling, gently draw your tailbone toward the floor and move your hips down onto your heels. While you move your hips down, draw your navel in and up toward your spine so your lower and middle back come into a gentle convex (upward) curve. Keep your hands in the same place you had them in Cow Pose so your arms and shoulders remain open. Now move into Child's Pose. If you can't place your hips on your heels, or if you have knee discomfort, place a blanket between your calves and thighs.
Now your lower back is in
flexion,
which elongates the back of your lumbar spine and increases the disk space between the back of each vertebra. Inhale into your lower back, visualizing length coming into all the muscles that tend to tighten up and contract. Feel the relief in your lower back as you exhale, your muscles give way, and your spinal muscles release.
See if you can fold forward enough to rest your chest on your thighsâthis helps bring space, and holistically speaking, energy into the area around your kidneys and adrenal glands. The flow of fresh blood and prana helps bring the organs into balance, and in turn they help to balance your blood pressure and nervous system.
Step 3: Cow-and-Child's-Pose Flow
Using mindful, deep breathing or Ocean Breath as your guide, slowly move back and forth between Cow Pose and Child's Pose six to eight times. Inhale as you come into Cow Pose and exhale as you move into Child's Pose. This gentle, flowing movement from spinal extension to flexion softens and loosens the lower back muscles. Visualize length and spaciousness coming into that liminal space between sacral vertebra S1 and lumbar vertebra L5 during both movementsâalong the front of the joint while you come into Cow Pose and along the back of the joint while you move into Child's Pose.
In each movement, let your inner eye travel up your lower back, visualizing each disk, until you reach the top of your lumbar spine at L1. As you mindfully move up through your lower back, notice where it feels comfortable or distressed. Is there one area that feels more compressed? Can you feel where the muscles are tired or weak? Are both movements comfortable, or does one or the other irritate your lower back? If that is the case, lessen the intensity of the movement until your lower back feels comfortable. You
will be able to move your spine fully in both extension and flexion as your back becomes more toned and flexible.
Practice for a Healthy Lumbar Spine
Reclining Spinal Twist
Stretch |
Supta Padangusthasana III
Spinal twists activate the deep back muscles and stretch the connective tissues that help realign and maintain a healthy spine. Begin this twist by coming into
Reclining Hand-to-Foot Pose
lying on your back, lifting your right leg, and holding your right foot with a belt. Now change the hold of the belt so you're holding it with your left hand. Take your right arm straight out to the right, laying it in line with your shoulder. Keep your right leg straight and walk your left hand up the belt until your left arm is straight. As you exhale, draw your right leg over to your left, lifting your right hip up off the floor as your leg twists to the left (
fig. 4.3
). Go slowly at first and observe your sacrum. If it grumbles or crackles with discomfort, untwist until you are comfortable.
If you can bring your right foot all the way across your body but not to the floor, use a chair or stacked blocks as supports. If your sacrum gives you a “thumbs up” for a full twist, take your right leg all the way over to the left, placing your foot on the floor or on a single block. For a full spinal twist, turn your head to the right, gazing at your right hand.
Enhance your practice by trying the following:
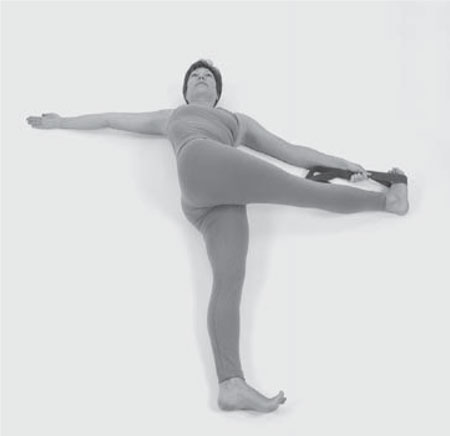
FIG. 4.3
â¢Â  Place your right hand on your outer right hip, press your hip up into your hand, then draw your hip away from your waistâthis lengthens the musculature on the right side of your lower back, and you may feel more stretch along your outer right leg. Breathe deeply into the stretch in your outer right hip and along your outer leg.
â¢Â  For an even deeper twistâif it's comfortable in your bodyâpress your right hip farther to the left with your right hand.
â¢Â  Spread your collarbones apart so your right shoulder and upper back remain on the floor and feel relaxed in the twist. If there is tension in either, support your right foot on a higher support.
â¢Â  Draw the tops of your shoulders down to the floor and draw your shoulder blades away from your neck. Then find the bottom tips of your shoulder blades and gently lift them up toward your front chest to help open and broaden your chest.
Visualize the action of the pose twisting and rinsing your spinal muscles (and your kidneys as well) and as you release the pose, visualize fresh blood and energy flowing into your lower back.
Seated Lower-Back Side Stretch
Stretch | Parshva Sukhasana