Yoga for a Healthy Lower Back (29 page)
Read Yoga for a Healthy Lower Back Online
Authors: Liz Owen

FIG. 4.8
your hands on the seat, and slowly walk your feet back until you feel a comfortable stretch in your trunk. You will probably feel a pretty good stretch in your hamstrings tooâthis is a good thing! As I mentioned in the beginning of this chapter, the tone of your hamstrings has a major effect on the health of your lower back. Bringing flexibility into your hamstrings and hips will help your lumbar muscles come into their natural alignment.
Variation 2: Dangling Down-Dog Pose
One of the best ways to release tightness in your lower back and balance your hips, sacral band, and the musculature along the sides of your spine is to practice Down Dog with the support of a belt around your hips. There are two ways to do it:
â¢Â  Ask a friend to wrap a belt around the base of your hips and then gently draw evenly back on the sides of the belt.
â¢Â  Wrapping a belt around any strong and stable support in your home (such as a support post in a basement or a sturdy banister) is worth trying, because it so effectively releases the gravitational pressure in your spine. Step into the belt. Lean your weight against it and bring your hands onto the floor or blocks. Walk your feet back until they are behind your hips, resting your heels up on a wall or banister posts if your heels do not reach the floor. Walk your blocks forward until you feel lightness in your hands and a release through your spinal muscles (
fig. 4.8
).
Deep Side Stretch Pose
Stretch and Strengthen | Parshvottanasana Variations
To set up for this pose, stand in the center of your mat and step your feet about four feet apart. Turn your left toes inward until they are at about a forty-five-degree angle to the right, and turn your right foot and leg ninety degrees to the right. Place a yoga block on either side of your right foot. Place your hands on your hips and turn your hips and torso to face your right foot. Balance your waist, chest, and shoulders evenly from left to right. Place one hand on your low abdomen and the other on your sacral joints. Drop your tailbone toward the floor and lift your front hip bones up toward your chest, bringing your hips into an upright and neutral position. This “neutral hip position” should be very familiar to you by now (for a refresher, see
chapter 1
).
Step 1: Half Deep Side Stretch Pose
With an inhalation, reach your arms over your head with your palms facing each other, and with an exhalation, bend your trunk forward over your right leg. The forward-bending action should come as much as possible from your hip joints, rather than from your middle or upper back. Reach your arms forward and then bring your hands to your blocks, or place your hands on the floor next to your right foot if your hamstrings are flexible. If your hamstrings are tight and it's difficult for you to reach the blocks while keeping your right leg straight, place your hands on the seat of a chair instead. Lift your trunk so it is parallel to the floor, with the front of your torso as long as possible (
fig. 4.9
). Draw your shoulder blades away from your neck and look forward, lengthening your breastbone and collarbones as much as possible.
Take a moment here to bring your hips into alignment with each other so your lower back can lengthen evenly on both sides. Place one hand on the back of your hips and adjust them so they are balanced. As in
Half Forward Bend Pose
, your back hips should be parallel to the floor so that your sacral joints are in natural alignment with your back hip bones. Stay here for a few breaths, feeling your lower back muscles lengthening as they get ready to come into a full forward bend. If you feel a strong stretch in your hamstrings, support your hands on more height. To come out of the pose, first place your hands on your hips, then lift your trunk back to an upright position. Rest for a few breaths. If your lower back feels comfortable, repeat the pose and move into the next step.
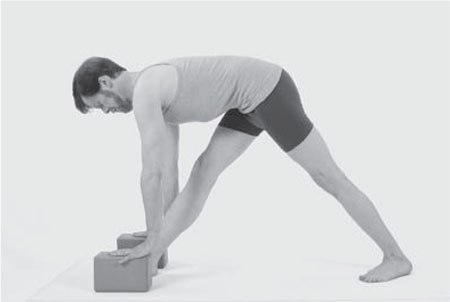
FIG. 4.9
Step 2: Deep Side Stretch Pose
Start in step 1. On an exhalation, draw your spine down toward your right leg. Visualize that one day your trunk will come to rest on your right leg with your chin resting on your shin. If you are very flexible, you might experience this restful position today, but be sure your hips are balanced as you bend. In the final pose, all your back muscles, especially those of your lower back, get a good stretch, as do the hamstrings of your front leg, the calf of your back leg, and your hips.
To come out of the pose, first, lift your trunk so it is parallel with the floor. Take your hands on your hips, and with an inhalation, lift your trunk to an upright position. Turn your feet to the opposite direction, and repeat the pose to your left.
Deep Side Stretch Pose is excellent for lower back issues because the actions of moving into and out of the pose both lengthen and strengthen your lumbar muscles. As you bend forward and come into spinal flexion, you stretch and release tension all along your lower back. As you come up and out of the pose, you strengthen the musculature as you lift yourself up. If your back feels comfortable, you can flow into and out of the pose three or four times on each side, but caution is advised in the case of disk injuries, arthritis, spinal stenosis, or spondylolisthesis.
Variation: Open-Heart and Standing Seal
When you feel stable and comfortable in Deep Side Stretch Pose, try a more challenging variation that will increase tone in the stabilizing muscles of your legs, hips, and spine, as well as stretching the pectoralis minor muscles on your upper chest. You'll learn a lot more about the upper chest and upper back in chapter 6, but it's appropriate to note here that tightness in these muscles pulls the shoulder blades away from the centerline of the spine, which rounds the upper back and weakens its musculature. Toning them contributes to proper alignment of the shoulder blades and the tone of the upper back.
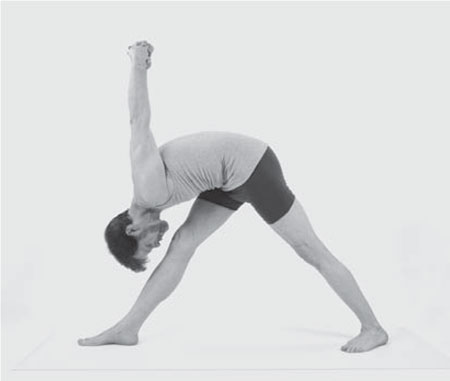
FIG. 4.10
Standing in the starting position, interlace your hands behind your back. Stretch your shoulders back and reach your arms toward your back foot, mindfully lengthening your lumbar spine by scooping your tailbone in and up. Lift up your chest and look up toward the sky as you inhale. Open your heart!
Bend forward from your hips on your next exhalation. Descend your trunk toward your front leg as you lift your clasped hands up toward the ceiling (
fig. 4.10
). Feel the energy of your body drawing inward as you come into a forward bend; imagine you have sealed your physical and mental energy within yourself as you folded your trunk down toward your front leg. Hold the pose for a few breaths, then inhale, elongate your trunk forward, and come back to an upright position. Repeat to the opposite side.
Half-Moon Pose
Stretch and Strengthen | Ardha Chandrasana
Half-Moon Pose is one of the most beautiful standing poses, with therapeutic benefits including toning and strengthening all the main movers and supporters of your legs, hips, spine (especially your lower back), and shoulder girdle. In the pose, you'll feel your back leg sweeping upward from the earth just like the curved outline of a half moon, while your arms stretch away from each other so your inner light pours forth from your heart.
You can practice Half-Moon Pose with or without support for your body. Since balancing in Half-Moon Pose can be a challenge, practice it first with your back body supported at a wall. Slowly move away from the wall as you learn to balance on your own.
Begin with your back body two to three inches from a wall, and take your legs four to five feet apart. Turn your left foot slightly inward and turn
your right leg all the way to the right, as you did for
Triangle Pose
. Place a block or chair against the wall, about a foot in front of your right toes.
Bend at your right hip and reach your trunk and right arm to the right, coming into Triangle Pose for a few moments. Feel your lower back elongating, and feel your hips as broad and open. Bend your right knee and place your right hand on your block or chair. Step your left foot to the right, sweep your left leg up, and stretch it straight. Feel your back body supported by the wall so you can stay in the pose for a few breaths without worrying about losing your balance (
fig. 4.11
).
Stretch your body from your left foot to the crown of your head, and from the tips of your right fingers to the tips of your left. Turn your torso up toward the sky any amount possible. Enjoy a feeling of openness in your hips, length in your spine, and a quiet, focused mind that brings you into a place of mental peace.
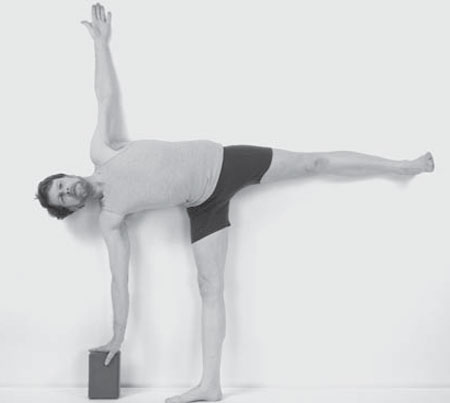
FIG. 4.11
Flowing Bridge Pose
Strengthen | Setu Bandha Sarvangasana Variation
You learned Bridge Pose and its one-legged variation in chapter 2 as ways to stretch and strengthen your hips. Bridge Pose is a multibenefit pose, so now you'll practice a flowing version of it with the intention of strengthening your lower back muscles. Please review the basics about coming into
Bridge Pose
, and set your body up in the same way.
With an inhalation, lift your hips up as far as you comfortably can. Lift up your lower, middle, and upper back, and as you move, lift your arms all the way up over your head to the floor (
fig. 4.12
). As you exhale, slowly bring your spine down to the floor, vertebra by vertebra, at the same time that your arms come back down to your sides. Repeat four or five times, and coordinate the movements of your hips, trunk, arms, and breath, so your body feels like a smooth, undulating flow of energy from your feet up to your hands.
The continuous movement of your spine into a backbend and then back down to the floor is very toning for the muscles in your lower back. If you have disk injuries, arthritis, or spinal stenosis, only lift your hips as high as your lumbar spine is comfortable. Over time you'll be able to lift up into a stronger backbend. Mindful movements are important here so that you don't overwork your shoulders, middle and upper back, or neck. Be sure to initiate your movements from the strength of your legs, your buttock muscles, and your abdominal core.
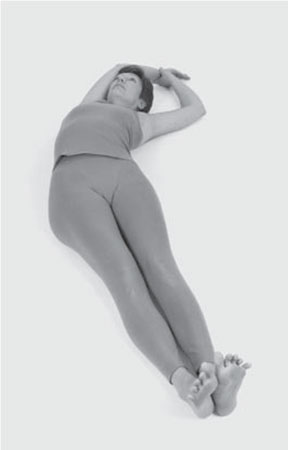
FIG. 4.12
Flying Locust Pose
Strengthen | Shalabhasana Variation 1
This pose is a wonderful strengthener for your lower back muscles. Before you try it, though, be sure your sacrum feels comfortable in
Alternate Arm/Leg Prone Backbend
and
Supported Locust Pose
, both of which you practiced in chapter 3. Also, now would be a good time to review “
Tips for Healthy Backbends
”.