Yoga for a Healthy Lower Back (46 page)
Read Yoga for a Healthy Lower Back Online
Authors: Liz Owen

Revolved Half-Moon Pose
Balance and Strengthen | Parivrtta Ardha Chandrasana
This is a beautiful pose that helps you develop balance as you give a deep twist to your spine and strengthen your lower back. I suggest you first practice it with your back against a wall, the same way you practiced
Revolved Triangle Pose
so that you first learn to elongate your trunk and spine without worrying about balance. You'll move away from the wall as your lower back gains strength and your body becomes stable. As with the previous pose, proceed deeply into the pose only when your lower back is ready.
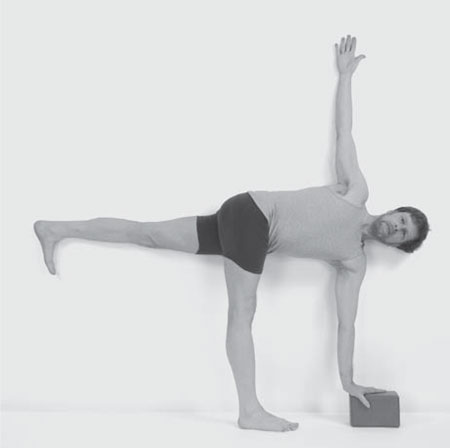
Begin in Revolved Triangle Pose with your left hand on either a block or a chair. Bend your right knee and step your left foot about twelve inches toward your right foot. Walk your block forward so your left hand is under your shoulder (or walk your hand along the chair).

FIG. 6.19
Inhaling, lift your left leg up until it forms a straight line with your trunk. Straighten your right leg (
fig. 6.19
). Breathe deeply, elongating your trunk and your left leg in opposite directions away from your hips with each inhalation, and deepen the twist with each exhalation. Be sure your head, neck, and shoulders are aligned with your spine, and gaze straight forward.
Remember the image of your trunk as a tornado, and summon the powerful, spiraling flow of energy so you can tap into and express your inner power.
To come out of the pose, bend your right knee, reach back through your left leg and place your left foot on the floor, coming back briefly into Revolved Triangle Pose. Lift your trunk up and unwind your spine. Repeat to your left.
You're almost ready to practice Wheel Pose. Before you attempt it, practice these two backbends from previous chapters in final preparation. If your body is feeling tired and Wheel Pose feels unattainable for now, end your sequence at Bridge Pose and proceed to the poses that follow Wheel Pose, before you rest in deep relaxation.
â¢Â Â
Supported Upper Back Stretch
â¢Â Â
Bridge Pose
Wheel (Upward Bow) Pose
Balance, Stretch, and Strengthen | Urdhva Dhanurasana
To practice Wheel Pose, it's important that you are very familiar with the instructions for
Bridge Pose
because the actions of Bridge Pose create both maximum support and length in your lower back. Caution with both Bridge and Wheel Poses is advised in the presence of spinal stenosis, herniated disks, spondylolisthesis, other spinal conditions, and some shoulder injuries.
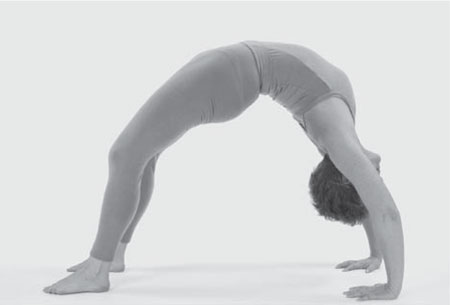
Come into Bridge Pose. Place your hands by your ears, palms down, with your fingers pointed toward your feet. Ground your feet and hands into the earth. Firm your legs and hips, scoop your tailbone up toward the sky to elongate your lower back, and engage your abdominal core muscles. Remember that the sacrum comes naturally into nutation in a backbendâit tips forward toward your front body relative to your hips and lumbar spine. Your job is to avoid excessive nutation, though. To do this, make sure that your whole spine lengthens and lifts toward your front body and that your abdominal core stays firm. Finally, create “helping hands” out of your shoulder blades, as we have throughout this chapter, to support and broaden your chest. Inhaling, lift your hips, stretch your arms straight, and lift your lower, middle, and upper back up any amount possible (
fig. 6.20
).

FIG. 6.20
Lift
is the operative word hereâeverything in your body except your hands and feet should elevate so you create an even arc, a curved and unbroken channel of energy along your whole spine rather than an intense, focused bend in your lower back. You may remember back in chapter 3 that I talked about your sacrum as the keystone of the bridge your hips form as they distribute weight from your trunk to your legs. Keep this in mind as you practice Wheel Poseâthe keystone of the arch is not your lumbar spine, it's your sacrum, the heart of your spine.
Visualize your spine as a luminous, graceful rainbow, each vertebra a vibrant pearl connected by Sushumna, Ida, and Pingala, the energetic channels of the spine.
Let your head release toward the floor so that your neck is long and comfortable, and gaze straight ahead. Hold Wheel Pose for five to ten seconds when you first start practicing it; slowly increase the time as you feel stronger. To come out of the pose, gently tuck your chin and lower your back body down to the floor, first onto the back of your head, then your shoulders and upper back, middle back, lower back, and hips. Make your journey out of the pose slow and gentle, maintaining the scoop of your tailbone so that your lower back elongates along the floor. Hug your knees into your chest for a few breaths and move your legs around to massage your lower back.
Wheel Pose can be a joyous experience that creates physical, mental, and emotional well-being. It lengthens tight and contracted spinal muscles, it helps to correct an exaggerated kyphotic thoracic spine, it opens the area around your heart and lungs, and it stimulates the Anahata (heart) chakra so that it's fully expansive and expressive. After practicing it, your body should feel buoyant and aliveâcongratulations!
When you're done practicing Bridge Pose or Wheel Pose, take time to release and relax your back. Finish your practice with two or three of the following poses to release your spinal muscles:
â¢Â Â
Free-Your-Sacrum Pose
â¢Â Â
Reclining Hip Twist
â¢Â Â
Happy Baby Pose
â¢Â Â
Restorative Twist Pose
â¢Â Â
Decompressing Forward Bend
â¢Â Â
Wide-Legged Standing Forward Bend
â¢Â Â
Restorative Cleanser Pose
TIPS FOR A COMFORTABLE WHEEL POSE
Wheel Pose can be easier said than done, so here are some suggestions to help you create comfort, lift, and space in your lower back (and the rest of your body) as you practice it:
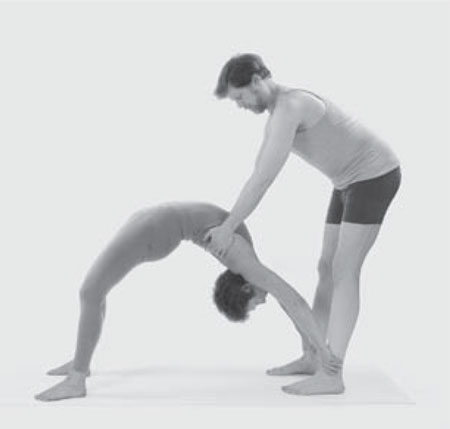
â¢Â  Hold on to a partner's ankles and have your partner support your shoulder blades, literally offering the “helping hands” I've described in this chapter (
fig. 6.21
). This is especially helpful for opening tight shoulders and straightening the arms.
â¢Â  Place the short end of two blocks against a wall with the blocks in the “low” position, about shoulders' distance apart. Place your hands on the blocks and lift up into the pose. This helps lift the middle and upper back.
â¢Â  Come onto your tiptoes to lift your hips as much as possible, then lower your heels while you maintain the height in your hips.
â¢Â  Belt your thighs or hips to help protect a tender lower back (see
Bridge Pose
instructions).
â¢Â  Try a standing version of Wheel Pose: Stand about three feet away from a wall in Mountain Pose, with your back facing the wall and your feet hips' width apart. With a deep inhalation stretch your arms up over your head and as you exhale, bend your knees slightly and reach your hands back to the wall. Press your feet down strongly, engage your leg, hip, and abdominal core musculature to protect your lower back, and lift your chest as high as possible. Feel your middle and upper back arching back into a beautiful bow. Inhaling, reach your arms back up to the ceiling and bring yourself back to Mountain Pose.

FIG. 6.21
Child's Pose and Deep Relaxation
Rest | Balasana and Shavasana Variation 1
You're now ready for a luscious, soft, restful Child's Pose! Make yourself completely comfortable, using any supports that help you completely relax your entire body (see
chapter 2
for ideas). Once you're settled, visualize your whole spineâeach vertebra, from the base of your sacrum to top of your cervical spine, and all the surrounding musculature and myofasciaâsurrendering into your supports and into the earth. Visualize Ida, Pingala, and Sushumna, the channels of energy that surround your spine, as completely open, and see if you can sense awakened Kundalini energy gracefully flowing through those channels, enlivening and nourishing each cell of your spine.
When you're ready to come out of soothing Child's Pose, rest completely in the deep relaxation described
earlier
.
7
W
E HAVE JOURNEYED TOGETHER
through your entire back body, and you now have a lot of tools and resources for releasing and quieting pain in your lower back. Hopefully you have discovered new sources of strength, flexibility, and balance in your body. But your journey doesn't stop here! You are now ready to maintain your healthy lower back in ways that will keep your practice fresh and relevant to the realities of your life . . . without consuming too much of your time.
There are a number of reasons your lower back might start to slip into old patterns of pain and tension. Some of the biggies are becoming emotionally stressed, physically exhausted, or overly sedentary, spending too much time in front of a computer, or overexerting yourself in ways that can tweak an old injury or flare a condition.
When you notice any of these things in your life, don't despair that you've undermined or undone all the progress you've made toward a healthy lower back. Instead, use the same technique you use when you notice your thoughts wandering or spiraling during a meditation practiceâsimply give yourself a gentle reminder to come back to your center.
To help, I've drawn from the poses you learned in this book to create sequences for the five common scenarios I described above. These can supplement your regular yoga practice, or take its place if the day calls for it.
Experiment with these sequences to see how the poses might feel different from when you practiced them with your attention on a particular area of your back. Can you use your yoga to bring health and vitality to your emotional body in a time of stress, or to release a tense day of computer work, or recover from a physically taxing experience? Once you find out what works best for you in these situations, you can let go of the anxieties and self-doubt that often accompany anything that feels like a “setback.”
During your practice, rest in Child's Pose at any time when your back feels fatigued. Be sure to rest in Deep Relaxation for three to five minutes at the end of any practice.
Calming Sequence for Stress
Stress is the great scourge of modern life, and you can't help but experience its reality in your day-to-day. But you know the difference between a “normal” stress level and when stress starts to take on a life of its own, building in your body and sabotaging your healthy habits. The following calming sequence can help it.
In this sequence, you will release muscle tension in your neck, upper back, shoulders, lower back, and hipsâsome of stress's favorite gathering places in the body. Breath practices, especially Ocean Breath with an elongated exhalation, will start to restore balance to your nervous system, calming your mind as your body starts to let go. These poses use gentle movement to counter the sharpness of stress and anxiety. See if you can find a quiet, inward focus in this sequence, letting go of agitation and an overactive mind.