Yoga for a Healthy Lower Back (42 page)
Read Yoga for a Healthy Lower Back Online
Authors: Liz Owen

Studies have shown that mindfully holding your breath and elongating your exhalation when you practice Ocean Breath can actually deepen the feeling of a calm and quiet mind.
35
Sit quietly and observe how
your
mind has changed during this meditation and pranayama practice, and reflect on the power of your breath, the kumbha of your chest, and your whole body.
Y
OGA
P
OSES FOR A
H
EALTHY
M
IDDLE
B
ACK,
U
PPER
B
ACK, AND
N
ECK
Ask and Listen: Preparation for Practice
Passive Chest Opener
This is a supported position that stretches the pectoral muscles (your “pecs”), which run across the upper chest. When these muscles are tight, two things happen: They rotate the head of the upper arm bones forward and inward, resulting in rounded shoulders and a collapsed chest, and they pull the shoulder blades away from the centerline of the spine and forward, which causes an exaggerated kyphosis of the upper back and weakened upper back myofascia. Passive Chest Opener is particularly effective for an exaggerated kyphosis and a tight upper chest or shoulder girdle.
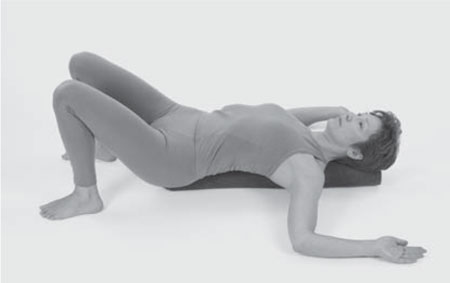
Open up a blanket so it's between three and four feet in length, or as long as your body is from your tailbone to the crown of your head. Roll it up tightly along the long side so it's very firm. It's important that the roll be narrowâif it's too wide, you won't feel a stretch across the front of your chest. Place the roll lengthwise on your mat. Sit on one end of the roll with your feet flat on the floor and lie down on it; your entire trunk and head should be supported by the roll (
fig. 6.1
). A four-inch foam exercise roller is also an excellent prop for this exercise and can be used instead of a blanket.

FIG. 6.1
POSES FOR YOUR OPEN CHEST
Passive Chest Opener increases broadness across the upper chest and increases the range of movement in your upper back. You'll feel how it helps in poses where your shoulders are in extension (when your arms move back and away from your body). We've done several so far, and we'll add more later in this chapter:
â¢Â  Bridge Pose
â¢Â  One-Legged Bridge Pose
â¢Â  Open Heart and Standing Seal Variation of Deep Side Stretch Pose
â¢Â  Bow Pose
â¢Â  Camel Pose
Stretch your arms out at a ninety-degree angle from your trunk and rest them on the floor with your palms turned up to the ceiling. Draw your shoulder blades away from your ears using the lower trapezius muscles at your middle back, and press them toward your front body, feeling those “helping hands” support and broaden your chest.
Now bring your arms into “Cactus Pose” by bending your elbows and pointing your forearms and hands in the same direction as your head. Your forearms should be at a ninety-degree angle to your upper arms. Place your forearms on the floor, if possible, pressing your elbows down first, then your forearms and hands. If you want more stretch, add more height under your trunk.
Close your eyes and breathe deeply into your upper chest. Feel the layers of myofascia releasing tightness, allowing your chest to soften and broaden. Stay in the pose for five minutes, or longer if you are comfortable. To come out, turn to your side, rolling off your support, and bring yourself up to a seated position. If you have a shoulder injury, approach Passive Chest Opener with respect; it can be a surprisingly strong stretch for a “passive” pose.
Supported Upper Back Stretch
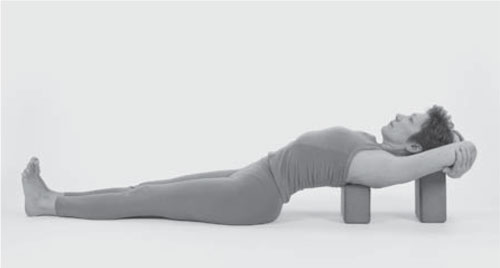
Place one block across your mat on its long edge, so it is at its “medium” height. Place another block about six inches behind it on its short end, at “high” height. Sit on your mat with your knees bent and your feet flat on the floor, reach back with your hands and hold the first block. Lay your upper back onto the block, making sure the block is underneath your shoulder blades and not your lower back. Place your head on the higher block. Hold your elbows and reach your arms over your head (
fig. 6.2
), or place your forearms on your forehead if you have a shoulder injury.
Check in with your body for a few breaths to make sure it's comfortable. If your lower back is uncomfortable, turn one or both of your blocks down to “low” height. If your upper back is flexible and you'd like more stretch, turn the block under your shoulder blades up to “high” height. Make sure your neck is in complete comfort, and add a blanket on top of your block for higher support. Finally, scoop your tailbone up toward your pubic bone to elongate your lower back, and stretch your legs straight down along the floor.
Let your upper back elongate along the block. Supported Upper Back Stretch helps lessen an exaggerated kyphotic thoracic spine. Visualize each vertebrae moving away from the one below it as the muscles elongate. Close your eyes and breathe deeply into your upper chest, feeling stretch and length. Remember the image of your chest as a chalice, and let your chest become a sacred vessel for holding prana.
Stay in the pose for five to ten minutes. To come out, engage your abdominal core muscles and press your hands down into the floor to help protect your spine as you lift your trunk back up into a sitting position.

FIG. 6.2
Neck Meditation
Practice Neck Meditation often to gently release tension and increase the range of motion in your neck. If you have a neck injury, proceed slowly and with caution.
Lie on your back with your arms reaching straight out from your shoulders and your palms facing upward. Draw your shoulder blades away from your neck, press them toward your front body to open your chest and ground the tops of your shoulders. Center your head and neck on the centerline of your body and make sure that the back of your neck is long. If your shoulders are rounded upward and your head tilts back, support your head on a folded blanket. Rest your legs along the floor or bend your knees for lower back comfort.
With your next exhalation, turn your head to the right, making sure it is rotating around the axis of your spine and not tilting up or down. Your gaze should be toward your right hand. It's sometimes helpful to lift your head slightly, turn it, and then put it back down. You should be resting on your right ear. Use each exhalation to turn your head farther. Be an observer in this meditation and find out what the range of motion is in your neck. Inhaling, bring your head back to center, and repeat to the left. You might find a surprising difference from side to side!
Bring your head back to center and stay there for a few breaths; give your neck time to receive the gentle stretch of Neck Meditation.
Practice for a Healthy Middle Back, Upper Back, and Neck
Seated Neck-Stretch Sequence
Stretch
This sequence of neck stretches will gently but actively stretch the neck musculature that I outlined earlier in the chapter so that when you move into yoga poses, your neck will be a little looser and more comfortable. These aren't yoga poses per se, but their movements are incorporated into many poses. Approach them as you would any yoga practiceâwith mindful attention, deep and conscious breathing, and self-awareness. An extra measure of caution is appropriate if your neck is tight or if you have an injury.
Active neck stretches can be intense. Hold each stretch for only a few breaths in the beginning. Proceed slowly into deeper stretching. Most of the stretches use gentle pressure of your hands to deepen the stretch. You may choose not to do this if the stretch feels too strong; in that case simply touching your fingertips to your skull can feel stabilizing for your neck and head.
Side Neck Stretch
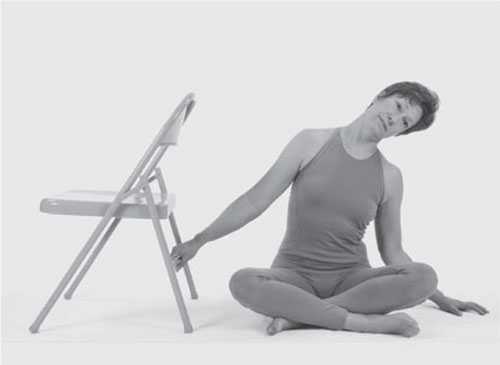
You'll need a chair, and a folded blanket if you like to sit on height for more support to your lower back. Sit in cross-legged position on your mat or blanket. Place the chair to your right, about eighteen inches from your body, and make sure the chair is on your mat so it doesn't slide when you're in the stretch. Hold the bottom rung of the chair with your right hand.
Lean to your left until your right arm is straight, almost to the point of being taut. Tilt your left ear down toward your left shoulder (without raising either of your shoulders) and make sure you're not rotating your head (
fig. 6.3
). Your eyes should gaze straight forward. Breathe into the right side of your neck and feel a good stretchâyou're bringing fresh blood and energy to your upper trapezius muscles. Let your exhalations guide you farther into the stretch. For a deeper stretch, take your left hand over your head to your right ear and gently draw your head farther to the left.
Release the pressure of your hand for a few seconds, turn your eyes down to the floor, and draw your nose toward your left shoulder. Press your fingers into the back right side of your skull to go deeper into the stretch. When you feel a stretch that starts behind your right ear and goes down your neck toward your shoulder blade, you've found your levator scapulae muscle. You can gently move your head until you find the perfect stretch for your neck. Keep your hand lightly on your skull as you bring your head up and into alignment with your spine, then repeat to the left.
Back Neck Stretch
Sit up tall with your head aligned with your spine. Tuck your chin slightly and draw it gently back toward your neck; you should feel the back of your neck lengthen. Exhaling, drop your chin down toward the top of your breastbone, making sure you keep your chest lifted. Move your chin more deeply with your exhalations, feeling the muscles at the back of your neck lengthen and release.
To deepen the stretch, place your fingers on the base of your skull (occiput), and press your chin farther down (
fig. 6.4
). You should feel a stretch to the upper trapezius muscles along the back of your neck and the tops of your shoulders. Keep your hands gently resting on the base of your skull as you lift your head back to an upright position.

FIG. 6.3
Front and Side Neck Stretch
Draw your shoulder blades away from your neck and envision those “helping hands” press them forward yet again. Place your fingers along the muscles of your neck and lengthen your neck upward. Then tip your head back, envisioning your cervical spine coming into a graceful arch. Take your head as far back as your neck comfortably allows, then slowly release your hands. Hold the base of your skull (occiput) while you tip your head back and draw it away from your neck, then release your hands and tip your head as far back as you comfortably can (
fig. 6.5
). Open your mouth as wide as possible to tip your head even farther back. See if you can maintain the position of your skull while you slowly close your mouth.
With your head tipped back, take your left hand to the right side of your forehead and draw your left ear toward your left shoulder. Your gaze should be upward. You should feel a stretch along the front right side of your neck at the long, thick sternocleidomastoid (SCM) muscles we discussed earlier; perhaps you can also feel a stretch to the scalenes, which sit underneath the SCMs.
36
Keeping your fingers resting on your forehead, slowly bring your head back to the center. Repeat on the opposite side.