Building Web Sites All-in-One For Dummies® (33 page)
Read Building Web Sites All-in-One For Dummies® Online
Authors: Claudia Snell

The Advanced button
Check out the Advanced button near the bottom of the New dialog box. When you click this button, you find settings for Color Profile and Pixel Aspect Ratio. These are important if you're working in print or video design.
Color Profile
helps you set up your document so that it can communicate colors more accurately. (Go ahead â click it to check out the options.)
Pixel Aspect Ratio
is for setting up graphics for use in video. If you click that drop-down menu, you see many options as well. Video likes pixels that are rectangular. Different projects have different needs, so you have several options. For Web design, you want square pixels.
Another way to start a new workspace is to open a graphics file by choosing FileâOpen, browsing to the image that you want, and then selecting it. Click Open. When the file opens, the image is in a layer called Background. We discuss layers next.
Layers and the Layers panel
One of the most important panels is the Layers panel. The elements that make up your graphics are held in
layers,
which you can think of as sheets of paper stacked one atop another. The big difference between layers and actual sheets of paper is that the layers can interact with each other. Some layers can be transparent so that layers underneath show through, or you can use
blend modes
(layer attributes that specify how a layer interacts with other layers below it) and
opacity
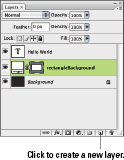
(the degree to which an object is not transparent) to blend the elements of your graphics. Figure 4-4 shows the areas of the Layers panel, and the following list gives you a crash course in working with layers:
â¢
Create a new layer
by clicking the Create New Layer icon.
â¢
Duplicate layers
by using any of these methods:
⢠Select the layer you want to duplicate and then press Ctrl+J (Windows) or
Ã
+J (Mac).
⢠Right-click the layer you want to duplicate and then choose Duplicate.
⢠Click the layer you want to duplicate and then drag down to the New Layer icon.
â¢
Reorder layers
by dragging them higher and lower in the window: Click a layer that you would like to move in the stacking order and then drag it up or down the stack.
â¢
Create new layers
by using the Text or Shape tool, as follows:
a. Click the Text tool (the large T in the tool panel).
b. Begin typing in the workspace.
The text appears on its own layer.
â¢
Delete a layer
by selecting the layer to be deleted and then clicking the Delete Layer icon (looks like a trash can).
â¢
Make a layer invisible
by clicking the corresponding eye icon for the layer you would like to make invisible. To make it visible again, click the empty box where the eye icon used to be. (The eye disappears when the layer is invisible.)
Figure 4-4:
The Layers panel and its many features.

Tools and the tool panel
In this section, we look at the most commonly used tools. Like with other features we introduce to you, we recommend that you experiment with these tools to get an idea of how they work.
Photoshop files and keeping editable copies
When you create a new document in Photoshop, the file saved by Photoshop is a PSD document by default, which contains all your layers and editable text (as long as you don't convert or rasterize the text). See the “Bitmaps versus vector images, Part 2” sidebar in this chapter for information about rasterizing. Make sure you keep a copy of your original PSD files so you can quickly make changes or build new graphics based on the originals. After you save a graphic as a Web graphic file, you can't edit certain elements, such as text, in the file. Without the editable file, you might not be able to make changes to your graphics at all. At the very least, a simple task will be much more difficult and time consuming. On the other hand, on some occasions, you must rasterize text. If, for instance, you create a graphic with a special font and you intend to pass the Photoshop file to someone who doesn't have that font on their machine, you need to rasterize the text (make it into a graphic layer). Otherwise, the other machine substitutes a different font for the one you used. Make sure you keep a copy of the original PSD file for editing, though.
Selection tools: Marquee, Lasso, and Magic Wand
The Marquee, Lasso, and Magic Wand tools select areas of a layer to be affected by filters or effects. They also help you work on a specific area of a layer without affecting areas you don't want to touch.
⢠The
Marquee tool
gives you a rectangular or elliptical marquee. With the marquee tools, you select an area of your graphic. Depending on which version of the tool you select, the selection will be rectangular or rounded.
⢠The
Magic Wand tool
selects everything in your graphic that matches the color you click with it.
⢠The
Lasso tools
allow you to make customized selections. You can click around an area and create a selection of any shape with the Lasso tools.
 Click the small black triangle in the lower-right corner of any tool icon to see the variations of the tool, like Rectangular Marquee or Elliptical Marquee. Many tools have different versions. You can tell which ones do by looking for the little black triangle. When you click it, the other versions pop out as a mini menu with icons. You can then select which version of the tool works best for the task at hand.
To use a selection tool, select the layer you want to work on and then select the tool that will work best for what you're doing. (See the previous list.) Then take the appropriate action based on the tool you chose.
â¢
Marquee tools:
Click and drag over the area you want to select.
â¢
Magic Wand tool:
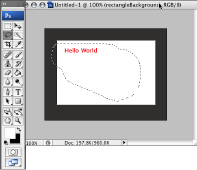
Click an area that's the color you want to select, and your selection appears as a dotted line around the selection. The dots, often described as
marching ants,
move along the line (see Figure 4-5 for an example) â the marching ants appear around all selections regardless of what tool made them.
â¢
Lasso tools:
Click along the edge of the object you want to select. Make sure you go all the way around, and then end by clicking the start point: In effect, you “draw” a complete container around the object you'd like to select.
Figure 4-5:
Making a selection with the Lasso tool.

Playing with layers
If you haven't worked with layers much, follow these steps to get started playing with blend modes and opacity to see what the different settings do:
1. Open a photo image.
2. Duplicate the layer. (See instructions in the “Layers and the Layers panel” section of this chapter.)
3. Select the top layer and then select a blend mode from the drop-down menu at the top of the Layers panel.
By default it will have Normal selected; when you click the menu, you see the other options, such as Multiply, Lighten, Darken, and Soft Light (to name a few).
4. Experiment with the different blend modes to see what they do.
You can also make multiple duplicate copies, use different blend modes on each, and then change the layer order or opacity on the different layers.
Undo the changes via the History panel, which shows a list of the actions you did in the file. Open this by choosing WindowâHistory. To step backward, select the step in your process you'd like to go back to.
Remember:
As long as you keep at least one layer that holds the original image, you can always delete layers that don't look so good.
The Move tool
Use the Move tool to (what else?) move elements of your artwork around the work area. You just select the layer that holds the artwork you'd like to move, and then click and drag inside the work area window until the element is where you want it.
 Interested in more precise movement? To move objects 1 pixel at a time, select the layer that contains the object you'd like to move, select the Move tool, click anywhere in the work area, and then use the arrow keys on your keyboard. To move an object 10 pixels at a time, hold down the Shift key while pressing an arrow key.
When you use the Move tool in conjunction with the Align icons, you can align multiple objects at once; just follow these steps:
1.
Select the layers you want to align by pressing and holding the Ctrl key (Windows) or
Ã
key (Mac) and clicking each layer.
2.
Click the Move tool.
3.
Click the appropriate Align icon (located at the top of the screen; see Figure 4-6).
Figure 4-6:
The Align tool helps you line up elements in your design.

The Crop tool
Use the Crop tool to cut down your file and remove any extra space floating around the main subject area. You can use the tool freehand-style by selecting it and then clicking and dragging a box around the area you want to keep. You can adjust the box (if you need to) and then press Enter/Return. The entire document is cut down to the size of the selected area.