Building Web Sites All-in-One For Dummies® (55 page)
Read Building Web Sites All-in-One For Dummies® Online
Authors: Claudia Snell

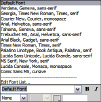
When you create Web pages and specify a font, you can specify the default and alternate fonts for a block of text. If the user doesn't have the default font installed on her machine, the HTML page displays one of the alternate fonts. Fortunately, you don't have to hand code the alternate fonts. When you use an application like Dreamweaver, you can choose a set of fonts from a pop-up menu. (See Figure 1-6.)
Figure 1-6:
Vote your choice!

Just when you think it's safe to make an educated choice, there's another issue to contend with: Web browsers. When you use
pixels
(the default unit of measure for text), your text looks fine in the Internet Explorer Web browser. However, if you view the same page in Mozilla Firefox, the text appears smaller. The solution is to use points as the default unit of measure for text. Then your text will display correctly in all browsers.
 Use a CSS (Cascading Style Sheet) to specify the parameters for text. This saves you from individually formatting each block of text you add to a Web page. For more information on using CSS to specify text, see Book III, Chapter 3.
Print to Web: Making Your Web Site Work with Existing Materials
What came first, the Web site or the bricks-and-mortar business? In most instances, the bricks-and-mortar business. When this is the case, you need to incorporate as many elements as you can from the client's bricks-and-mortar business on his Web site. The obvious way to do this is to use the client's printed materials as a prototype for your Web design.
When you're thinking about design elements for your client's site, start with the client's logo. That needs to be displayed prominently on every page of the site. If the client has a letterhead with his logo, you can use this as the basis for the site banner. If the client doesn't have a letterhead, use elements from her business card. Figure 1-7 shows a business card for a business coach and the Web site that was designed using elements from the business card.
Figure 1-7:
A Web site design using elements from a client's business card.

Understanding Image Formats for Web Design
When you use images on a Web site, you have two things to consider: the image format and optimization. When you get all these factors spot on, you have a crisp-looking image that loads quickly and looks the same in any Web browser. If you get it wrong, you either have an image that loads at the speed of light but looks horrible, or you have an image that looks absolutely gorgeous but takes three forevers to load. In the upcoming sections, we discuss the image formats used in Web designs plus the uses and limitations for each.
Using the GIF image file format
An image saved as a GIF (Graphics Interchange Format) file comprises 256 (8-bit) colors. Images saved with the GIF format can be viewed on all current Web browsers. The GIF (pronounced
giff
or
jiff
) image format is commonly used for images with large areas of solid color, such as logos, or graphic symbols, such as buttons. This file format also works well when the banner is predominantly text. The banner image for the Web page in Figure 1-8 is a GIF image.
The resulting file size of the image depends on how you optimize the image. When you
optimize
a GIF image, you specify the number of colors with which the image is saved and the color reduction algorithm. The goal is to optimize the image so that it still looks good and loads quickly. Find out more about image optimization in Chapter 4 of this minibook.
Figure 1-8:
A GIF image at work as a banner.

GIF images also support transparency. This option is useful when you're displaying text over a background image. When you create the image, use a background color similar to, or the same as, that of the background image for the Web page.
_fmt.jpeg) Don't use the GIF format to save photorealistic images with millions of colors. The restrictive color palette degrades the image quality. If you use
Don't use the GIF format to save photorealistic images with millions of colors. The restrictive color palette degrades the image quality. If you use
dithering
(where colors from the 256 color palette are mixed to create a reasonable facsimile of a color not in the palette), the file size is too large for practical use in a Web page.
Using the JPEG image file format
The JPEG (Joint Photographic Experts Group) file format is ideally suited for photorealistic images with millions of colors. The original JPEG (pronounced
JAY-peg
) format also has a derivative known as
JPEG 2000,
which features better image compression that results in smaller file sizes. Unfortunately, JPEG 2000 is not supported by all browsers. The JPEG format does its magic by compressing images. When you compress an image, data is lost; therefore, the JPEG format is known as a
lossy
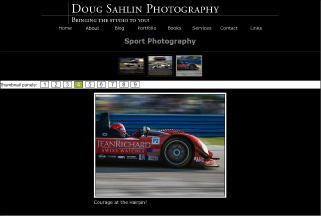
format. Figure 1-9 shows a JPEG image from a photographer's Web portfolio.
Figure 1-9:
The JPEG format is ideally suited to photographs.

The image quality is determined by the amount of compression you apply when saving the image. The ideal compression depends on the amount of detail in the image and the size of the image in the Web page in which you'll insert it. If the image is small without much detail, you can apply higher compression to the image. If the image takes up a large portion of the Web page and contains a lot of detail, you'll have to apply less compression to the image. Otherwise, the detail will be muddy, and the image won't be crisp. Fortunately, most image-editing applications, such as Fireworks and Photoshop, have options that enable you to compare the original image side-by-side to a version of the image with compression applied. The details about image optimization are in Chapter 4 of this minibook.
 If you have an image with a lot of text, saving the image in the JPEG format will result in text with jagged edges. This is because of the text anti-aliasing blending the edges of the text with the surrounding image. The best way to overcome this is to use an image-editing application (such as Fireworks) that enables you to slice an image into sections and then save them in different formats. Save the sliced sections with text in the GIF format and the rest of the image as JPEG files. When you optimize the image, make sure you specify enough colors; otherwise, you'll see jagged edges where the anti-aliasing blends the font to the background.
Using the PNG image file format
The PNG (Portable Network Graphics) format was originally designed to replace the GIF format. For graphics such as buttons and banners, you can save a file using PNG-8 format, which results in an 8-bit file that supports transparency. When you're working with photorealistic images with millions of colors, you can save the files using the PNG-24 format, which saves the file with millions of colors.
The best feature of the PNG (pronounced
ping
) format is that it uses
lossless compression,
similar to the LZW (Lempel-Ziv-Welch) compression used when compressing files saved as TIFFs (Tagged Image File Format). This results in a good-looking graphic with a relatively small file size. The drawback to the PNG format has been differing levels of support by popular Web browsers. Current browsers offer better support for the PNG format, but there are still issues when PNG files saved with transparency are displayed.