Building Web Sites All-in-One For Dummies® (96 page)
Read Building Web Sites All-in-One For Dummies® Online
Authors: Claudia Snell

Figure 2-1:
HTML newsletters requested by the customer are not spam.

Creating an E-Commerce Site
After you brainstorm with the client to get his grand vision and consider usability and technology, you're ready to begin designing the site. Setting up an e-commerce site isn't rocket science, but keep in mind that some design elements are critical and unique to e-commerce sites. For example, commercial Web sites need e-mail addresses that are associated with the domain. An e-mail address with an actual domain name other than a generic ISP service, such as AOL, lends credibility to the e-commerce business. And of course, there's the matter of how to pay for the goods. In the upcoming sections, we show you how to add these components to your e-commerce design and more.
Setting up the e-mail addresses
Most visitors to e-commerce sites don't feel comfortable sending an e-mail to an address like
[email protected]
. It just doesn't seem very professional to have an e-mail address that's not associated with the domain from which the goods are being sold. In most instances, you set up the e-mail addresses through the Web hosting service's control panel. Each Web hosting service is different, but the following shows an example of how this works.
1.
Log in to your Web hosting service's control panel.
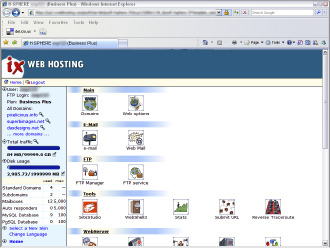
This is a secure part of the server's site. You need a user name and password to access the control panel. This information is generally included with the e-mail confirmation after you set up a hosting account. Figure 2-2 shows an example of a control panel.
2.
Click the e-mail link.
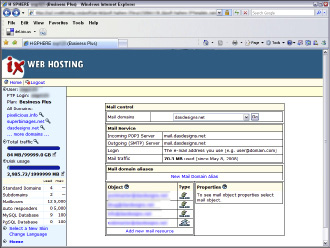
This section of the control panel enables you to add and edit e-mail addresses associated with the domain. An example of the e-mail section of a control panel is shown in Figure 2-3.
3.
Click the link to add a new e-mail address.
The control panel refreshes and shows the options available for setting up new e-mail accounts. You have several options from which to choose. Your best option is to set up a mailbox. Doing so means that you or your client has to configure her e-mail client to accept messages from the new mailbox.
Your other option is to forward mail from the domain to an existing e-mail address. The problem with this option occurs when your client needs to respond to a customer. That's right, the response is from the existing e-mail address, and not the new e-mail address with the client's domain name. A response from
[email protected]
? Not very professional.
Figure 2-2:
You use the control panel to manage the Web site.

Figure 2-3:
Most hosting services enable you to configure e-mail addresses.

4.
Choose the desired option.
The control panel refreshes and contains the necessary screen to set up an e-mail address and password. Figure 2-4 shows the typical screen for setting up a new e-mail address.
Figure 2-4:
Creating a new mailbox.

5.
Set up other mailboxes as needed.
Most Web hosting services enable you to set up a plethora (more than 2, fewer than 51) of mailboxes. This enables the savvy designer and client to make the company behind the Web site seem larger than it actually is. You can set up multiple mailboxes, such as
info@
mywebsite
.com
,
sales@
mywebsite
.com
,
service@
mywebsite
.com
, and so on. The customer never needs to know that only one person is responding to the messages.
Selling items with a PayPal account
If your client prefers to dip a toe in the e-commerce waters, she can save considerable money by accepting payments with a PayPal account. As we mention in Chapter 1 of this minibook, the rates are reasonable. All you need is a bank account and an e-mail address to set up a PayPal account. After the account is set up, you can accept payments online. Adding PayPal Add to Cart buttons to any Web page you create in Dreamweaver is a breeze, thanks to a free plug-in from WebAssist (
www.webassist.com
). To add PayPal Add to Cart buttons to a Web Page, do the following:
1.
Navigate to
www.webassist.com/professional/products/ProductDetails.asp?PID=18
.
As of this writing, this is the URL from which you download the free PayPal eCommerce Toolkit 4.5.1 for Dreamweaver.
2.
Download and install the plug-in.
The plug-in,
PayPal451.mxp
, is a Dreamweaver extension. By default, it's downloaded to your desktop.
3.
Launch Dreamweaver and then choose Commands
â
Manage Extensions.
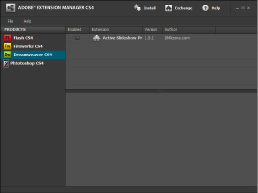
The Adobe Extension Manager CS4 dialog box appears (see Figure 2-5). This dialog box is used to manage all extensions for all Adobe CS4 applications you have installed on your computer.
Figure 2-5:
Manage extensions with the Adobe Extension Manager CS4.

4.
Click Install, navigate to and select the
PayPal451.mxp
file, and then click Open.
You have to accept a disclaimer that the extension is not an Adobe product and that Adobe does not warrant or support the extension. Don't be put off by this: The PayPal extension is a proven performer. Adobe is just dotting every
i
and crossing every
t.
Their lawyers wouldn't have it any other way. After you accept the disclaimer, the extension is installed.
5.
Close the Adobe Extension Manager CS4, exit, and then restart Dreamweaver.
The extension won't work until you do.
6.
Create the page from which the customer will check out.
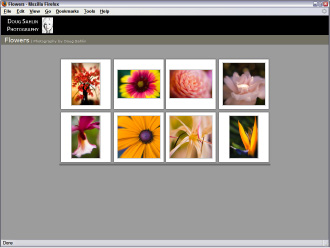
You have a lot of flexibility here. Many Web designers create a page where several products are displayed along with a description. The Add to Cart button appears below the product description. Figure 2-6 shows a photographer's Web site from which images can be purchased. The portfolio consists of thumbnails that, when clicked, reveal a larger image in a separate window. Figure 2-7 shows a basic HTML page with the image. Now it's time to insert the Add to Cart buttons.
7.
Choose Insert
â
PayPal
â
Add to Cart Button.
The first page of the Insert PayPal Add to Cart Button Wizard appears; see Figure 2-8.
_fmt.jpeg) The first time you use the PayPal extension, you have to activate it. After you download the extension, you get an e-mail receipt that has the serial number.
The first time you use the PayPal extension, you have to activate it. After you download the extension, you get an e-mail receipt that has the serial number.
Figure 2-6:
A photo-grapher's portfolio page.

Figure 2-7:
An image that needs an Add to Cart button.
