Read iOS Programming: The Big Nerd Ranch Guide, 3/e (Big Nerd Ranch Guides) Online
Authors: Aaron Hillegass,Joe Conway
Tags: #COM051370, #Big Nerd Ranch Guides, #iPhone / iPad Programming
iOS Programming: The Big Nerd Ranch Guide, 3/e (Big Nerd Ranch Guides) (10 page)

Before you dive into the UIKit, the set of libraries for creating iOS applications, you’re going to write an application that will let you focus on the Objective-C language. Open
Xcode
and select
File
→
New
→
New Project...
. In the lefthand table in the
Mac OS X
section, click
Application
and then select
Command Line Tool
from the upper panel, as shown in
Figure 2.3
. Click the
Next
button.
Figure 2.3 Creating a command line tool

(If there is no
Command Line Tool
choice, first make sure that you have selected
Application
from underneath the
Mac OS X
header. If
Command Line Tool
is still is not an option, visit our forums at
http://forums.bignerdranch.com
. Apple frequently changes the names and style of these templates. We’ll keep you updated as the templates change.)
On the next panel, name the product
RandomPossessions
, choose
Foundation
as its type, and make sure the box labeled
Use Automatic Reference Counting
is checked (
Figure 2.4
). Click
Next
, and you will be prompted to save the project. Save it some place safe – you will be reusing parts of this code in future projects.
Figure 2.4 Naming the project

One source file (
main.m
) has been created for you in the
RandomPossessions
group of the project navigator (
Figure 2.5
).
Figure 2.5 Project navigator for command line tool template

Click on
main.m
to open it in the editor area, and you’ll see that some code has been written for you – most notably, a
main
function that is the entry point of any C or Objective-C application.
Time to put your knowledge of Objective-C basics to the test. Delete the line of code that
NSLog
s
“
Hello, World!
”
and replace it with lines that create and destroy an instance of the Objective-C class
NSMutableArray
.
int main (int argc, const char * argv[])
{
@autoreleasepool {
// Create a mutable array object, store its address in items variable
NSMutableArray *items = [[NSMutableArray alloc] init];
// Destroy the array pointed to by items
items = nil;
}
return 0;
}
Once you have an instance of
NSMutableArray
, you can send it messages, like
addObject:
and
insertObject:atIndex:
. In this code, the receiver is the
items
variable that points at the newly instantiated
NSMutableArray
. Add a few strings to the array instance.
{
@autoreleasepool {
// Create a mutable array object, store its address in items variable
NSMutableArray *items = [[NSMutableArray alloc] init];
// Send the message addObject: to the NSMutableArray pointed to
// by the variable items, passing a string each time.
[items addObject:@"One"];
[items addObject:@"Two"];
[items addObject:@"Three"];
// Send another message, insertObject:atIndex:, to that same array object
[items insertObject:@"Zero" atIndex:0];
items = nil;
}
return 0;
}
When this application executes, it creates an
NSMutableArray
and fills it with four instances of
NSString
(another Objective-C class). Let’s confirm that these strings were added to the array. In
main.m
, after adding the final object to the array, loop through every item in the array and print each one to the console.
{
@autoreleasepool {
// Create a mutable array object, store its address in items variable
NSMutableArray *items = [[NSMutableArray alloc] init];
// Send the message addObject: to the NSMutableArray pointed to
// by the variable items, passing a string each time.
[items addObject:@"One"];
[items addObject:@"Two"];
[items addObject:@"Three"];
// Send another message, insertObject:atIndex:, to that same array object
[items insertObject:@"Zero" atIndex:0];
// For every item in the array as determined by sending count to items
for (int i = 0; i < [items count]; i++) {
// We get the ith object from the array and pass it as an argument to
// NSLog, which implicitly sends the description message to that object
NSLog(@"%@", [items objectAtIndex:i]);
}
items = nil;
}
return 0;
}
There is some interesting syntax in this code that we’ll get to in a second. But for now, go ahead and click the
Run
button. It may seem like nothing has happened because the program exits right away, but the
log navigator
tells another story.
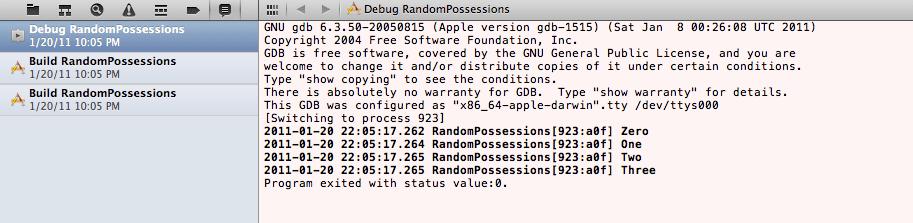
To reveal the log navigator, select the icon or use the keyboard shortcut Command-7. The log navigator stores the build results and console output from each build of your application. Select
Debug RandomPossessions
at the top of the log navigator to see your console output in the editor area (
Figure 2.6
).
Figure 2.6 Console output
Now let’s go back and take a closer look at the code in your
main
function.
First, notice the
@"One"
argument in the first
addObject:
message sent to
items
.
In Objective-C, when you want a hard-coded string, you prefix a character string with an
@
symbol. This creates an instance of
NSString
that holds the character string.
But, wait – aren’t instances created by sending
alloc
to a class? Yes, but the
@
prefix is a special case just for the
NSString
class. It is convenient shorthand for creating strings.
The following code shows three such uses, and each is completely valid Objective-C, where
length
is a message you can send to an instance of
NSString
:
int len = [myString length];
len = [@"Hello, World!" length];
myString = [[NSString alloc] initWithString:@"Hello, World!"];
len = [myString length];
Next, let’s look at the
NSLog
function we used to print to the console.
NSLog
takes a variable number of arguments and prints a string to the console. The first argument is required and must be an
NSString
instance. This instance is called the
format string
, and it contains text and a number of tokens. The tokens (also called format specifications) are prefixed with a percent symbol (
%
), and each additional argument passed to the function replaces a token in the format string. Tokens also specify the type of the argument they correspond to. Here’s an example:
float b = 2.5;
char c = 'A';
NSLog(@"Integer: %d Float: %f Char: %c", a, b, c);
The order of the arguments matters: the first token is replaced with the second argument (the format string is always the first argument), the second token is replaced with the third argument, and so on. The console output would be
In C, there is a function called
printf
that does the same thing. However,
NSLog
adds one more token to the available list:
%@
. The type of the argument this token responds to is
“
any object.
”
When
%@
is encountered in the format string, instead of the token being replaced by the corresponding argument, that argument is sent the message
description
. The
description
method returns an
NSString
that replaces the token. Because the argument is sent a message, that argument must be an object. As we’ll see shortly, every object implements the method
description
, so any object will work.