Low & Slow: Master the Art of Barbecue in 5 Easy Lessons (9 page)
Read Low & Slow: Master the Art of Barbecue in 5 Easy Lessons Online
Authors: Colleen Rush,Gary Wiviott

BOOK: Low & Slow: Master the Art of Barbecue in 5 Easy Lessons
2.04Mb size Format: txt, pdf, ePub
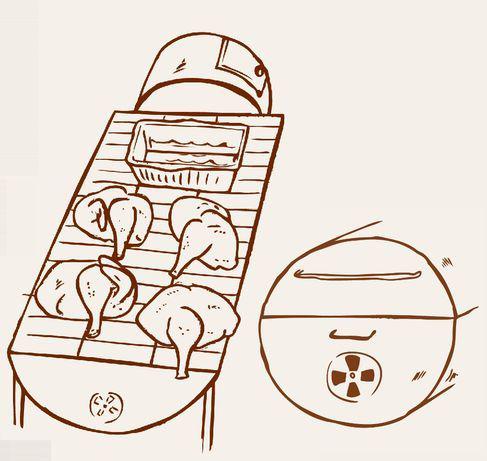
OFFSETPLACE THE CHICKEN HALVES ON the grate. Place the first chicken half in the m dle of the grate with the wing/leg side fa the firebox. Lay the remaining chicken ha away from the firebox. Use your tong to nudge the thigh/leg portion higher onto the breast. Don’t touch the lid for 1½ hours.TOP/BOTTOM VENTS:Open1½ HOURS INTO THE COOKOpen the lid of the cooker and puncture the thickest part of the breast with a fork. If the juice running out of the chicken is clear, it’s done. Most food types tell you to stick an instant-read thermometer into the chicken at this point. I don’t recommend using a meat or oven thermometer the first few cooks because you learn to rely on numbers instead of trusting your instincts. However, if you must, the meat is done when the breast reads 155°F and the thigh reads 165°F.If the juice is still pinkish, or the meat isn’t registering the correct doneness, leave the chicken on the cooker. To improve the likelihood of crisping the skin, squirt the chicken skin with cooking spray or olive oil and flip the chicken over, skin-side down.Check the water level in the water pan. Refill it if it’s low.Replace the lid and fork-test the chicken every 10 to 15 minutes until the juices run clear.
KETTLETUCK EACH WING UNDER THE BREAST
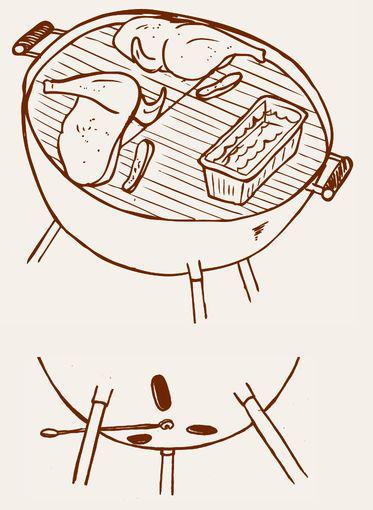
and place the chicken halves on the grate, with the breast-side close to the edge of the grate without touching the side of the cooker. The breast should not face the water pan and bank of charcoal. Use your tongs to nudge the thigh/leg portion higher onto the breast. Place the lid on the cooker with the top vent positioned directly above the chicken.TOP/BOTTOM VENTS:Open30 MINUTES INTO THE COOKCheck the charcoal. If more than half of the charcoal has burned to ash, top the charcoal with one-third chimney of lit charcoal. Check the water level in the water pan. If it is less than half full, add water.BOTTOM VENT:Close the bottom vent by one-third.1 HOUR INTO THE COOKRemove the lid of the cooker and puncture the thickest part of the breast with a fork. If the juice running out of the chicken is clear, it’s done. If the juice is still pinkish, or the meat isn’t registering the correct doneness. I don’t recommend using a meat or oven thermometer the first few cooks because you learn to rely on numbers instead of trusting your instincts. However, if you must, the meat is done when the breast reads 155°F and the thigh reads 165°F. To improve the likelihood of crisping the skin, squirt the chicken skin with cooking spray or canola oil and flip the chicken over, skin-side down.Check the water level in the water pan. Refill it if it’s low.Replace the lid and fork-test the chicken every 10 minutes until the juices run clear.
IF YOU MUST KNOW WHY ...WHY CAN’T I JUST THROW THE CHICKEN ON THE GRATE? you ask. Because the breast is more susceptible to drying out. Arranging the chicken on the grate with the breast away from the hottest zone on the grate protects the breast, and the meat cooks more evenly. On a WSM, the perimeter of the grate is hotter because heat flows around the water pan and up the sides. The chicken breasts should face the middle of the grate on the WSM. On a kettle grill set up with a two-zone fire, the heat is more intense at the center of the grate. The chicken breasts should face “out” on a kettle. Offset smokers are hottest closest to the firebox, so the chicken breasts should face away from the firebox.Incidentally, we’re off to a bad start if you’re already thinking of and asking these types of questions. Just follow the directions and you’ll have your barbecue epiphany soon enough.
THE SMOKE RINGIN BARBECUE, THE SMOKE RING—the bright pink layer just under the surface of the meat—is one of the signs of a successful low and slow cook. But some people get nervous when their chicken is pink. If you fall into this category of people, rest assured, this pink does not mean your chicken is undercooked. The smoke ring is the result of a chemical reaction between the wood smoke and the meat, and you want it there.
CONGRATULATIONS! YOU SHOULD HAVE A PLATTER OF TASTY, PERFECTLY SMOKED Chicken Mojo Criollo in your hands. Now, do a little victory dance around your cooker in the backyard. Because you followed the instructions exactly, didn’t you?
What’s that? You incorporated some tips you saw on the Virtual Weber site? You had a half bag of leftover charcoal briquettes and figured, Why not use it up? You smoked bologna instead of chicken?
I have a stock letter for transgressors of my Program. It goes like this:
Dear [Name of the Damned Withheld],
Stop reading the Virtual Weber site. It’s a great resource, but if you pick up techniques and methods from Web sites and try to incorporate them into the Program, things get confusing and don’t work well. Virtual Weber and I have very different philosophies on barbecue. The site is populated by engineers who tend to put too much emphasis on things like time charts and ambient temperature. My Program cares about none of that. Start the fire, put the meat in the cooker, and leave it the hell alone.
Now, go take that damn thermometer out of the vent. Not only is the thermometer blocking airflow, which causes smoldering (which leads to creosote-flavored food), but these thermometers are meant to be inserted in food. They don’t measure the air temperature in your cooker, so you’ll never get an accurate reading. Repeat after me: we don’t care about no stinking temperature. Remember, you’re learning to read fires and meat, not thermometers.
Also, do not reuse charcoal. Ever. Charcoal is an absorbent. It drinks moisture and odor from the air, which is why it’s often used as a filter. Moist charcoal cooks slow and transfers off flavors to your food. And let me guess: you used regular briquettes instead of natural lump charcoal? Do I have to remind you that briquettes contain a witch’s brew of chemicals, while lump charcoal is a natural product?
Okay, now try Lesson #1 again, but ditch the thermometer and the briquettes and buy some natural lump charcoal. If you are still interested in continuing this program . . . great. If I come on too strong and you think I’m full of soot, and you wish to discontinue, that’s perfectly understandable. No hard feelings. But the deal is this: please follow instructions exactly or drop out of the program.
Cordially but firmly,


Gary Wiviott
CONTINUING EDUCATIONTO TRULY MASTER THE SKILLS YOU’VE LEARNED IN LESSON #1 and hone your expertise, I recommend practicing the cook over and over again. However, you’ll soon learn that eating Chicken Mojo Criollo over and over again is a drag, and likely to discourage you from perfecting the techniques you need in order to move on to the next lesson. To keep you in the program, here are some simple marinades to expand your flavor repertoire. Or check the index for more recipes that incorporate your delicious, soon-to-be-legendary (in your neighborhood, at least) smoked chicken.
MARINADE 101MANY PEOPLE WOULD enthusiastically skip this part of the tutorial, buy commercial marinades for the rest of their lives, and be none the wiser. But you, student, have already proven your desire to know more—to elevate your understanding of barbecue cookery—by committing to this program.
If you’re not used to making your own marinade, the following recipes might seem like a lot of work for food that picks up most of its flavor from wood smoke. Instead of relying on garlic or onion powder and salt for flavor, the recipes call for real ingredients—freshly squeezed citrus juice, toasted and ground dried chile peppers, garlic cloves, onion, and more. This extra step is what will separate you from every other person who cracks open a bottle of sauce and calls himself or herself a “good cook.” Those preservative-laden concoctions can’t touch the flavor of a marinade made with fresh ingredients.
I am not as strict about the ingredients in a marinade, however, as I am about following instructions for the cooks. You won’t get kicked out of the Program if you use store-bought OJ because you don’t have eight oranges lying around the kitchen. A few shortcuts here and there are more like culinary improv than cheating. The beauty is that learning the simple fundamentals of making a marinade will serve you well. If you’re taking the time to learn the art of barbecue, using the freshest available ingredients in your marinades not only makes for better barbecue—but it also makes you a better cook.
HOT SAUCEIN THIS PROGRAM,
there are two types of hot sauce: Louisiana-style and Mexican-style. Although Tabasco is the hot sauce most associated with Louisiana, I rarely use it because it is a one-note sauce. It contains a higher ratio of vinegar—too much, in my opinion—which brightens the flavor of the hot sauce, but you lose some of the characteristic heat of the peppers. My preferred Louisiana-style hot sauces—Crystal, Louisiana and Texas Pete—aren’t as punchy as Tabasco. These hot sauces have the perfect balance of vinegar and heat. It’s an accent flavor. It enhances without overpowering. Mexican-style hot sauce, like Cholula, Búfalo and El Yucateco, has a broader spectrum of flavors because most brands use a mix of chiles. The consistency of the hot sauce also tends to be thicker, and some are even gritty.
there are two types of hot sauce: Louisiana-style and Mexican-style. Although Tabasco is the hot sauce most associated with Louisiana, I rarely use it because it is a one-note sauce. It contains a higher ratio of vinegar—too much, in my opinion—which brightens the flavor of the hot sauce, but you lose some of the characteristic heat of the peppers. My preferred Louisiana-style hot sauces—Crystal, Louisiana and Texas Pete—aren’t as punchy as Tabasco. These hot sauces have the perfect balance of vinegar and heat. It’s an accent flavor. It enhances without overpowering. Mexican-style hot sauce, like Cholula, Búfalo and El Yucateco, has a broader spectrum of flavors because most brands use a mix of chiles. The consistency of the hot sauce also tends to be thicker, and some are even gritty.
MARINADE MUST-HAVESShortcuts are tempting, but not tasty.• Always use real, fresh-squeezed juice from citrus fruits, not “juice” that comes out of fruit-shaped plastic.• Use canola or inexpensive olive oil.• If your spices have been collecting dust for more than eight months, buy a fresh batch. For the best flavor, toast and grind whole spices (page 18) from sources like The Spice House (
www.thespicehouse.com
) or Penzeys (
www.penzeys.com
).
Other books
Midnight in Your Arms by Morgan Kelly
The Child Comes First by Elizabeth Ashtree
Closer by Maxine Linnell
Cockatiels at Seven by Donna Andrews
The Mountains Rise by Michael G. Manning
Vampire - In the Beginning (Vampire Series Book 1) by Mitchell, Charmain Marie
The Rebound Guy by Farrah Rochon
Dream Huntress (A Dreamseeker novel) (Entangled Ignite) by Michelle Sharp
...or something: Ronacks Motorcycle Club by Debra Kayn

