Low & Slow: Master the Art of Barbecue in 5 Easy Lessons (5 page)
Read Low & Slow: Master the Art of Barbecue in 5 Easy Lessons Online
Authors: Colleen Rush,Gary Wiviott

BOOK: Low & Slow: Master the Art of Barbecue in 5 Easy Lessons
9.91Mb size Format: txt, pdf, ePub
VOLUMES HAVE BEEN WRITTEN
about the various flavors and qualities of the wood used in low and slow barbecue, but frankly, it’s all in the mouth of the beholder. Telling you which wood goes best with which meat is just the kind of distracting filler information that obscures the real lessons to be learned. For the five lessons in this book, I recommend using hickory because many hardware and grocery stores stock it, and the flavor of hickory is a common one in barbecue. Starting with hickory also gives you a good point of reference for gauging the strength of other wood flavors when you start using other types.
about the various flavors and qualities of the wood used in low and slow barbecue, but frankly, it’s all in the mouth of the beholder. Telling you which wood goes best with which meat is just the kind of distracting filler information that obscures the real lessons to be learned. For the five lessons in this book, I recommend using hickory because many hardware and grocery stores stock it, and the flavor of hickory is a common one in barbecue. Starting with hickory also gives you a good point of reference for gauging the strength of other wood flavors when you start using other types.
Once you get the hang of using wood chunks (remember: chunks, not chips), feel free to experiment with different combinations of wood. The most common woods for smoking are mesquite, hickory, oak, pecan, cherry, and apple. Often, the type of wood people use in a smoke varies with what’s available in the region. In Texas and other southern states, post oak, pecan, hickory, and mesquite are common. In the Midwest, hickory, apple, and cherry are popular. Alder is used—mostly for smoking fish—in the Pacific Northwest.
There’s no point in describing the ethereal and effervescent qualities of each type of wood. You just have to taste them for yourself. However, it’s worth noting that mesquite has a very strong, distinct flavor that can be overpowering or acrid if it’s not used in moderation. It’s best to mix mesquite with a more neutral wood, like oak, or to use it very sparingly in a cook. And cherry tends to produce a darker smoke, so meat smoked with cherry will have a darker tint.
WOOD TLCUNLESS YOU HAVE EASY ACCESS
to cut, dried, aged wood, you’ll probably end up buying bags of wood chunks at your local hardware or grocery store. This is perfectly acceptable, as long as you use a hand ax to carefully chop or shave off any remaining bark on the chunks. The bark is where critters, mold, and other impurities reside, and these elements produce off flavors that can penetrate your food.
to cut, dried, aged wood, you’ll probably end up buying bags of wood chunks at your local hardware or grocery store. This is perfectly acceptable, as long as you use a hand ax to carefully chop or shave off any remaining bark on the chunks. The bark is where critters, mold, and other impurities reside, and these elements produce off flavors that can penetrate your food.
After shaving the wood, give it a sniff. It should have a clean, woody smell. Moldy wood is a common issue with bagged wood chunks. If, after trimming the wood, it still smells musty or damp, toss it. You’ll probably end up throwing away a few chunks of wood out of every bag.
This mantra also bears repeating: wet wood is no good. Despite the fact that nearly every chef on TV and barbecue cookbook on the shelves advises you to soak wood to make it burn slower and longer, I beseech you: do not soak the wood chunks in water, wine, beer, or any other liquid. Initially, you’ll just have to trust me on this one. But as you progress through the cooks, you will begin to understand intuitively that adding wet wood to hot coals causes unsavory reactions in the cooker, including a spew of ashy steam or a drop in temperature. If you insist on using wet wood chunks to test the theory, you’ll also get a taste of the tarry substance smoldering wood produces. “Flavored” wood falls in the same category of no-nos, but for a different reason. Wood soaked in any unnatural flavoring or twenty-year-old bourbon is a waste of money (and of good bourbon).

REMOVE THE WATER PAN FROM THE
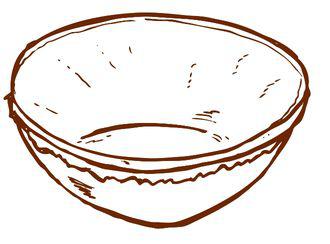
WSM. Tear off a two-foot sheet of extra-wide, heavy-duty aluminum foil—enough to cover the bottom of the bowl and over the lip of the water pan. Smooth the foil against the bottom of the water pan and up the sides, then gently crimp the edges of the foil around the lip of the water pan. (Do not wrap the entire pan—just the inside and outer rim.) If the foil rips or doesn’t cover the complete surface of the water pan, start over. This tight layer of foil holds the water, but also keeps the fat drippings from dirtying the water pan. Foiling the water pan isn’t essential because it doesn’t affect the cook, but it does make cleanup easier.
WSM. Tear off a two-foot sheet of extra-wide, heavy-duty aluminum foil—enough to cover the bottom of the bowl and over the lip of the water pan. Smooth the foil against the bottom of the water pan and up the sides, then gently crimp the edges of the foil around the lip of the water pan. (Do not wrap the entire pan—just the inside and outer rim.) If the foil rips or doesn’t cover the complete surface of the water pan, start over. This tight layer of foil holds the water, but also keeps the fat drippings from dirtying the water pan. Foiling the water pan isn’t essential because it doesn’t affect the cook, but it does make cleanup easier.
THIS METHOD OF LAYERING CHARCOAL
and wood in your WSM is very specific, but there is good, solid reasoning behind each step. If you stray from the methodology to incorporate techniques you picked up in the Girl Scouts, I can’t guarantee the outcome. Follow the steps—exactly as I outline them—and you will have a consistent, clean-burning, 250°F to 275°F low and slow fire in your WSM for about five hours.
and wood in your WSM is very specific, but there is good, solid reasoning behind each step. If you stray from the methodology to incorporate techniques you picked up in the Girl Scouts, I can’t guarantee the outcome. Follow the steps—exactly as I outline them—and you will have a consistent, clean-burning, 250°F to 275°F low and slow fire in your WSM for about five hours.
TO GET STARTED, YOU NEED:
• Charcoal chimney starter
• Natural lump charcoal
• Six wood chunks
• Three sheets of newspaper (not glossy)
• Extra-wide, heavy-duty aluminum foil
• Metal tongs
TIP:
Use your tongs to pick up stray pieces of charcoal that fall outside of the chamber to keep charcoal from blocking the bottom vents on the WSM. Blocked vents choke off your fire.
1. Open the top and bottom vents. The top vent should remain open at all times throughout the cook.
2. Remove the center ring and the lid of the WSM. Fill the charcoal chamber halfway with unlit charcoal—about two chimney starters full of charcoal.
3. Lay three clean, debarked wood chunks on top of the unlit charcoal in the chamber.
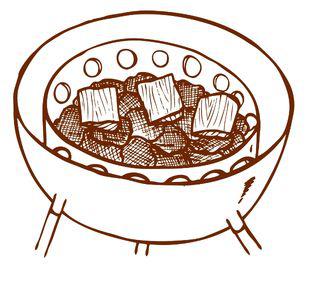
4. Fill the chimney starter halfway with unlit charcoal. Spread this charcoal over the wood chunks and unlit charcoal already in the chamber. The charcoal level should be just below the top edge of the chamber.

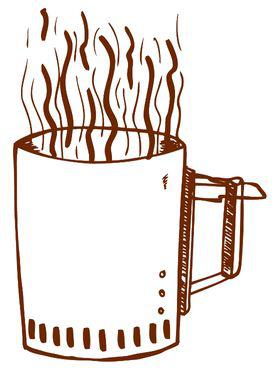
5. Prepare the chimney starter for lighting charcoal (see Starting Your Chimney, page 28): Roll three sheets of newspaper into loose concentric rings. Fit the paper rings inside the bottom of the chimney. Fill the starter to the top with unlit charcoal. Set the chimney on a grate or other fireproof surface that allows air to flow underneath. Light the paper in two or three places.
6. After about ten minutes, when the charcoal in the chimney is fully engaged—you should see glowing red coals, clear flames shooting from the top of the chimney, and a gray-white ash edging the top layer of coals—gently pour the lit charcoal in an even layer over the unlit charcoal and wood in the chamber. As you’re topping the unlit charcoal, pieces of charcoal may spill out of the chamber and into the bowl. Use the tongs to pick up and return the strays to the charcoal chamber.
7. When the charcoal stops billowing white smoke (about five minutes after you pour the lit charcoal into the chamber), add three debarked wood chunks to the pile.

8. Return the center ring (empty water pan and grates in place) to the top of the charcoal bowl.
9. Using a slow-running garden hose or a watering can, pour water through the grates to fill the water pan to within one inch of the top edge. Avoid splashing water into or down the sides of the cooker.
10. The cooker will continue to billow white smoke for about five minutes. When the smoke dies down to steady, lighter puffs, arrange your meat on the top grate.
11. Return the lid to the WSM with the top vent at 1 o’clock and the small metal door at 6 o’clock. It’s time to cook.
K.I.S.S. ON AN OFFSET SMOKERI GENERALLY PREFER TO COOK ON THE WSM—
particularly in the confines of a city dwelling’s back yard—but the offset does offer some conveniences. Restocking charcoal and wood in the side firebox is simple, and the single-grate surface makes cooking in quantity and rotating meat easier.
particularly in the confines of a city dwelling’s back yard—but the offset does offer some conveniences. Restocking charcoal and wood in the side firebox is simple, and the single-grate surface makes cooking in quantity and rotating meat easier.
However, there is a slight glitch in the engineering of most horizontal offsets that can create problems: the opening between the firebox and the cooking chamber allows too much hot air to flow into the cooker and directly across the grate. This problem is easily fixed with a cheap aluminum loaf pan filled with water. Place it an inch or two from the firebox vent on the cooking grate, and this impromptu water pan will improve heat circulation by directing heat downward, below the grate, and act as a heat shield between the food on the grate and the hot stream of air flowing out of the firebox. Instead of direct, radiant heat, it creates a flow of indirect, convective heat. (Some people modify the cooker by inserting a small metal heat shield into the vent opening inside the cooking chamber, but the aluminum loaf pan works just fine for this program. If you have the tools and inclination, instructions for the more permanent modification are easily found online.)
Other books
The Language Revolution by Crystal, David
Watcher: A raven paranormal romance (Crookshollow ravens Book 1) by Steffanie Holmes
Mr. Rockstar by Leaf, Erin M.
Besieged by Rowena Cory Daniells
Murder and Moonshine: A Mystery by Miller, Carol
Dead Sleeping Shaman by Elizabeth Kane Buzzelli
Revenge by Taslima Nasrin
Mean Streak by Carolyn Wheat
Backstairs Billy by Quinn, Tom
Steel by Richard Matheson