Low & Slow: Master the Art of Barbecue in 5 Easy Lessons (6 page)
Read Low & Slow: Master the Art of Barbecue in 5 Easy Lessons Online
Authors: Colleen Rush,Gary Wiviott

BOOK: Low & Slow: Master the Art of Barbecue in 5 Easy Lessons
6.74Mb size Format: txt, pdf, ePub
TO GET STARTED, YOU NEED:
• Charcoal chimney starter
• Natural lump charcoal
• One split of wood
• Aluminum loaf pan
• Three sheets of newspaper (not glossy)
• Metal tongs
TIP
: Place the splits of wood next to the firebox to preheat. The wood ignites faster when it is hot. Use your tongs to pick up the wood. It’s hot—remember?
1. Open all of the vents on the offset.
2. Pour two chimneys full of unlit charcoal onto the grate inside the firebox.
3. Fill the aluminum loaf pan three-quarters full with water. Place the pan on the grate in the cooking chamber, about one inch from the firebox vent.

4. Prepare the chimney starter for lighting charcoal (see Starting Your Chimney, page 28): Roll three sheets of newspaper into loose concentric rings. Fit the paper rings inside the bottom of the chimney. Fill the starter with unlit charcoal. Set the chimney on the cooking grate or another fireproof surface that allows air to flow underneath. Light the paper in two or three places.
5. When the charcoal is fully engaged—after about ten minutes, you should see glowing red coals, clear flames shooting from the top of the chimney, and a gray-white ash edging the top layer of coals—gently pour the lit coals over the unlit charcoal and wood in the firebox.
6. Place one clean, debarked split of wood on top of the lit charcoal in the firebox. In about ten minutes, when the charcoal stops billowing white smoke and the wood begins to blacken or ignites, close the lid on the firebox.

7. Arrange the meat on the grate in the cooking chamber with the most heat-sensitive side of the cut (the breast on chicken, the meat end of the rib) facing away from the firebox. Close the lid. It’s time to cook.
K.I.S.S. ON A KETTLE GRILLDON’T GET ME WRONG:
I love the kettle-style grill—for grilling. And with some guided instruction, you can use this equipment to make some fine low and slow barbecue. But of the cookers in this book, the kettle requires the most vigilance by far. You have to build a two-zone fire on the charcoal grate to cook by indirect heat. This setup means you will use less charcoal and sacrifice some space on the grate to an aluminum water pan, which sits over the charcoals and deflects the heat down and under the meat. (Without the water pan modification, the grate temperature would be too hot for low and slow barbecue.) Because you have less cooking space and use a smaller batch of charcoal, you will need to check and restock the cooker about every forty-five minutes.
I love the kettle-style grill—for grilling. And with some guided instruction, you can use this equipment to make some fine low and slow barbecue. But of the cookers in this book, the kettle requires the most vigilance by far. You have to build a two-zone fire on the charcoal grate to cook by indirect heat. This setup means you will use less charcoal and sacrifice some space on the grate to an aluminum water pan, which sits over the charcoals and deflects the heat down and under the meat. (Without the water pan modification, the grate temperature would be too hot for low and slow barbecue.) Because you have less cooking space and use a smaller batch of charcoal, you will need to check and restock the cooker about every forty-five minutes.
TIP:
Grilling is a form of “direct heat” cooking—exposing meat directly to a flame or live charcoal. Grilling cooks fast and hot, which makes it ideal for cooking smaller, tender cuts of meat like steaks, chops, and fish. Indirect heat is best for large, tough cuts, like ribs, pork shoulder, and brisket. The lower temperature and longer cook slowly tenderizes the meat by rendering the fat and breaking down the tough connective tissue. Direct heat would turn these cuts into shoe leather.
To get started, you need:
• Charcoal chimney starter
• Natural lump charcoal
• Metal tongs
• Two wood chunks
• Two aluminum loaf pans
• Three sheets of newspaper (not glossy)
1. Open the top and bottom vents on the kettle.
2. Fill the chimney three-quarters full with unlit charcoal.
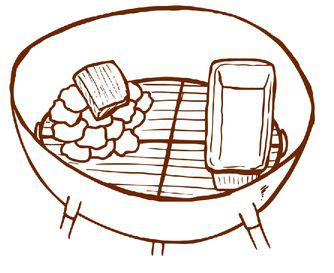
3. Remove the top grate and pour the unlit charcoal on one side of the charcoal grate, using your tongs to “bank” the charcoal in a slight slope against one side of the kettle.
4. Lay one clean, debarked wood chunk in the middle of the unlit charcoal.
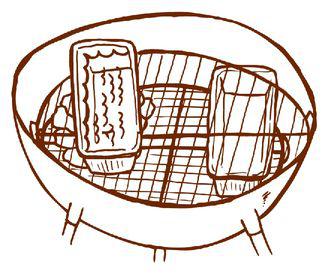
5. Set one empty aluminum loaf pan on the opposite side of the charcoal grate. Return the top grate to the cooker.
6. Prepare the chimney starter for lighting charcoal (see Starting Your Chimney, page 28): Roll three sheets of newspaper into loose concentric rings. Fit the paper rings inside the bottom of the chimney. Fill the chimney halfway with unlit charcoal. Set the chimney on a grate or other fireproof surface that allows air to flow underneath. Light the paper in two or three places.
7. When the charcoal is fully engaged—after about five minutes, you should see glowing red coals, clear flames shooting from the top of the chimney, and a gray-white ash edging the top layer of coals—lift the top grate and gently pour the lit coals over the pile of unlit charcoal. Use your tongs to retrieve any charcoal that spills off of the pile.
8. When the charcoal stops billowing white smoke, about five minutes later, place one more clean, debarked wood chunk on top of the lit charcoal. Replace the top grate.
9. Fill the second aluminum loaf pan three-quarters full with water. Set the pan on the top grate over the lit charcoal and wood.
10. Lay the meat on the opposite side of the grate, as close to the outer edge of the grate as possible without touching the side. Face the most heat-resistant side of the cut (the thighs/legs on a chicken, the chine bone on ribs) toward the fire.
11. Set the lid in place with the vent postioned over the meat. It’s time to cook.
RESTOCKING THE COOKERTHE FIRST THREE LESSONS—CHICKEN
Mojo Criollo, Brined Chicken, and Baby Back Ribs—are relatively short cooks that do not require additional wood or charcoal if you’re using a WSM or offset. Because you’re only using half the grate for charcoal on a kettle, you will need to add more unlit or lit charcoals to the pile about every thirty to forty-five minutes throughout all kettle cooks.
WSMMojo Criollo, Brined Chicken, and Baby Back Ribs—are relatively short cooks that do not require additional wood or charcoal if you’re using a WSM or offset. Because you’re only using half the grate for charcoal on a kettle, you will need to add more unlit or lit charcoals to the pile about every thirty to forty-five minutes throughout all kettle cooks.
If all is set and running according to the master plan—vents are unblocked and opened to the right degree, you’re using the right kind and quantity of charcoal—the initial KISS batch of charcoals should last at least four to five hours without any meddling. The only thing you’ll have to keep an eye on is the water pan: check it about every hour and a half, and refill it any time it’s less than half full.
A stern warning: As you learn to restock water and charcoal, you will be tempted to flip open the flimsy side door on the center ring to refill the water pan or the charcoal chamber. It will seem like an efficient way to get the job done. It is not. If I had my say, Weber would remove these doors from all future WSMs. If I thought you would actually do it, I’d instruct you to weld the door shut because its alluring presence invites unnecessary peeking and futzing. If it isn’t latched properly, the door can fall open. The blast of air across the coals will overheat the cooker and screw up your lesson. If that’s not enough to convince you, consider this: poking a rubber hose through the door over glowing-hot charcoal to refill the water pan is dangerous and dumb.
REFILLING THE WSM WATER PAN1. Remove the lid and set it on the ground.
2. With oven mitts on to protect your hands, remove the top grate from the center ring and set it on a heat-safe surface, like a pair of clean bricks.
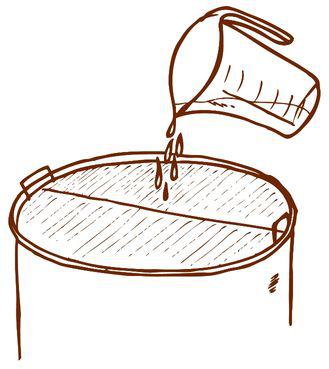
3. Refill the water pan within one inch of the top, being careful not to splash down the sides of the cooker. (Once you get the hang of refilling the water pan this way, try your hand at pouring the water through the grates.)
4. Reassemble and close the cooker.
RESTOCKING THE WSM CHARCOAL CHAMBER1. At the four- or five-hour mark, when half to three-quarters of the initial batch of charcoal has burned through, fill the chimney starter with charcoal and light it (see Starting Your Chimney, page 28).
2. When the charcoal in the chimney is fully engaged, put on a pair of heatproof gloves and carefully remove the center ring and lid together from the charcoal bowl—using extra caution to keep the water in the pan from sloshing out.
Other books
Crying in the Dark by Shane Dunphy
Love Minus Eighty by McIntosh, Will
La lanza sagrada by Craig Smith
Never a Hero to Me by Tracy Black
Murder in Time by Veronica Heley
One Night of Trouble by Elle Kennedy
Paper Moon by Linda Windsor
The Pages of the Mind by Jeffe Kennedy
It Had to Be You by Lynda Renham
The Corrigan legacy by Anna Jacobs