Make: Electronics (74 page)
Authors: Charles Platt

The diode and headphone can be ordered from
http://www.scitoyscatalog.com
. You cannot use a modern headphone of the type you wear with an MP3 player.
Some of these items are shown in Figure 5-59.

Figure 5-59.
Just add wire and a coil, and this is all you need to receive AM radio signals. The black disc becomes the tuning dial, after it is screwed onto the variable capacitor (right). This is actually an optional extra. A germanium diode (center) rectifies the radio signal. The high-impedance earphone (top) creates a barely audible sound.
First, you need to make a coil. It should be about 3 inches in diameter, and you can wind it around any empty glass or plastic container of that size, so long as it’s rigid. A soda bottle or water bottle isn’t suitable, because the cumulative squeezing force of the turns of wire can deform the bottle so that it isn’t circular anymore.
I chose a vitamin bottle that just happened to be exactly the right size. To remove the label, I softened its adhesive with a heat gun (lightly, to avoid melting the bottle) and then just peeled it off. The adhesive left a residue, which I removed with Xylol (also known as Xylene). This is a handy solvent to have around, as it can remove “permanent” marker stains as well as sticky residues, but you should always use latex or nitrile gloves to avoid getting it on your skin, and minimize your exposure the fumes. Because Xylol will dissolve some plastics, clearly it’s not good for your lungs.
After you prepare a clean, rigid bottle, drill two pairs of holes in it, as shown in Figure 5-60. You’ll use them to anchor the ends of the coil.
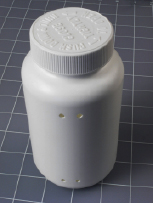
Figure 5-60.
A large, 3-inch diameter empty vitamin bottle makes an ideal core for a crystal radio coil. The drilled holes will anchor wire wrapped around the bottle.
Now you need about 60 feet of 22-gauge solid-core wire. If you use magnet wire, its thin insulation will allow the turns of the coil to be more closely spaced, and the coil may be slightly more efficient. But everyday vinyl-insulated wire will do the job, and is much easier to work with.
Begin by stripping the first 6 inches of insulation from the end of the wire. Now measure 50 inches along the insulated remainder and apply your wire strippers at that point, just enough to cut the insulation without cutting the wire. Use your two thumb nails to pull the insulation apart, revealing about a half-inch of bare wire, as shown in Figure 5-61. Bend it at the center point and twist it into a loop, as shown in Figure 5-62.
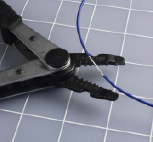
Figure 5-61.
Wire strippers expose the solid conductor at intervals along a 22-gauge wire.
You just made a “tap,” meaning a point where you will be able to tap into the coil after you wind it. You’ll need another 11 of these taps, all of them spaced 50 inches apart. (If the diameter of the bottle that you’ll be using as the core of your coil is not 3 inches, multiply its diameter by 16 to get the approximate desired spacing of taps.)
After you have made 12 taps, cut the wire and strip 6 inches off that end. Now bend the end into a U shape about a half-inch in diameter, so that you can hook it through the pair of holes that you drilled at one end of the bottle. Pull the wire through, then loop it around again to make a secure anchor point.
Now wind the rest of the wire around the bottle, pulling it tightly so that the coils stay close together. When you get to the end of the wire, thread it through the remaining pair of holes to anchor it as shown in Figure 5-63. The completed coil is shown in Figure 5-64.
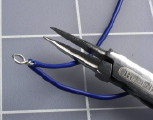
Figure 5-62.
Each exposed section of wire is twisted into a loop using sharp-nosed pliers.

Figure 5-63.
The stripped end of the wire is secured through the holes drilled in the bottle.
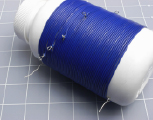
Figure 5-64.
The completed coil, wrapped tightly around the bottle.
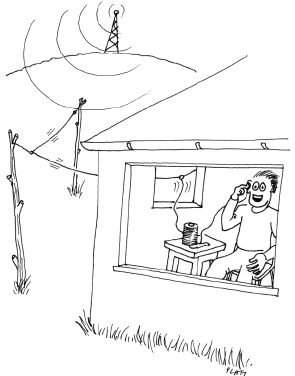
Your next step is to set up an antenna. If you live in a house with a yard outside, this is easy: just open a window, toss out a reel of 16-gauge wire while holding the free end, then go outside and string up your antenna by using polypropylene rope (“poly rope”) or nylon rope, available from any hardware store, to hang the wire from any available trees, gutters, or poles. The total length of the wire should be about 100 feet. Where it comes in through the window, suspend it on another length of poly rope. The idea is to keep your antenna wire as far away from the ground or from any grounded objects as possible.
 High Voltage!
The world around us is full of electricity. Normally we’re unaware of it, but a thunderstorm is a sudden reminder that there’s a huge electrical potential between the ground below and the clouds above.
If you put up an outdoor antenna, never use it if there is any chance of a lightning strike. This can be extremely dangerous. Disconnect the indoor end of your antenna, drag it outside, and push the end of the wire into the ground to make it safe.
If you live in an apartment where you don’t have access to a yard outside, you can try stringing your antenna around the room, hanging the wire from more pieces of poly rope. The antenna should still be about 100 feet long, but obviously it won’t be in a straight line.
Hook the free end of your antenna to one end of your coil. At this point, you also need to add a germanium diode, which functions like a silicon-based diode but is better suited to the tiny voltages and currents that we’ll be dealing with. The other end of the diode attaches to one of the wires leading to a high-impedance earphone.
A normal modern earphone or headphone will not work in this circuit.
The return wire from the headphone is connected to a jumper wire, the other end of which can be clipped to any of the taps in your coil.
One last modification, and you’ll be ready to tune in. You have to ground the jumper wire. By this I mean connect it to something that literally goes into the ground. A cold-water pipe is the most commonly mentioned option, but (duh!) this will work only if the pipe is made of metal. Because a lot of plumbing these days is plastic, check under the sink to see if you have copper pipes before you try using a faucet for your ground.
Another option is to attach the wire to the screw in the cover plate of an electrical outlet, as the electrical system in your house is ultimately grounded. But the sure-fire way to get a good ground connection is to go outside and hammer a 4-foot copper-clad grounding stake into reasonably moist earth. Any wholesale electrical supply house should be able to sell you a stake. They’re commonly used to ground welding equipment.