Mother of Purl (3 page)
Authors: Edith Eig,Caroline Greeven

Needles
.
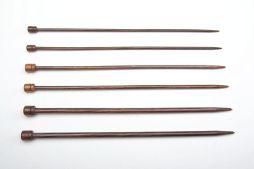
Like yarn, there are a variety of knitting needles ranging widely in price and quality. Needles may be made of bamboo, wood, plastic, and metals of all sorts. The Rolls–Royce of needles, however, are the rosewood needles, which are both beautiful and pricey. At La Knitterie Parisienne, I suggest that knitters select needles based on their level of experience. It is not necessary for beginners to use the most expensive needles. Instead, buy a pair of plastic or bamboo needles in the size indicated on the ball of yarn. Often, when knitting a scarf, I recommend going up one needle size to ensure the scarf is light and airy, and using plastic needles when knitting with artificial fibers, as they don’t slide well on bamboo. As you become more experienced, you’ll want to invest in needles in a variety of sizes and styles—including the coveted rosewood needles, which also come in incremental sizes. Typically, needles used in the United States only come in single sizes: 0, 1, 2, etc., except for the incremental size of 10.5. For the skilled knitter who wants to be very precise about their knitting gauge, a perfect gauge can be maintained by using rosewood needles, which come in quarter increments such as 8.25 and 8.75. Such sizing is common in Europe.
There are a few other basic items a knitter will need and important to have.
[
EDITH KNIT TIP
]U.S. vs. Metric Needles
When reading your yarn label, make sure the size of the needles stipulated is in U.S. measurements, not metrics; otherwise, you will need to convert it to U.S. sizing. For example, a size 6 metric is actually a size 10 U.S.
A Case for the Needle Case
It’s not only functional to keep your knitting needles in the proper needle holder, but it’s also extremely practical. If you store and carry your needles in a plastic bag, you may not realize until it’s too late, or after the needle has pierced the bag, slipped though, and disappeared. When you go to knit, you find the needle is missing. A needle case protects the needles from breaking, bending, and disappearing.
Pain Relief
If you suffer from arthritis and sometimes find knitting painful, try knitting with Clover bamboo needles. They are lighter in the hand.
The “Other” Basics
.
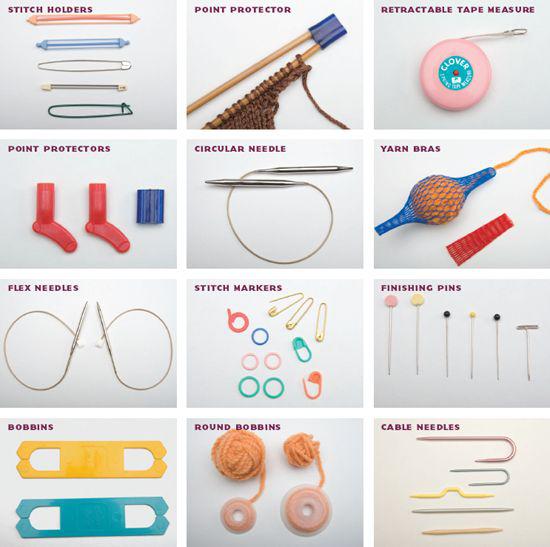
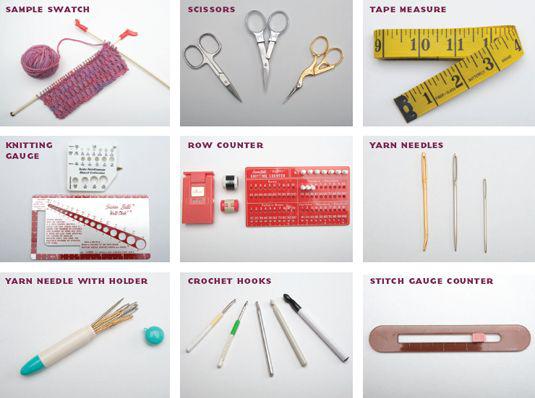
Besides needles and yarn, other basics include a tape measure, a yarn needle for finishing your garment, scissors, point protectors to prevent the stitches from sliding off the needle, stitch holders, and stitch markers. In addition, I highly recommend purchasing a knitting needle gauge and a stitch counter to keep track of your rows. These come in a variety of styles, and I prefer the
clicker–style hand counter to the one you place at the end of the needle (which can often turn by itself and cause a miscount and confusion in the pattern). And last but not least, I recommend purchasing a knitting bag to carry your projects. It’s fun to accessorize and make a knitting fashion statement: that’s why we carry some terrific custom–made knitting bags in a variety of stylish shapes, sizes, and fabrics, each made with multiple pockets for needles and accessories.
Your First Pattern
.
New knitters generally need some guidance when selecting their first project. Often, new mothers are eager to knit a baby blanket, though as a rule I recommend beginning with a straight piece, like a scarf. Scarves knit up quickly and give you the satisfaction of completing a project. This simple project also gives you a chance to develop tension control, the ability to knit smooth, even stitches that are uniform in size and appearance. Until you have developed tension control, a blanket would be so irregular in dimension—"pulling in and pulling out"—that you would be unhappy with the results. On a scarf the same effect can look as if it is part of the pattern.
We have a motto at La Knitterie Parisienne: “As ye shall knit, so shall ye rip.” Regardless of your knitting ability, every knitter—beginner and experienced alike—will rip their work at one point or another. If you’re going to learn to knit, you need to be prepared to rip and start again. No one is exempt from ripping; even I have to do it quite frequently.
Casting On: The Two–Ball Method
.
Casting on is the process of creating the first row of stitches. There are many ways to cast on, but the one I find most effective is the two–ball method. It is simple and easy (and also the fastest). This technique of casting on guarantees that you will never run out of yarn. I developed this approach years ago when I needed to cast on 400 stitches for a blanket—and ran out of yarn at 382 stitches. Necessity, after all, is the mother of invention.
Read your pattern and see how many stitches you need to cast on.
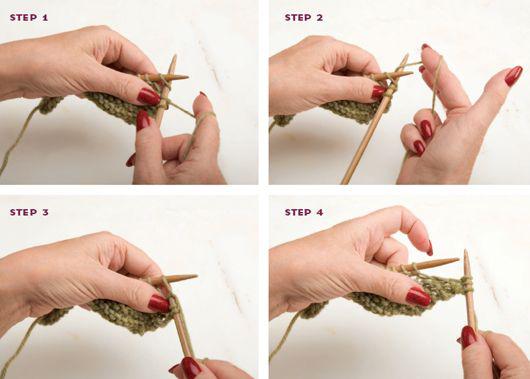
STEP 1:
Pull out a length of yarn from ball #1, approximately an eight–inch tail or enough to wrap around your thumb.
STEP 2:
Wrap your yarn around your left thumb with your thumb sticking up as if you were going to hitchhike and insert the needle through the loop.
STEP 3:
With the tail of ball #2 in your right hand, bring the yarn counterclockwise between the needle and your left thumb.
STEP 4:
With your right hand, take your yarn counterclockwise from the tail of ball #2 and place it between the needle and your thumb. Take the loop that is on your left thumb and bring it over the tip of the needle in your right hand.
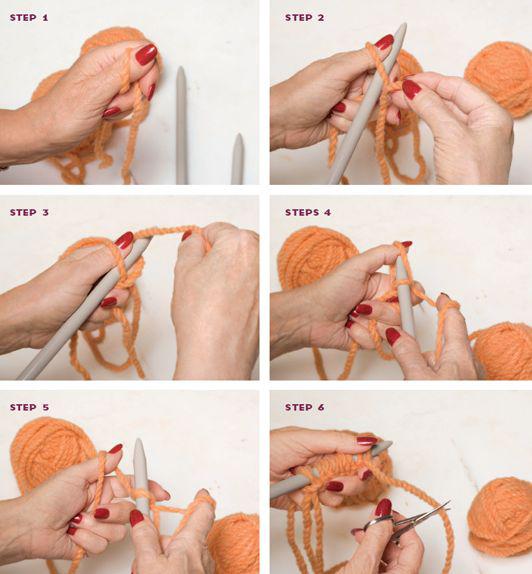
STEP 5:
With your right hand, gently pull on the tail of the ball to firm up your stitch. Avoid pulling too tightly. Your stitches should be able to gently glide along the needle.
STEP 6:
Continue with this method until you have cast on the desired number of stitches. At this point you can cut either one of the two balls. Once you master this technique, you will notice that you are basically knitting using your thumb as the second needle.
Knitting consists of two basic stitches: the knit stitch and the purl stitch. Once these are mastered, any project can be accomplished regardless of difficulty. Virtually every pattern created is a combination of the knit and the purl stitch. The knit stitch is the foundation of knitting, and it is important to do it well before you proceed to its companion, the purl stitch.
Learning how to knit is a simple four–step process, which can be easily remembered with a knitting verse that I originally created for children. It helps in visualizing the cast–on process. First, cast on approximately 20 stitches for practicing. Once you’ve accomplished this, follow these four steps: (1) go up the front door, (2) around the tree, (3) down the cellar, and (4) off you go.
[
EDITH KNIT TIPS
]Knit with the Needle, Not with the Tip
It’s important to remember that when knitting to always keep the stitches past the tip of the right–hand needle. The stitches, however, can remain very close to the tip on the left–hand needle for easy removal. Always keep a finger from your left hand on the first stitch to prevent it from slipping off. Remember, the tip of the needle is only used as a guide and is not the same size as the rest of the needle. If you keep the stitches on the tip of the right–hand needle and don’t slide them along the needle as you knit, your stitches will become too tight and impossible to knit with.
[
EDITH KNIT TIPS
]Keep Count of Your Stitches
One of the most frustrating things about knitting is the endless counting of stitches, especially when you have a large number of them. To make this task easier, I suggest placing a stitch marker every 20 stitches and using the markers to count and keep track of your cast–ons.
STEP 1:
Go up the Front Door:
Hold the needle with your stitches on it in your left hand, and slip the tip of the right needle through the front loop, from the bottom up, holding the yarn attached to the ball in your right hand. You’ll want to maintain a constant tension; your yarn should be firmly taut but not tight. Wrap the yarn from the ball around your right index finger, holding the yarn firmly in the palm of your hand. Your needles now form an X.
STEP 2:
Around the Tree:
With the right–hand needle underneath the left–hand needle, move the yarn around from behind the needle, toward the front in a counterclockwise motion through the X. Maintain a constant tension between your right hand and the strand of yarn. Bring the yarn behind the right needle, then pull it toward you between the X.
