Read Sew Fast Sew Easy: All You Need to Know When You Start to Sew Online
Authors: Elissa K. Meyrich
Sew Fast Sew Easy: All You Need to Know When You Start to Sew (8 page)

 Back 2 along the side seams
 Back 2 at the upper fold line
Use this guide to help you understand the following pillow cover diagrams


Step 1: Back Envelope Edges
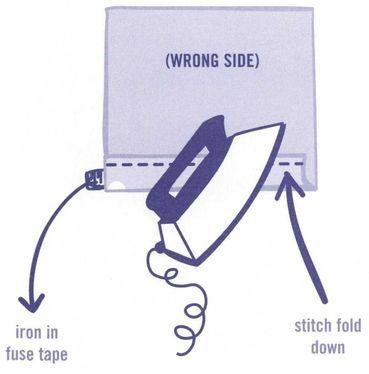
(To prevent burning, test a sample of the fuse tape on some fabric before ironing it into the pillow cover.) Unpin Back 1 paper pattern from fabric. To make the hem, at the bottom edge, fold the fabric back 1½ inches at the notches. Press the hem to the wrong side of the fabric so that there is a crisp crease. Do the same for Back 2.
If you are using fuse tape or Stitch Witchery
®
, insert two strips of fuse tape side by side into the hem of pieces Back 1 and Back 2. Using an iron, press the fold back down. Depending on the fabric, it may fuse in as few as 15 seconds or in as many as 45.
If you decide to sew the envelope edges instead of using fuse tape, press back ¼ inch of the fabric at the raw edge of the fold back.
Stitch the fold down.
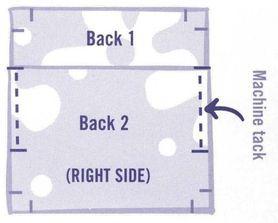
Step 2: Finishing the Back
Lay Back 2 faceup. Lay Back 1 on top of Back 2. Match the finished edge of Back 1 to the notch on the side of Back 2. (The finished edge of Back 2 will then match up with the notch in Back 1.) Pin the overlapped edges together. Machine-tack these two back pieces to form one piece the same size as the front pattern piece. Use ½-inch seam allowance.
OVERLAP BACKS AND SEW THEM TOGETHER AT THE SIDE SEAMS
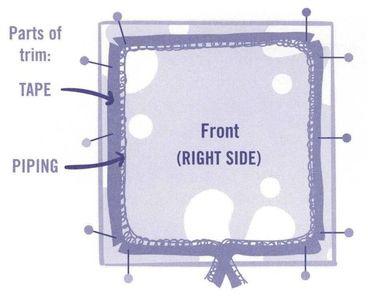
Step 3: Pinning the Piping
Lay the front piece (right side of fabric up) on the table. Start laying the piping out at the bottom edge of the pillow. Leave a 3-inch tail at the beginning. You can trim it down after you have sewn the piping on to the pillow. Lay the piping down so that the flat edge is closer to the raw edge of the fabric and the piping is facing the interior of the pillow. Using a ruler, measure the seam allowance (
5/8
inch), and make sure the piping bumps up against it. Pin the piping tape to the right side of the fabric. Work your way around the edges of the pillow. At the corners, clip notches into the tape of piping so that it lays flat and curves slightly around the corners of fabric so they cross each other. Note that the corners will be rounded. Once you have reached the bottom again, overlap the piping edges.
PIN CORDING AND TRIM ON THE
FACE OF THE PILLOW
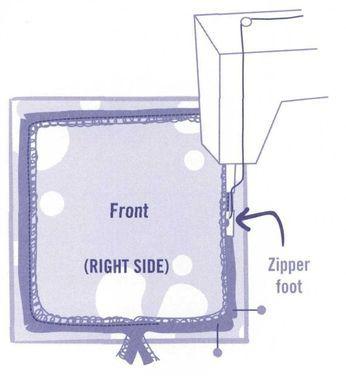
Step 4: Sewing the Piping
Now you are ready to sew the piping. Change the all-purpose presser to a zipper foot. Make sure to adjust the zipper foot (or the needle, depending on your machine) so that the needle sits to the left of the foot. This position will allow you to stitch as close as possible to the piping without sewing on top of it. Sew the piping around the edge of the pillow cover.
USING A ZIPPER FOOT TO
SEW THE PIPING
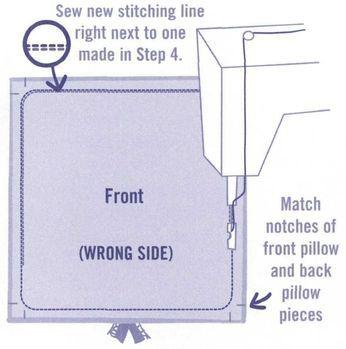
Step 5: Sewing Front to Back
Lay the completed back piece faceup on the table. Lay the completed front piece facedown on top of the back. Match the notches in the corners. Pin the edge together. Using the zipper foot, sew around the edge of the pillowcase. Use the previous stitching line (for the piping) as your guide. If you stitch on the inside of that line, there is less of a chance for the piping tape to show.
SEW THE FRONT OF THE PILLOW
COVER TO THE BACK,
WRONG SIDES OUT
Step 6: Finishing
Using the tips of your scissors, clip the seam allowance at the corners. Turn the pillowcase right-side out. Press flat. Insert
pillow form
. You are done!
CLIP AND TRIM THE CORNERS OF
YOUR PILLOW COVER SEAM
ALLOWANCE

