Sew Fast Sew Easy: All You Need to Know When You Start to Sew (5 page)
Read Sew Fast Sew Easy: All You Need to Know When You Start to Sew Online
Authors: Elissa K. Meyrich

Cutting lines
. Patterns have different cutting lines for different sizes. Sometimes they are solid lines; sometimes they are broken lines.
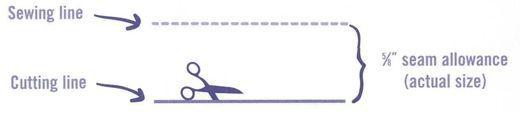
Seam allowance.
This is the distance between the cutting line and the sewing line of a pattern. All American commercial patterns include a
5/8
-inch seam allowance in their patterns unless otherwise noted. The skirt pattern in this book has
5/8
-inch seam allowance.
The Cutting Rules

Naturally you want your sewing project to come out looking great. If you follow these rules, you will have sewing success on any project you plan to make.
| Rule 1 . | |
| | Cut on the line of your pattern, which is the correct size according to your measurements. Not all projects have multiple sizes, though. For example, the pillow and the tote projects in this book only use one size. |
| Rule 2 . | |
| | Press out your fabric if it is very wrinkled. Press out your pattern if it is very creased. Since your pattern is made of paper or tissue, use a dry iron (no steam). |
| Rule 3 . | |
| | The right side of the fabric is called the face. Always fold the face side of the fabric inward so that it is on the inside of the folded fabric. The exception to this rule is velvet; when folding velvet, have the face on the outside. |
| Rule 4. | |
| | If folding the fabric, make sure the edges are placed evenly, selvage on top of selvage. Take time to smooth out your fabric so there are no ripples, and it is lying flat on the table. |
| Rule 5 . | |
| | Pin down all your pieces properly. The pattern piece that is marked center front fold should be pinned to the fold of the fabric. Note: This rule does not apply to the pillow or tote projects |
| Rule 6.* | |
| | Make sure the arrow on the pattern piece marked STRAIGHT GRAIN LINE is measured so that it is absolutely parallel to the selvage of the fabric or fold line. To check if your selvage is parallel to the straight grain line, use a ruler to measure from the straight grain line on the pattern to the selvage or fold of the fabric. The measurement should be the same at each end of the straight grain line. Pin the grain line down before pinning the rest of the pattern piece. Only use as many pins as you need. Softer, more slippery fabrics require more pins. |
| Rule 7 . | |
| | When cutting out your pattern pieces, make sure to cut your pieces as evenly as possible. If you cut evenly, you will be able to sew your project together much more easily. Take small snips, using the tips of the scissors. Keep your eye on the pattern line. |
| Rule 8. | |
| | When you are cutting, never move the pattern pieces that are pinned to the fabric and never slide your hand under the pattern pieces. |
| Rule 9. | |
| | Clip the “notches” on your pattern pieces using only the tips of your scissors. |
| Rule 10. | |
| | Mark an “X” with tailor’s chalk at the bottom of your project to indicate the wrong side of your fabric. This will save you time figuring the pieces out. |
| *Note on slippery fabrics: If you have slippery fabric, make sure to run the selvage of the fabric along a table that has a straight edge. This will help to keep the fabric lying on perfect grain. In addition you tear the fabric at the very top to find the even (weft) cross grain. Then when you lay it on a table and run the length of the fabric along the length of the table, the top of the fabric (where you tore it) should be even too. The fabric will be on perfect straight grain if it is forming a right angle. |

Sewing Machine Fear:
HOW TO GET OVER IT FOR GOOD

When you look at this simple machine, does it frighten you? That is only because you are unfamiliar with it. Relax. When you get a handle on how easy it is to use, and then “bond” with your machine, it will give you back so much pleasure. And it will save you money, too.
All sewing machines are actually very much alike in how they thread and how they operate. Once you have learned how to use a basic sewing machine with a little help from the manual, you can adapt yourself to any model.
All sewing machines sew a stitch formation known as a
“lockstitch.”
This stitch is formed by the machine with a top thread and a
bobbin
thread, which comes from the bottom of the machine. Each time the needle penetrates the fabric, the machine creates a knot, or the “lock” of the lockstitch. Those are the little stitches you see on the collars of some of your shirts, pockets, and the orange stitches on your jeans.
An Industrial Versus a Home Sewing Machine
An industrial machine is designed to sew one type of stitch for repetitious factory use. For example, some industrial machines only sew a lockstitch or only sew an overlock stitch. They are made for turning out hundreds of garments daily. A good example of this can be seen when you look at your jeans. Jeans are made on at least two different types of industrial machines because several kinds of stitches are needed to assemble them.
The home sewing machine is much more versatile than an industrial one.
It has many stitches that imitate those of industrial machines but it also does embroidery and knit stitches. All you have to do is turn the stitch pattern dial on your machine to change the stitch. With the variety of stitches you have available on your home sewing machine, you can make a very professional garment. The embroidery stitches can add some finishing touches that will make your garment look unique. You will also be able to sew many different kinds of fabric easily by using the proper
sewing foot,
needle, and
stitch length.
Refer to the instruction manual that comes with the machine, and experiment with your sewing on a scrap piece of fabric.
For sewing projects in this book, you will be using the
all-purpose foot,
which is always on your sewing machine. You will then be changing to a
zipper foot
to sew in the elastic waist or put decorative piping on your pillow.
The Parts of Your Sewing Machine
Here is a diagram of a typical sewing machine. Follow along and you will see how all sewing machines work in a similar way.
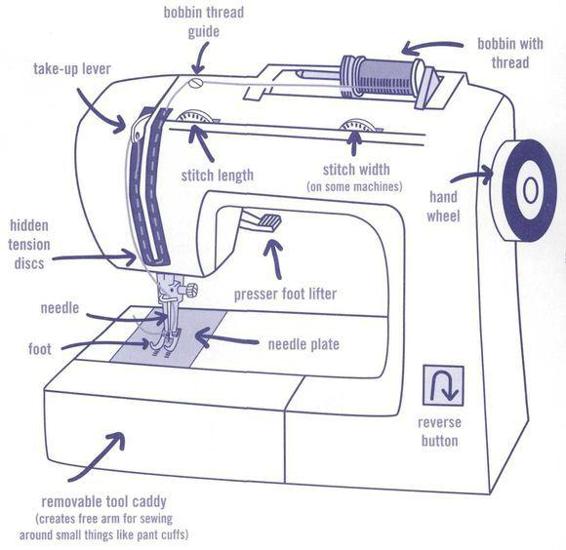
1.
Thread the needle from front to back. (Some of the very old machines thread from left to right.)
2.
Have a reverse button, and it is some times indicated with this symbol:

3.
Have a bobbin winder. When it winds a bobbin, it will stop when it is full. Each model and brand varies slightly in how it threads and winds a bobbin. Check your owner’s manual for your machine’s specifics.
4.
Have a
bobbin case.
Some machines have drop-in bobbins while other machines have a separate bobbin in a bobbin case to insert it into the machine. Use your sewing machine’s user manual to locate the bobbin case.