The Essential Book of Fermentation (31 page)
Read The Essential Book of Fermentation Online
Authors: Jeff Cox

Once the curd has set, you’ll need to cut it. Large pieces of curd will make a soft cheese, medium-size pieces (cubes roughly an inch or two on a side) will make a semisoft cheese, and small curd (cubes ½ inch or less on a side) will make a firm cheese. Since we’re after something like a Colby or cheddar, use a medium-size curd cut to cubes about an inch on a side. Don’t worry if the curd isn’t exactly the right size, or even if it granulates into something resembling cottage cheese. You’ll still get cheese—it just may not be exactly the type or texture you hoped for. Use a sharp knife and cut the curd into inch-wide strips, then cut it crosswise into inch-wide cubes. If the curd is deeper in the bowl than an inch or two, turn the knife sideways and cut in parallel swipes from side to side. It will break apart somewhat, but don’t worry. Keep the curd warm—to about blood temperature for a semi-hard cheese such as we’re making.
After you’ve cut the curd, run your fingers through it gently for about 10 to 12 minutes, moving the curd pieces around until they firm up to the consistency of firm scrambled eggs. Don’t squeeze the curd. Just stir it gently with your fingers. Make a bag over the sink with a couple of layers of cheesecloth laid into a mixing bowl and pour the curds and whey into the cloth bag. Tie up the ends of the bag and hang it from the faucet of the kitchen sink, allowing the whey to drain into the bowl. You may want to keep it and make a little ricotta. Allow the bag to drain naturally for about 6 hours.
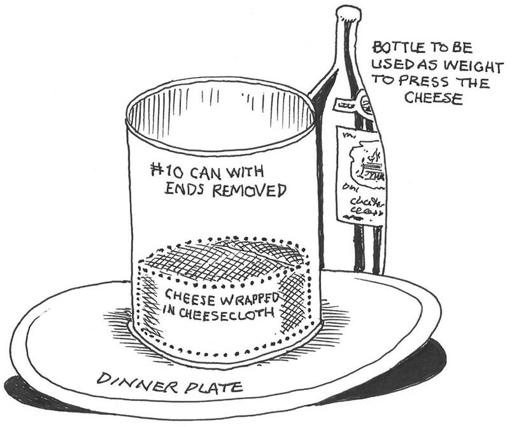
While the bag is draining, prepare a cheese mold—a number 10 tin can used for a food product with both ends cut out is fine for this size batch. Use one of the cut ends (watch out you don’t cut yourself) or find a small saucer or other flat ceramic circular material that’s hard and won’t impart anything to the cheese, and that just fits into the can. Place the can on a dinner plate and put the cheesecloth bag into the can, gently pressing it into the bottom so that it forms a round cylindrical cake. Press gently. Fold the excess cheesecloth over the top of the cake and put the saucer or can lid on top. Place a weight on the saucer—nothing too heavy, just something to exert some pressure so any excess whey will drain out. Something weighing a pound or so (approximately the weight of the cheese itself) is perfect. Slide something under one end of the dinner plate so that any whey that oozes from the cheese will run off.

After a half hour, take out the weight and the saucer and turn the can upside down, sliding the cheese in its cloth to the opposite end, replace the saucer on top, and put on the weight. Repeat this 4 times over 2 hours. At this point, allow the cheese to sit under the weight for about 12 hours. At the end of that time, unwrap the cloth gently, and you should have a nice round cylinder of cheese. It’s time for surface salting. First, rub the cheese all over with coarse salt (sea salt or kosher salt, not iodized salt) and allow it to mature for 2 to 3 days at a cool 60ºF in a cool room or basement. Then rinse it in clean water and immerse the cheese in brine made by dissolving 12 ounces (1½ cups) of coarse sea salt or kosher salt (not iodized salt) in a quart of lukewarm water. Place the cheese in the brine so it’s covered with liquid and allow it to stay there for 24 hours in the cool place you selected for maturing it.
After the 24 hours is up, remove it from the brine and place it on a tilted plate to dry. When the top is relatively dry, turn it upside down so the bottom can dry. By gently brushing (with a clean, damp cloth) and washing the surface of the cheese with brine several times during its maturation, you’ll achieve a washed-rind cheese that prevents the development of stray molds on its surface.
Cheesemakers do sometimes add white rind mold or blue molds to their cheeses, or spray molds onto their surfaces, but that’s a rather advanced technique. An alternative to the washed-rind cheese is dry salting. You can dry salt the cheese by gently rubbing the surface with kosher or coarse sea salt several times during the maturation period. Another alternative is to wait until a dry, yellow rind develops after about 2 weeks, then dip the entire cheese in melted wax. I don’t particularly like this method, though, since I think the cheese needs to breathe during its maturation, allowing gases to escape and allowing air to support the natural microorganisms on the rind.
Maturation should take place in a cool (45 to 60ºF) place with relatively high humidity. A root cellar or cool cellar is ideal. Think about a wine cellar—always at 58ºF. There’s a correspondence between cheese and wine; the ideal temperature and humidity (about 80 percent) for storing wine is also the ideal temperature and humidity for maturing cheese. Turn the cheese upside down weekly during its maturation. If you used raw milk, allow the cheese to mature for a minimum of 60 days, which ensures its safety, and longer if you want a sharper-flavored cheese. If you used pasteurized milk, you can allow it to mature for anywhere from 3 weeks for a very mild cheese to a year for a very sharp and tangy cheese. If some mold does develop on the dry rind, don’t worry too much about it. Just brush it lightly and rewash the rind in brine, or brush it and dry salt it again. If some questionable mold persists, you can always trim it off when the time comes to enjoy your homemade cheese.
Making Your Own Ricotta
Ricotta is a by-product of the cheesemaking process. If you followed the recipe for homemade cheese above, you will have a couple of quarts or so of whey, which will make about a pint of ricotta—an Italian word meaning “recooked,” because that’s what you do to the whey to make the ricotta.
During the cheesemaking process, after you’ve drained the whey off the curds into a stainless-steel, ceramic, or plastic container (anything but aluminum, which will react with the acid), let it sit overnight. The next day, heat the whey until it is near boiling, about 180ºF, but before it scorches, sticks, boils, or burns. You’ll see it become cloudy with small white pieces of curd. Take the whey off the heat and allow it to cool until just warm, about 85 to 90ºF, when it will be cloudy with fine curd and the liquid will be yellowish green.
Very carefully pour the clear whey off the curds into a couple of layers of clean cheesecloth lining a strainer suspended over a large bowl. Try not to disturb the curds. Here you’re trying to get as much clear whey off the curds as possible without yet transferring the curds to the cheesecloth. You can discard the clear liquid or, if you have a pig, your pig will consider it a real treat.
Pour or scoop the curds from the cooking pot into the cloth. There will still be some whey mixed with them. Tie the ends of the cloth up into a bag and allow it to drain until all the whey is drained out. This may take several hours. You can give the bag a little shake now and then to help it to drain.

Scoop the well-drained curds into a container and either use fresh within two weeks or freeze indefinitely. The ricotta is unflavored. Add a little kosher or sea salt to taste. Some people spice it up with lemon zest. You’ll find that homemade ricotta spiked with lemon zest and a little egg yolk will make the best filling imaginable for rolled-up crepes, which you will then brown gently in butter. Serve hot with your choice of sour cream, crème fraîche, Greek yogurt, or fromage blanc. Oh, and strawberry jam. Yes, you’re right. These are blintzes. Blindingly good blintzes.
Fromage Blanc

Fromage blanc is a thick and lovely fresh cheese, fermented, but not for long, yet containing the goodies produced by the bacilli in buttermilk. It’s good over fruit, on crepes, and wherever you want a smoother, fresher, sour cream–like product. You can use the whey to make
ricotta
.
Makes about 1 generous quart
2 quarts whole milk
1 cup half-and-half
2 cups buttermilk
2 tablespoons freshly squeezed lemon juice
¼ teaspoon salt
1.
In a large saucepan, mix together the milk and half-and-half.
2.
In a small bowl, combine the buttermilk, lemon juice, and salt, then add the mixture to the saucepan. Allow the mixture to rest for 1 hour, which gives the bacilli in the buttermilk a little time to work on the milk and half-and-half. (If you were to pour the lemon juice straight into the milk and half-and-half mixture, it could curdle the milk. It’s best to incorporate it into the buttermilk and salt first because lemon juice doesn’t curdle buttermilk.)
3.
Gently, over low heat, begin raising the temperature of the liquid in the saucepan. Use a candy thermometer or food thermometer to measure the heat. Stir the mixture once or twice with a few quick strokes, as the heat rises.
4.
When the temperature reaches 175ºF, remove the saucepan from the heat and set aside for 10 to 12 minutes to cool.
5.
Line a colander with several layers of cheesecloth and set it over a deep bowl. Pour the contents of the saucepan into the cheesecloth, then tie the ends up to form a bag. Hang the bag from the kitchen faucet to drain. When the draining stops, turn the fromage blanc into a container with a lid. If you wish, you can turn it into a bowl and beat it until very smooth if you prefer that texture. Cover the cheese and store in the fridge for up to 1 week.
Quark

On my first visit to Berlin, I was amazed at the ubiquity of ceramic stoves, oddly shaped toilets, incredibly good bread and beer, and quark—a lovely fresh cheese somewhere between ricotta and yogurt in texture and flavor. It’s so easy to make, and so useful. Spoon some on granola and fresh fruit. Spread it on toasted bagels instead of cream cheese. Fill crepes, omelets, frittatas, and ravioli with it. Spoon it onto pasta. It’s great stuff. It’s also full of friendly bacteria.
Makes about 1 cup