The Granny Square Book: Timeless Techniques and Fresh Ideas for Crocheting Square by Square (34 page)
Authors: Margaret Hubert
Tags: #Crafts & Hobbies, #Needlework, #Crocheting

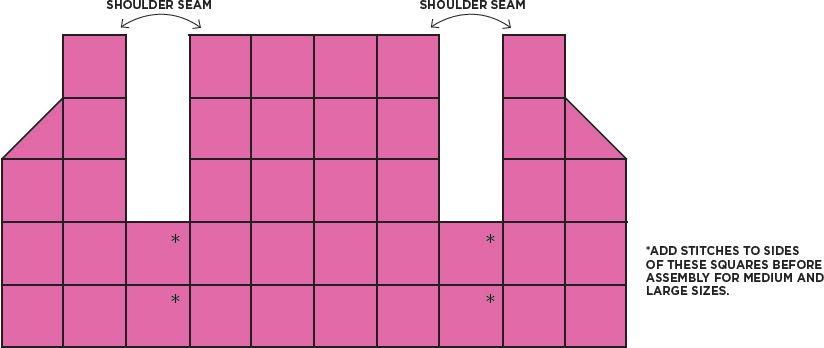
For size Large add 2 rows of dc on each side of the underarm squares before seaming.
Sew shoulders and underarm seams.
BOTTOM BORDER
Begin at bottom right front, right side facing you:
ROW 1:
Work in sc, picking up 23 sc in each square and each half square all around to bottom left front, turn.
ROW 2:
Ch 1, 1 sc in each sc to bottom right front, turn.
ROW 3:
(Buttonhole row) Mark 7 buttonholes using bottom and center of squares as placement points, starting at bottom and ending at V-neck shaping, *work sc to marker, ch 2, sk 2 chains, rep from * 6 times more, cont in sc to bottom left front, turn.
ROW 4:
1 sc in each sc, 2 sc in ea ch-2 sp to bottom of right front, turn.
ROW 5:
1 sc in each sc, do not turn.
ROW 6:
Work 1 row of reverse sc, fasten off.
ARMHOLE BORDER
RND 1:
Join at underarm, work 1 row sc as follows, * 1 sc in each of next 2 sts, sk 1 st, repeat from * around, join with a SI st, do not turn.
RND 2:
*1 sc in in each of next 14 sc, sk 1 st, rep from * around, join with a SI st.
RND 3:
1 sc in each st around.
RND 4:
Reverse sc in each st around.
If blocking is needed, lay garment on a padded surface, spray with water, pat gently into shape, allow to dry.

YOGA TUNIC AND MAT CARRIER
DESIGNED BY SHARON VALENCIA

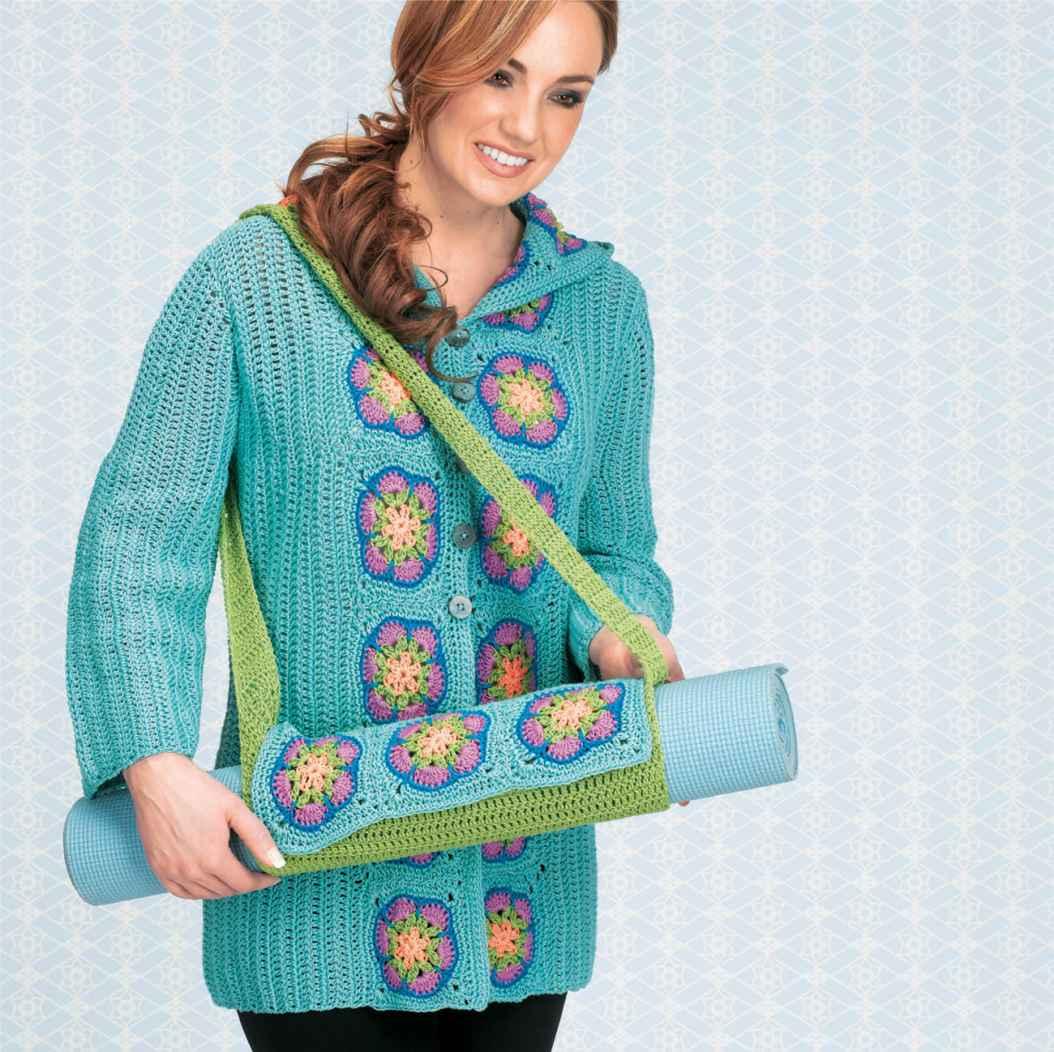
Cotton yarn is a classic choice for a tunic that is both functional and pretty. Comfortable and cool, this button-front jacket is easy-wear and easy-care.
Cool turquoise is a relaxing color, perfect for this yoga tunic designed by my daughter. The Yoga Tunic is worked in an unusual manner, first making the motifs, then working from side to side, creating the flattering vertical lines of the pattern. This project is a little challenging but rewarding as there is very little finishing work to do. And even if you’re not the most flexible student in the yoga class, you will be the most stylish when you transport your mat in this handy carrier. Easy to crochet and even easier to use, the carrier simply rolls around your mat and buttons in place above a row of colorful granny squares. Sling into the shoulder strap and you’re ready to go.
YARN
For Tunic: Tahki
Cotton Classic
, 100% mercerized cotton, 1.75 oz (50 g), 108 yd (100 m): aqua #3777 (E), 14 skeins; and 2 skeins each canteloupe #3476 (A); bright lime green #3726 (B); light raspberry #3457 (C); and bright blue #3806 (D).
For Mat Carrier: bright lime green #3806 (B), 2 skeins; small amounts of colors A, C, D, and E, left over from Tunic. If you are making the Mat Carrier alone, you will need 1 skein each of colors A, C, D, and E.
HOOK
F/5 (3.75 mm)
GAUGE
1 square = 4 1/4" × 4 1/4" (11 × 11 cm)
17 dc = 4 1/4quot; (11 cm)
8 rows = 4" (10 cm)
NOTIONS
for tunic: five 3/4" (2 cm) buttons
for Mat Carrier: tapestry needle
six 5/8" (1.5 cm) buttons
sewing needle and thread
FINISHED SIZE
Tunic: finished bust: 42" (106.5 cm)
46" (117 cm) at bottom edge
19" (48.5 cm) long from underarm
If larger size is desired use 6/G (4 mm) hook.
This will result in a wider, longer tunic.
Mat Carrier: 13" × 17 1/2" (33 × 44.5 cm)
SKILL LEVEL
Experienced

TUNIC
GRANNY SQUARE BAND
Make 17 #28 Paula’s Pendant Squares (
page 61
), working first 6 rnds only, working 1 rnd each of A, B, C, and D, and 2 rnds of E.
Sew squares in a strip, as shown below.
ROW 1:
With right side facing, join E in lower left corner space of first square, ch 2 (counts as dc), *work 1 dc in each st along edge of square, dc in next corner sp**, dc in corner sp of next square, rep from * across, ending last rep at **, turn (18 dc across each square side; 306 dc).

Labels, from left to right: Start here. Bottom left front. Left shoulder. Hood center. Right shoulder. Bottom right front.
RIGHT FRONT
ROW 2:
Ch 2 (counts as a dc here and throughout), sk first dc, 1 dc in each of the next 107 dc, for a total of 108 dc. This brings you to the top edge of the 6th square (top of right shoulder seam, see diagram,
page 127
), turn, leaving remaining sts unworked.
ROW 3:
Ch 1, 1 sc in each of first 36 dc, 1 dc in each of next 72 dc, turn. Note: This brings you to the bottom right front of the sweater. (See diagram,
page 127
.)
ROWS 4–9:
Rep rows 2 and 3 (3 times).
ARMHOLE SHAPING:
ROW 10:
Ch 2, 1 dc in each of next 71 sts, 1 sc in each of next 18 sts, turn, leaving remaining sts unworked.
ROW 11:
Ch 1, 1 sc in each of next 18 sc, 1 dc in each of next 72 dc, turn (90 sts).
ROW 12:
Ch 2, 1 dc in each of next 71 dc, 1 sc in each of next 9 sc, turn, leaving remaining sts unworked (81 sts).
ROW 13:
Ch 1, 1 sc in each of next 9 sc, 1 dc in each of next 72 dc, turn. (Beginning of row 13 is bottom of underarm.)
ROW 14:
Ch 2, 1 dc in each of next 71 dc, ch 10, turn.
ROW 15:
Beg in 2nd ch from hook, 1 sc in next 9 ch, 1 dc in each of next 72 dc, turn (81 sts).
ROW 16:
Ch 2, 1 dc in each of next 71 dc, 1 sc in each of next 9 sc, ch 10, turn.
ROW 17:
Beg in 2nd ch from hook, 1 sc in each of next 9 ch, 1 sc in each of next 9 sts, 1 dc in each of next 72 dc, turn (90 sts).
ROW 18:
Ch 2, 1 dc in each of next 71 dc, 1 sc in each of next 18 sc, ch 19, turn.
ROW 19:
Beg in 2nd ch from hook, work 1 sc in each of next 18 ch, 1 sc in each of next 18 sts, 1 dc in each of next 72 dc, turn (108 sts). (Armhole shaping complete. See diagram,
page 130
.)
ROW 20:
Ch 2, 1 dc in each of next 107 dc, turn (108 dc).
ROW 21:
Ch 1, 1 sc in each of next 36 sc, 1 dc in each of next 72 dc, turn.
ROWS 22–27:
Rep rows 20 and 21 (3 times).
ROW 28:
Fold sweater at underarm “seam” (at bottom of armhole shaping), ch 2, 1 dc in each of next 107 sts, (108 dc). Starting in edges of next square above right front, where you left off on row 2, work 18 dc across each of next 2 squares, work 9 dc across to center of next square, ch 2, turn, leaving remaining sts of square unworked.
ROWS 29–36:
Ch 2, 1 dc in each of next 152 sts (153 sts). Note: You should be at the top center back of sweater. Fasten off, leaving a strand long enough to sew top seam of hood.
LEFT FRONT
ROW 1:
With wrong side facing, join E at left shoulder edge, at the top of the 6th square above opposite end of assembled squares. Ch 1, starting in same st, 1 sc in each of next 36 sts, 1 dc in each of the next 72 dc, turn (108 sts).
ROW 2:
Ch 2, 1 dc in each st across, turn.
ROW 3:
Ch 1, 1 dc in each of next 72 dc, 1 sc in each of next 36 sc, turn.
ROWS 4–9:
Rep rows 2 and 3 (3 times).
ARMHOLE SHAPING:
ROW 10:
Ch 2, 1 dc in each of next 71 sts, 1 sc in each of next 18 sc, turn, leaving remaining sts unworked (90 sts).
ROW 11:
Ch 1, sc in each of first 18 sc, dc in each st across, turn.
ROW 12:
Ch 2, 1 dc in each of next 71 dc, 1 sc in each of next 9 sc, turn, leaving remaining sts unworked (81 sts).
ROW 13:
Ch 1, 1 sc in each of next 9 sc, 1 dc in each of next 72 dc, turn. (Beginning of row 13 is bottom of underarm.)
ROW 14:
Ch 2, 1 dc in each of next 71 dc, ch 10, turn, leaving remaining sts unworked.
ROW 15:
Beg in the 2nd ch from hook, 1 sc in each of next 9 sc, 1 dc in each of next 72 dc, turn (81 sts).
ROW 16:
Ch 2, 1 dc in each of next 71 sts, 1 sc in each of next 9 sc, ch 10, turn.
ROW 17:
Beg in 2nd ch from hook, 1 sc in each of next 9 ch, 1 sc in each of next 9 sts, 1 dc in each of next 72 dc, turn (90 sts). Ch 2, 1 dc in each of next 71 dc, 1 dc in each of next 18 sc, ch 19, turn.
ROW 18:
Beg in 2nd ch from hook, 1 sc in each of next 18 ch, 1 sc in each of next 18 sts, 1 dc in each of next 72 dc, turn (108 sts). (Armhole shaping complete)
ROW 19:
Ch 2, 1 dc in each of next 107 dc, turn.
ROW 20:
Ch 1, 1 sc in each of next 36 sts, 1 dc in each of next 72 dc, turn.
ROWS 21–26:
Rep rows 19 and 20 (3 times).
Row 27:
Ch 2, 1 dc in each of next 107 dc. Fasten off, leaving a strand long enough to sew shoulder seam. Sew shoulder seam from wrong side of work.
ROW 28:
With wrong side facing, join E with a SI st to center back of hood (see fig 2), ch 2, work 8 dc along remaining half square, 18 dc across each of next 2 squares (45 dc in all), dc in each st across row 27, turn (153 dc).
ROWS 29–36:
Ch 2, 1 dc in each of the next 152 sts, turn, ending last row at bottom center back of sweater. Fasten off leaving a strand long enough to sew center back seam.
SLEEVES
Starting at underarm seam, ch 54.
ROW 1:
Starting in 2nd ch from hook, 1 dc in each ch across, ch 11, turn (53 dc).
ROW 2
(begin cap shaping): Beg in 2nd ch from hook, work 1 sc in each of next 10 ch, 1 sc in each of next 2 dc, 1 dc in each dc across, turn (63 sts).