The Small House Book (8 page)
Read The Small House Book Online
Authors: Jay Shafer

Trinity Park, MA (top) & a San Francisco Bungalow Court (above)
63
You know you have perfection of
design not when you have noth-
ing more to add, but when you
have nothing more to take away.
-Antoine de Saint Exupery
MAKING SPACE
How to Build a House on Wheels
The Foundation and Framing
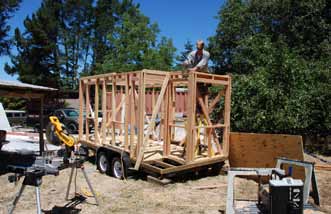
With little exception, my first portable house was built by using the most stan-
dard methods of construction. Like any other mobile home, my structure sit
on a steel chassis – in this case, a 7’ x 14’ flatbed, utility trailer. I took most of
the wooden deck off to save weight and put aluminum flashing over the gaps
to safeguard against mice. The floor framing was laid on top of that. I used
two-by-fours spaced about 24 inches apart on center.
Once that framing was assembled, I filled the cavities between the boards
with foam board insulation and spray foam and capped the whole thing off
with some ¾-inch plywood subflooring.
The walls were framed right over the wheel wells using headers just as you
would over any other opening. I used two-by-four studs and rafters spaced
twenty-four inches on center rather than the more typical sixteen inches. This
is a fairly standard practice used to save both money and natural resources.
At this point, I was using it primarily to save weight. My flatbed was rated to
hold 7,000 pounds.
Bracing
Tumbleweed would have to withstand not only the normal wear and tear of
everyday living, but also the occasional jolts and gale-force winds generated
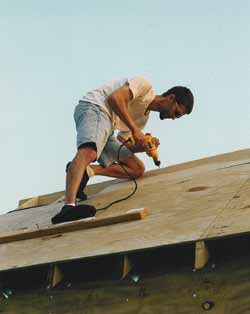
by highway travel. To prepare for this, I used what has come to be called the
“screw-and-glue” method of sheathing. This means that a bead of construc-
tion adhesive was squeezed onto the entire length of every framing member
before 3/8” plywood sheathing was screwed (not nailed) to its surface. This
makes for a structure far more resilient to lateral wind loads than sheathing
secured with nails alone.
before 3/8” plywood sheathing was screwed (not nailed) to its surface. This
makes for a structure far more resistant to lateral wind loads than sheathing
secured with nails alone.
Preventing Condensation
The only other special building consideration, after the foundation and bra-
cing, for a little house on wheels is condensation. Unless they are insulated,
sealed, and vented properly, small spaces are prone to a lot of condensation.
It simply takes less time to fill the air in a small enclosure with the moisture
caused by bathing, breathing, laundry, and cooking than it does to fill a large
one. If that warm, moist air comes into contact with a sufficiently cold surface,
it will condense into water. That is the reason that cars come equipped with
defrosters, and that small houses need to be equipped with the right insula-
tion, vapor retarders, and ventilation.
I used expanded polystyrene foam board as insulation with expanding spray
foam in the seams for two basic reasons: 1) It takes a thicker piece of fiber-
glass batting to get the same amount of insulating power as you get out of a
piece of extruded polystyrene. As I didn’t have enough space for eight-inch-
thick walls, this would have stood as reason enough for my choice. 2) Foam
board is far more resistant to condensation.
With fiberglass batting and other porous insulations, you have to worry about
moist air getting into it and condensing when the moisture gets to the cold
part of the wall. At that point, the fluffy, pink stuff turns to mush, and mush
doesn’t insulate. It rots. To prevent this, you have to use a vapor retarder.
This is usually just a large sheet of six-millimeter plastic hung over the inside
67
surface of the batting and sealed at its edges. If your seals hold and your
plastic does not rip, your fiberglass should stay fairly dry.
Expanded polystyrene with an impermeable coating does not need a vapor
retarder. Being virtually waterproof makes it its own retarder. I chose the
white, expanded polystyrene over the pink, extruded poly because, while I
love the pink stuff for its superior insulating qualities, bugs love it, too.
The threat of condensation is also what prompted me to use double-glazed,
insulated windows. The glass panes on a little abode can fog up pretty quick-
ly unless they are well protected against the cold. I’ve found that windows
sold with gas between the interior and exterior panes work pretty well for this
purpose.
The other primary way to eliminate condensation in a small enclosure is by
venting it. I installed a fan at the peak of my loft. It sucks moisture-laden air
out of my living quarters when I am cooking or bathing and helps keep the
place cool during the summer. On cold days, the vent can be sealed with a
plug I cut from some leftover scraps of foam board.
Tools
My tools are pictured on the facing page. They are pretty much all I have
needed to build a dozen small houses. Folks I’ve worked with tell me I’m a
fool for not using a table saw, too. You might want to add one to your list.
1. skill saw, 2. jig saw, 3. plyers, 4. files, 5. miter saw, 6. hammer, 7.
wrench, 8.goggles, 9. tape measure, 10. drill & drill bits, 11. pencil, 12. box
cutter, 13. level, 14. chisel.
68

1
4
3
2
14
12
13
5
6
10
7
11
9
8
69

Step-By-Step Instructions
1) Buy your materials and
order your windows. Be sure
the trailer will accommodate
the weight of your house.
Cut any extra vertical parts
off the trailer, but leave the
wheel wells intact. Remove
all the decking you can.
Leave no more than 24” be-
tween the remaining boards.
These gaps should be cov-
ered with aluminum flashing
to guard against rodent and
water infiltration. Do not put
any beneath the porch.
2) Assemble the floor framing
in front and in back of the wheel
wells. Then connect the two
sections by framing between the
wells. Use screws instead of
nails for this and all your fram-
ing.
70

3) Fill the cavities with your
choice of insulation (in this
case, expanded polystyrene
foam board with expanding
spray foam at the seams).
Once again, the porch area
should be left open to let wa-
ter drain through it.
4) Once you cover the whole
thing with 3/4” flooring or a
subfloor, the exterior wall
framing can be erected all
along the perimeter. Connect
the walls by driving screws
through the bottom plates
into the floor framing below.
71