The Washington Manual Internship Survival Guide (34 page)
Read The Washington Manual Internship Survival Guide Online
Authors: Thomas M. de Fer,Eric Knoche,Gina Larossa,Heather Sateia
Tags: #Medical, #Internal Medicine

•
It is possible to distinguish veins from arteries using ultrasound.
• Veins, in contrast to arteries, are more easily compressible with application of anterior–posterior pressure with the ultrasound probe. Central veins tend to be larger and less circular than adjacent arteries, but this can be misleading (e.g., patients with low intravascular volume).
• The relationship of the vein to the artery can also be useful: The internal jugular is typically anterolateral to the carotid artery. The femoral vein is typically medial to the femoral artery.
• Doppler ultrasonography with color flow can help identify arteries on the basis of pulsatile flow, but this can be misleading, as well (e.g., patients with severe tricuspid regurgitation).
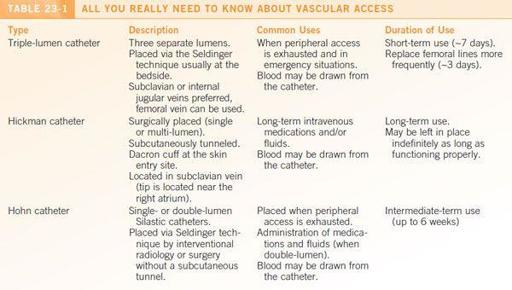
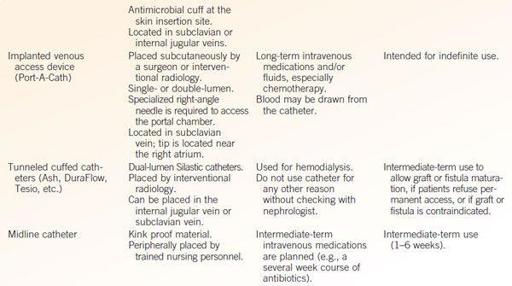
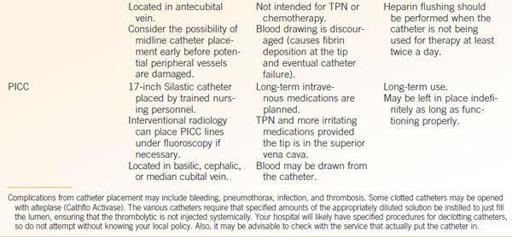
•
See
Table 23-1
for all you need to know about vascular access.
Equipment
•
This is in addition to what is typically needed for central venous access
•
A real-time 2D ultrasound machine with transducer: Make sure it is fully charged!
•
Sterile plastic transducer sheath
•
Sterile and nonsterile ultrasound gel (sterile gel is often included with the plastic transducer sheath kit)
•
A nonsterile assistant
Procedure
1.
First and foremost, track down and obtain a fully charged ultrasound machine.
2.
It is usually helpful to visualize the vascular structures at your access site prior to sterilization of the procedure site. This can be done with nonsterile ultrasound gel or surgical lubricant.
• Note the depth and caliber of the vein.
• Evaluate for vein patency and compressibility.
• Identify adjacent structures. Remember, the vein is typically anterolateral to the artery for the IJ and medial to the artery for the femoral.
•
Look for an alternate site if multiple collateral vessels without a single large lumen or if a central thrombus is visualized
.
3.
Cleanse and drape the patient as you would for sterile procedures.
4.
Apply sterile ultrasound gel to the interior of the plastic transducer sheath (alternatively, your nonsterile assistant may apply nonsterile gel to the ultrasound transducer).
5.
With the aid of your nonsterile assistant, carefully lower the ultrasound transducer into the opening of the plastic sheath (ensure that the transducer does not contact the outer surface of the sheath). The sheath should be pulled by the assistant to cover the length of the transducer cord that may contact the sterile field.
6.
Place sterile ultrasound gel on the patient at the selected access site.
7.
Once again locate the vein at the selected entry site. Rotate the ultrasound probe to obtain the transverse view (perpendicular to the course of the vein). As for the landmark technique, you should err initially on aiming your needle away from the artery (e.g., laterally or toward the ipsilateral nipple for IJ access, and medially for femoral venous access). Before beginning, align your ultrasound view perpendicular to your intended needle path.
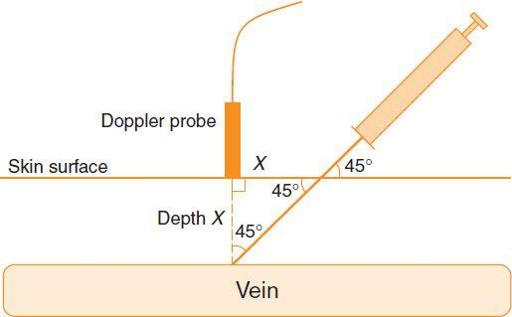
Figure 23-1.
Needle insertion site using ultrasound guidance.
8.
After anesthetizing the area, insert your introducer needle from the central venous access kit at a 45° angle to the skin at a distance away from the transducer that is approximately equal to the depth of the vein (as previously measured [see
Figure 23-1
]).
When starting out, it is best to have a sterile assistant hold the ultrasound transducer for you to free both hands for the line placement.
9.
Once venous return is obtained, the ultrasound probe may be left to the side on the sterile field.
10.
The other procedural aspects of central line placement are covered in detail on the accompanying procedure card.
OTHER PROCEDURES
All other procedures (i.e., arterial line placement, peripheral IV, thoracentesis, paracentesis, arthrocentesis, and lumbar puncture) are described in detail on the accompanying procedure card.
GUIDELINES FOR OCCUPATIONAL EXPOSURES
•
If an exposure to blood or other bodily fluids occurs:
•
Stop what you are doing immediately!
Take a deep breath; don’t panic.
• Cleanse wound with soap and water. For mucous membrane exposures, rinse with copious amounts of water.
• Call the hospital’s exposure hotline to report the exposure and get further instructions.
Each hospital has its own procedures on handling occupational exposures
, you likely heard about them in your orientation. Be sure to follow them. In reporting an incident, you will need the following information:
▪ Date and time of exposure.
▪ Details of procedure being performed, amount of fluid or material exposed to, severity of exposure, type of needle used (e.g., hollow bore).
▪ Details of exposure source—e.g., known HIV, HBV, HCV positive? If source has known HIV, obtain the names and dosages of medications the source is taking.
• You and the source patient will need to be evaluated for HIV, hepatitis B, and hepatitis C. Follow instructions from employee/occupational health for testing and follow-up.
•
The risk of transmission of a bloodborne pathogen depends on the pathogen involved, the type of exposure, amount of blood involved in the exposure, and amount of virus in the patient’s blood at the time of exposure.
•
If you have been exposed, you should avoid exchange of bodily fluids with other persons until follow-up is complete, including using condoms with sexual partners until the results of the HIV test from the source patient are known.
•
For more information on postexposure risk and therapies:
• National Clinicians’ Postexposure Hotline 1-888-448-4911 or
http://www.nccc.ucsf.edu/about_nccc/pepline/
(last accessed July 30, 2012).
• CDC
http://www.cdc.gov/hai/
(last accessed July 30, 2012).
Final Touches
24
1.
When in doubt, ask and ask again. Call someone (wake up someone if you need to), preferably someone who knows more than you do.
2.
Stay organized and prioritize your tasks.
3.
Real patient care first, documentation later.
4.
When in doubt, it’s always better (albeit more painful) to go see the patient.
5.
The right thing to do usually involves more time expenditure.
6.
Never but never make it up! If you don’t know, you’d better say so. Even stretching the truth is dangerous.
7.
Nurses are almost always right. If they are wrong, be selective about pointing this out.
8.
Walk if you don’t need to run. Sit down if you don’t need to stand. Lie down if there’s a bed nearby. Answer all of nature’s calls. There is almost always time to refuel (i.e., eat).
9.
Take primary responsibility for your patients—you are their doctor.
10.
Listen to your patients. They’ll usually tell you what you need to know.
11.
Resist the temptation to discuss patient care in public areas; no good can come of it.
12.
A healthy amount of compassion and compulsion makes it difficult to harm patients.
13.
See one, do one, teach one. You’ll be expected to assume more teaching responsibilities as time goes on. Start developing your own teaching style and discuss expectations clearly with all learners.
14.
Choose your battles carefully! Even in the name of patient care, ugly behavior is an ugly thing. You will be remembered for violations—don’t get a reputation.
15.
Help out your colleagues. If you finish your work early, check with other members of your team or the cross-covering intern
to see if they need anything; they can return the favor when you need it most.
16.
Before going home for the day, make sure your patients are tucked in and check out with your resident. A complete sign-out is vital— make sure to include any information (studies, consults, procedures) that may be needed to make major therapeutic decisions.
17.
Worthy goals for internship include learning to distinguish the life-threatening issues from the acute ones from the stable ones; mastering the interpretation and proper usage of diagnostic tests; learning procedural skills; refining the ability to ask specific questions for every consult you request.
18.
Fear and anxiety are normal. Take a deep breath and plunge in— there are people around to help you. If you are feeling overwhelmed by fear, anxiety, or other emotions, seek help—don’t be a hero!
19.
There is no magic spell on the last day of internship that will turn you into a resident. Trust that if you do and learn the right things during internship, you will be prepared to rise to the challenges of residency.
20.
Residency, too, shall pass.
Index