125 Physics Projects for the Evil Genius (62 page)
Read 125 Physics Projects for the Evil Genius Online
Authors: Jerry Silver

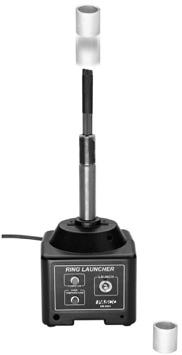
Figure 105-1
Courtesy PASCO
.
- lead ring
- coil of insulated wire connected in series with a low-wattage light bulb
- AC voltmeter (or multimeter configured as an AC voltmeter)
- tongs
- optional: Pyrex bowl with liquid nitrogen
- Safety: All wiring to the launcher should be appropriately enclosed and insulated to avoid a potential shock hazard. Without giving away the results of this experiment yet, it should come as no surprise that metal objects will be launched, sometimes at significant velocities.
Make sure no one and nothing of value can be hit by flying rings
. Caution should be exercised when working with low-temperature rings. Avoid constraining any of the collars for any prolonged period, which could result in elevated temperatures and burning hazard. The current should flow through the coil of the launcher for a limited time. Be careful to avoid overheating the coil by flowing current for an excessive time. - Slide the aluminum ring over the iron core of the ring launcher apparatus and slide in down over the coil.
- Activate the launch switch for a few seconds to apply 120V alternating current to the coil.
- Repeat with the other rings and collars.
- Connect an AC voltmeter across the two sides of the split ring to measure the current while
the current is flowing in the core of the launcher. Similarly, put a coil of wire around the core. Compare the AC voltage developed in one, two, or multiple coils of wire. - Place the coil of wire attached to the light bulb over the launcher coil and apply current to the launcher, as shown in
Figure 105-2
. - Hold the copper ring over the collar for a few seconds with the launcher turned on and feel the collar’s temperature. (Be careful not to hold it too long or it may get too hot to handle.)
- For this next part, make sure the ceiling is high enough. Immerse the rings in liquid nitrogen and activate the launcher.
Closed conductive rings and collars will be throw vertically by the ring tosser, as shown in
Figure 105-3
. The copper ring is thrown the highest, followed by aluminum. The copper collar is raised, but it is more sluggish. The split rings are not lifted. An AC voltage of a few millivolts can be measured across the split ring. A ring that is held down while the current is flowing in the coil will heat up significantly. The rings cooled in liquid nitrogen are much more response than their room temperature counterparts. The cooled copper ring will fly the highest and can likely damage a standard 8 to 10 foot (2 meter) ceiling. The light bulb will be illuminated when held over the current-carrying coil.

Figure 105-2
Induced current causes light to be illuminated. Courtesy PASCO
.
This is a demonstration of electromagnetic induction based on an apparatus developed by the prolific inventor Elihu Thomson. A constantly changing magnetic field produced by the applied alternating current causes an opposing current, and voltage in the rings and collars. The generation of an opposing current is an illustration of Lenz’s law.

Figure 105-3
Ring tosser. Courtesy PASCO
.
This induced current gives rise to a magnetic field oriented to repel against the field that forms in the ring launcher coils. The repulsion between these magnetic fields causes the ring to be tossed.
Because copper is a better conductor than aluminum or lead, more current flows and the ring is tossed higher. The collars are heavier and are not thrown as far. The split rings do not provide a complete current path, so the induced current does not flow in a complete circuit. The bulb lights because a current is induced in the coil connected to the bulb. The liquid nitrogen reduces the resistance of the rings. With lower resistance, more current can flow. The higher current creates a stronger magnetic field, which launches the ring higher.
The current generated in the split ring can be measured by attaching an AC voltmeter or a multimeter configured as an AC voltmeter.
A current flowing in a conductor produces a magnetic field. A changing magnetic field can induce a current in a conductor. The induced current can then generate a current. These currents according to Lenz’s law will always oppose each other.
Magnetic levitation using superconductivity. The Meissner effect
.
Typically, when the temperature of a conductor is reduced, the resistance is also lowered. We saw in the previous experiment how a magnetic field can cause an object to levitate. For some materials, if we continue to lower their temperature, the resistance continues to drop until it disappears entirely. When this happens, we have what is known as a
superconductor
. Superconductors have amazing properties and are beginning to find their way into practical applications.
- liquid nitrogen
- thin piece of cork (about ¼ inch thick)
- Styrofoam dish (formed by cutting a Styrofoam cup; tThe total height should be about 2 mm)
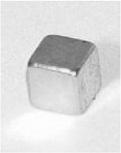
- cube-shaped neodymium magnet (see
Figure 106-1
) - plastic tongs
- superconductor disk consisting of YBa
2
Cu
3
O
7
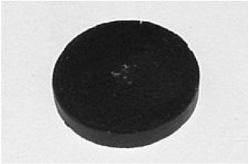
ceramic (see
Figure 106-2
) - optional: video camera or PC cam connected to a TV monitor (to show this to a larger group)
- optional: thermocouple, voltmeter, DC power supply, superconductor coil, superconductor sample with measurement leads attached

Figure 106-1
Neodymium magnet cube
.

Figure 106-2
YBa
2
Cu
3
O
O
7
ceramic disk
.
- Place the YBa
2
Cu
3
O
7
ceramic disk on the table and set the neodymium magnet on top of it to show no repulsive force is occurring at room temperature. - Place the cork in the center of the Styrofoam dish.
- Place the black YBa
2
Cu
3
O
7
ceramic disk on the piece of cork. - Carefully pour liquid nitrogen into the Styrofoam dish to partially cover the ceramic disk.
- The liquid nitrogen will boil for a short while. When the boiling subsides, the disk has sufficiently cooled, as shown in
Figure 106-3
. - Using the plastic tongs, pick up the neodymium magnet. Carefully place the magnet over the ceramic disk.
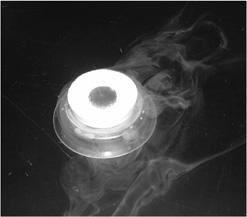
- When the magnet is observed to hover over the ceramic disk, use the tongs to give it a spin, as shown in
Figure 106-4
. - Because the parts in this project are small, if the intention is to show this to a larger group, a video camera or PC cam can be used to display this on a monitor.
The magnet is held suspended above the ceramic superconducting material. If the magnet is spun, it continues spinning without noticeable resistance. Eventually, the ceramic will warm up and the superconducting effect will fade.

Figure 106-3
Superconducting disk being brought below Curie temperature
.

Figure 106-4
Magnetic cube spinning above superconducting ceramic disk
.
Normally, at temperatures above what is known as the critical temperature of a material, the material has some electrical resistance. This means a voltage must be applied across the material to push the electrons through the material. The voltage is needed to drive the electrons through what is like an atomic obstacle course, consisting of other atoms vibrating randomly. As (normal nonsuperconducting) resistors cool down, their resistance gets lower. However, superconductors have zero resistance. Not just lower, but zero! This means the electrons no longer need a voltage to push them. This also means the electrons can move about freely throughout the superconductor without energy losses.