125 Physics Projects for the Evil Genius (65 page)
Read 125 Physics Projects for the Evil Genius Online
Authors: Jerry Silver

A magnetic field does not exert a force on a stationary electron. However, a magnetic field does produce a force on a
moving
electron. The electron’s motion, the magnetic field, and the force are
all
at right angles to each other.

Figure 110-3
Cathode ray tube with magnetic field front to back
.

Figure 110-4
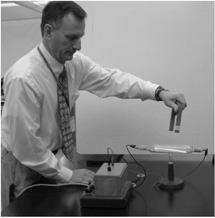
Cathode ray tube with magnetic field back to front. Photo by S. Grabowski
.
The direction of the force on the electron follows the right-hand rule. If your index finger points in the direction of the beam, and your other three fingers point in the direction of the magnetic field (north to south), then your thumb shows the direction of a force on a positive particle (or the opposite direction for a negative particle, such as an electron). You can label the fingers of your right hand with Post-it notes to help keep track of the electron motion, the field, and the resulting
force. (This is why Post-it notes are on the What You Need list.)
You can take this a step further. Thomson applied an electric field to deflect the electron beam by a measurable amount. Then, by applying a magnetic field at a right angle to the electric field, Thomson was able to determine the charge to the mass ratio of the electron. This can be performed using commercially available equipment.
Properties of the electron can be determined by observing its behavior in electric and magnetic fields.
The electron is negatively charged.
The force produced by a magnetic field on a moving beam of electrons can be described by
the right-hand rule
, in which the thumb indicates the direction of the force, the index finger indicates the direction of the motion of the electrons, and the rest of the fingers indicate the direction of the magnetic field.
Careful analysis of electric and magnetic fields on an electron beam determines the charge to mass ratio of the electron.
What is the shape of a magnetic field
?
You cannot see a magnetic field. But you can define the shape of the field by measuring its effects. In this project, you trace the shape of the magnetic field created by various arrangements of permanent magnets.
- 2 bar magnets
- U-magnet
- several sheets of paper
- iron filings
- Lay the bar magnet on the table.
- Place the sheet of paper over the magnet.
- Trace the outline of the magnet, showing the north and south poles.
- Evenly sprinkle iron filings over the paper. Distribute the filings so the shape of the pattern on all sides of the magnet is delineated by the iron filings.
- Repeat with the following cases.
- The iron filings can be easily poured back into the container. If they come into direct contact with the magnet, it is much harder to clean up.
– Two north poles facing each other
– A north and a south pole facing each other
– A horseshoe magnet
Expected Results– Any other shape—your choice
The electric field surrounding a bar magnet follows lines that go from the north pole to the south pole, as shown in
Figure 111-1
.
With a north pole directly opposite a south pole, the lines of force are directed from the north pole to the south pole, as shown in
Figure 111-2
.
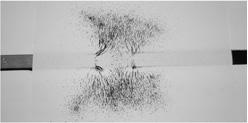
With two north poles facing each other, the electric field is directed away from each of the poles. Lines of force can be seen directed perpendicular to each of the two magnets, as shown in
Figure 111-3
.

Figure 111-1
Bar magnet
.

Figure 111-2
North pole opposite south pole
.
The magnetic field causes ferromagnetic materials, such as iron filings, to align with the field lines.
A higher tech approach would be to use a magnetic field sensor to map out the shape of these magnetic fields.

Figure 111-3
North pole opposite another north pole
.
Magnetic fields show the force a magnet would exert on the north pole of another magnet. Magnetic fields point from north to south. Magnetic fields point away from north poles (opposites repel) and toward south poles (likes attract).
What happens to a current-carrying wire in a magnetic field
?
The heart and soul of an electrical motor is movement created when magnets repel each other. The discovery by Michael Faraday that a force is produced when current flows through a magnetic field was a groundbreaking discovery, which paved the way for the eventual development of the electric motor.
- powerful horseshoe magnet
- DC voltage source, such as an adjustable power supply, a motorcycle battery, or a car battery
- about 1 meter (a few feet) of insulated wire
- ring stand with clamps to position the wire
- Set the horseshoe magnet on the table.
- Position the wire midway between the north and south poles of the magnet. The wire should run perpendicular to the two ends of the magnet and it should be able to move.
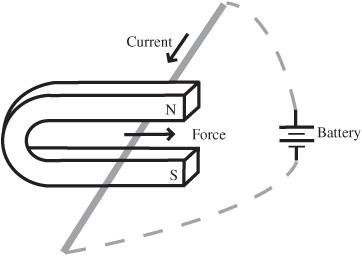
- Attach one end of the wire to the negative terminal of the power supply, as shown in
Figure 112-1
. - Briefly touch the other end of the wire to the positive terminal and observe the wire passing between the poles of the magnet. If you are using an adjustable power supply, start with a lower-current output setting and slowly increase it until the wire responds. Because there is no resistance besides the little resistance the wire offers, a high current may flow that may cause a fuse or circuit breaker to blow.
With current flowing in the wire, the magnet pushes the wire away from the magnet.
A force is exerted on a moving charge (or current) in a wire moving perpendicular to a magnetic field.

Figure 112-1
Force between two current-carrying wires
.
Repeat this with a tight coil of the wire in the magnetic field. Compare with the response of an uncoiled wire.
A magnetic field exerts a force on a current-carrying wire. The direction of that force depends on the direction of current flow and the orientation of the magnetic field according to the right-hand rule.
A no-frills motor
.
In this project you will build a very basic electric motor. This project has been broken down into a number of steps for clarity, but the overall device is simple. It’s like assembling a barbeque grill—the first time you do it may take a little longer, but once you get the overall idea, it gets easier each time. It takes just a few minutes to build, but it can keep running until the battery runs out.
- C or D cell battery
- ceramic disc magnet
- 1 meter of enamel-coated (thin) 22 American Wire Gauge (AWG) wire. It is much easier to work with red or green coated enamel, rather than clear-coated
- 2 paper clips or a few inches of at least 20 AWG wire