Building Web Sites All-in-One For Dummies® (112 page)
Read Building Web Sites All-in-One For Dummies® Online
Authors: Claudia Snell

Testing
Finally, test the site to ensure a smooth transition from the old to the new. If the site is small, you can test most of it on your local machine. Or, if the site uses ASP, ColdFusion, or PHP, you can test the pages with a testing server on your local machine. At the risk of being blatantly obvious, check everything: navigation menus, links, interactive content, and so on. Another option you can choose is doing an online beta test, as outlined in Book III, Chapter 10. After testing the site, evaluate your findings and tidy up any loose ends or faulty code. Then you're ready to go live.
Trauma-free site expansion
Whether you're expanding existing pages or redesigning the site from scratch, your task is a lot easier if you follow certain steps during the project. Most of this is common sense, but even the best designer might forget a step or take things for granted because he's worked with the client before. Well, the long and the short of it is to
not take anything for granted.
Otherwise, one of Murphy's Laws will come into play when you least expect it. At any rate, here are a few things to consider when expanding a Web site:
â¢
Write a proposal for the expansion project.
After you and the client come to terms with the scope and breadth of the project, prepare a proposal and get the client to sign the proposal before you begin work.
â¢
Present a mockup to the client for approval.
Just because you've worked with the client before doesn't mean you know her like the back of your hand. You might be in for a nasty surprise if you assume that she'll fall in love with your expansion, sight unseen.
â¢
Use existing pages as the basis for the site expansion.
When you begin the site expansion, download the old pages from the Web hosting service. In a worst-case scenario, you may need to create a new navigation menu to incorporate new sections of the site. You can create a new menu in Fireworks and insert it in the proper place in your HTML pages.
â¢
Archive the original Web site so you can refer to the old content if you need to.
If the current site is relatively small, download the site to a folder on your computer.
â¢
Maintain links and the page's listing in a search engine index.
When revising a page that's currently on the site, begin with the document you downloaded from the Web hosting service. Change the page as needed and save it, using the same name. This keeps all your links intact and preserves the page's listing in a search engine index.
â¢
Keep your client abreast of the project.
If you're uploading your work while you do it, tell the client when the revised work is posted and get the client to sign off on the work. If you're working on a total redesign, upload the content to a different folder at the Web hosting service and ask your client to review and comment on the work you've done so far.
â¢
Test, test, test â and then test again.
Make sure everything on the pages you're creating or revising works perfectly. That includes links and any code. A site expansion should be handled with the same kid gloves as a new design.
In fact, if you have the luxury of time and the scope of the expansion is massive, consider doing a full-blown beta test, as outlined in Book III, Chapter 10. In lieu of a beta test, use your friends, employees, or the client's employees to test the revised site.
â¢
Upload pages
only after
securing the client's approval.
Never upload pages to the root directory of the Web hosting service until the client agrees that the work is to her liking and after you test the pages to ensure that no problems exist. Your best bet is to upload the new pages to a different folder on the server and send the URL to the client and anyone else who is testing the pages.
â¢
Set up a testing server.
If you're creating ColdFusion, PHP, or ASP pages, set up a testing server on your local machine. That way, you can test the pages while you create them.
â¢
Work smarter, not harder.
Use the features of your HTML editor to modify the previous work you did for the client as part of the site expansion. If you're using Dreamweaver, read the nearby sidebar, “Making Dreamweaver work for you,” to find out how you can whip through a site expansion without breaking a sweat.
After Launching the Expanded Site
You might think the work is done after you upload the revised or redesigned site to the server. Nay, nay, Nanette! Your work â or your client's work â has just begun. Sure, you posted something new (and hopefully exciting) for the world to see. However, like anything else, nobody will know what you did unless you tell them about it. That's right: You've got it, so flaunt it. The following is a list of things you or your client should do to publicize a revised or redesigned site:
â¢
Send a press release to the local media.
The press release should include the reason why the client changed the Web site. Don't forget to include information about the client and the client's business or organization. Be sure to include the URL to the site in the press release. If your client enjoys a worldwide audience, several services are available on the Internet that you can use to create a press release. You can find a service that suits your needs by typing
“Internet Press Release”
in your favorite search engine.
â¢
Notify members of your client's mailing list that the site has new content.
â¢
Send a newsletter to existing clients telling them about the expanded Web site.
â¢
Request link exchanges.
If your client's expanded Web site contains information pertinent to Web sites not currently linked to the site, request a link exchange.
â¢
Include an invitation to visit the expanded Web site in all the client's printed media, including advertisements.
â¢
Re-register the site with the search engines.
â¢
Use other online marketing techniques, such as pay per click ads, to draw visitors to the expanded site.
Pay Per Click Search Engine Marketing For Dummies,
by Peter Kent (Wiley) can help you (and your client) bring a steady flow of potential customers to your client's site.
Making Dreamweaver work for you
You already created a lot of material for the site you're about to expand. Whether you're revising the old site or redesigning it, there's no sense in reinventing the wheel. The Assets panel is chock-full of items you used on the old site: images, Flash movies, URLs, and so on. To use them in the revision or redesign, simply open the Assets panel and then drag the Asset into the new or revised page. Snippets can also be a great timesaver, especially if the site uses a lot of code. If you added items to the Library (such as footers and copyright notices), you can use these in the site expansion as well. And last, but not least, consider recycling templates you used when creating the site. If it's a total redesign, you might be able to get by with revising templates. To revise a template, open the document as a DWT file. You can then edit locked regions of the template and make other necessary changes to suit the revision. As an added bonus, when you save the template, you have the option of updating all pages that were designed with the template.
 After you launch the redesigned or revised site, pay careful attention to the site statistics to determine the overall success of the expanded site. Notice which pages are getting the most visits and from which pages visitor exit the site. If viewers are exiting the site from pages that contain important new content, you need to revise the pages. The information you learn from site statistics will drive future changes, revisions, and redesigns.
 Convince your client to add an online survey with your redesign or revision. The survey should ask visitors what they like and dislike about the redesigned site. If the survey is long, consider including a special offer as a reward for submitting the completed survey. The information garnered from the survey can help you and the client gauge the overall success of the site. You can also require the visitor's e-mail address, which can then be added to the client's mailing list.
Book IX
Case Studies

Chapter 1: Blog Site
In This Chapter
Knowing how blogs work
Adopting the b2evolution blog application
Running multiple blogs with WordPress
Using a blog hosting service
Incorporating a blog with an existing site
A
blog,
for those of you who have been couch potatoes instead of 'Net potatoes, is short for
Weblog.
A blog is like an online diary. You post your thoughts, photos, or information of interest to your viewing audience and then collect comments from people who read your blog. Kids use blogs, and so do politicians. Blogs come in many different varieties. There's the
vanity blog,
which is put up by someone who absolutely thinks it's the coolest thing since wireless pointing devices but only fills the blog with vacuous text. And there's the
serious blog,
put up by someone who has important information to convey to his Web site visitors. In this chapter, we explore two pieces of blog software and explore a blog used by two book authors to display tutorials and information about digital photography and image-editing applications. You can use the information in this chapter to create your own blog or to create blogs for your clients.
Examining Blog Software and Services
If you type
blog software
into your favorite search engine, you get pages of results to explore. Much of the most popular blog software and many blog templates are free.
Before actually showing you some blogs, we tell you a bit about how they work. When you add a blog to your Web site, you add PHP pages to your Web site. The pages enable you to display your blog online and accept comments from visitors to your blog. You post entries to your blog from the administration pages. From the administration pages, you can also delete pesky comments or comments you don't consider suitable for your blog. When you post an entry to your blog or a user posts a comment, the information is stored in a MySQL database on the server. When someone visits a blog site, the PHP page plucks the information from the database and displays it.
b2evolution
The b2evolution blog software, which is free, features an administration section that enables the user to create blog posts and also manage comments posted by users. The b2evolution blog is multilingual and supports multiple users and multiple blogs. You can download different blog
skins
(user interfaces) to change how the blog looks to visitors. If you're conversant with PHP code and CSS (Cascading Style Sheets), you can modify the blog to match the look and feel of other Web pages on the site. In the following sections, we show you some of the features of a b2evolution blog.
Introducing the b2evolution application
The b2evolution blog is powered by PHP and a MySQL database. As of this writing, the current version of b2evolution is b2evolution 2.4.5, which is also known as Monument Valley. You can download b2evolution at
http://b2evolution.net
. Follow the links to the Download section.
In order to run b2evolution, your Web server needs PHP 4.3 or above and MySQL 3.23 or above. The designers of the application claim that it works best with Linux with an Apache server. Everything on the blog is done online through a Web browser. b2evolution has been tested with the following browsers: Firefox 1.0+, Internet Explorer 6.0, and Konqueror 3.5+.
The b2evolution application has an impressive manual, which you can view at its Web site. You can see the full manual at
http://manual.b2evolution.net/Main_Page
. The manual covers every conceivable question about the application, including how to change the look of the blog, how to create blog entries, how to manage multiple blogs, and so on. The downloaded application comes with installation instructions that link to the b2evolution Web site and manual.
Installing b2evolution
If your Web server has the required features (listed in the preceding section) to run b2evolution, you're ready to install b2evolution on your server. You can find detailed instructions with the application. The following steps are condensed, but they give you an idea of how simple it is to install the application on your server.
1.
Download and unzip the b2evolution application.
Detailed installation instructions can be found here:
http://manual.b2evolution.net/Install_b2evolution
All the necessary files you need to run the application are downloaded into a folder named Blogs.
2.
Create a new MySQL database on your server.
You can easily create a MySQL database through your Web hosting service's control panel or a server application called phpMyAdmin. When you create the database, you're prompted for a name, user name, and password. You don't have to configure the database because the b2evolution application handles that task for you.
3.
Upload the Blogs folder to your server via an FTP (File Transfer Protocol) application, such as CuteFTP or FileZilla.
When you unzip b2evolution, all the files required to run the application appear in the Blogs folder.
4.
Change permissions on several pertinent files.
Using your FTP application, change the permission of files that configure the blog, enable uploading of image files when creating blog entries, and so on. Detailed instructions on which files need permission changes are in the complete instructions.
5.
Install b2evolution on the server:
a. Access the Install folder.
On a typical installation, you can find this at
www.
mywebsite.com
/blogs/install/
.
The installation dialog boxes appear.
b. Follow the prompts to enter your MySQL database name, user name, and password.
6.
After entering your database information, choose New Installation, click Go, and then follow the prompts.
The installation software writes the config files and populates the database. During the installation, you receive a username and password, which you use to log in to the blog. If desired, after logging in to the blog for the first time, you can change the default password.
7.
After you install b2evolution on your server, click the Log In link.
This takes you to the blog's log in page, where you're prompted for your user name and password. Before you can actually post to the blog, though, you have to change a few files.
8.
Change a few permissions on the server and make some changes to the
config.php
file.
 Most FTP applications give you the option to change permissions. The blog installation instructions tell you what changes to make.
After making these changes, you're ready to go blogging.
Posting a blog entry in b2evolution
After you install and set up a b2evolution blog, you (or your client) can begin posting entries to the blog. When you post entries to a b2evolution blog, you do so through the Back Office, which you access by logging in as administrator and then clicking the Log into Backoffice button. Several tabs in the Back Office enable you to perform myriad blogging tasks. The Back Office is well documented in the online manual. It's also fairly intuitive â almost as easy as writing an e-mail. If your client is familiar with working in a Web browser, you'll have him up and blogging in no time flat.
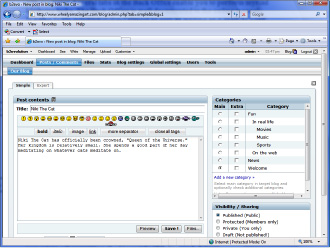
When you create a blog post, you enter the information in the Write section of the Back Office. You use the various buttons to add hyperlinks, images, and so on. (See Figure 1-1.)
Figure 1-1:
Post an entry to the blog.

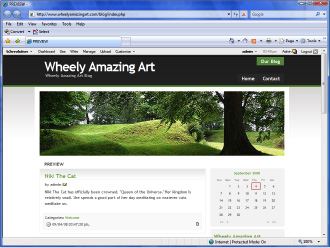
After writing a blog entry, you can preview it (see Figure 1-2) before clicking the Save button. After you upload the post, visitors to the blog can read it and add comments.
Figure 1-2:
Preview the blog prior to posting it.

Managing a b2evolution blog
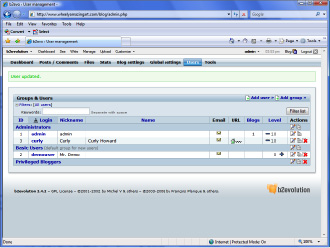
You manage a b2evolution blog through the Back Office. In the Back Office, you configure your blog and add other users to the blog. If you're maintaining the blog for your client, you're the administrator, and you set up other users on the Users tab. (See Figure 1-3.)
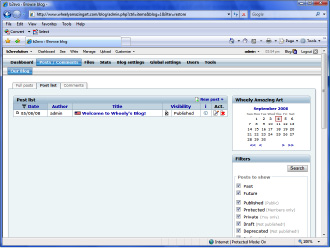
After you have the blog up and running, you can manage posts as well as user comments. You can edit previous posts, delete posts, and delete comments that you deem inappropriate for the blog. You do this on the Posts/Comments tab of the Back Office. (See Figure 1-4.)
WordPress
Another very popular blog application is WordPress. Like b2evolution, WordPress is free. The application is feature rich. After you set up a blog on a server, you (or your client) can manage everything online through a Web browser. WordPress supports multiple blogs and multiple users. If desired, you can have users create profiles with WordPress. Depending on the template you use, visitors to the blog can leave comments about each post.
Figure 1-3:
Set up other users in the Back Office.

Figure 1-4:
Manage blog posts here.
