Building Web Sites All-in-One For Dummies® (114 page)
Read Building Web Sites All-in-One For Dummies® Online
Authors: Claudia Snell

Managing a WordPress blog
If you're setting up a blog with multiple authors and multiple categories, you can easily manage the blog through the WordPress Dashboard. You can also edit or delete posts. To edit posts in a WordPress blog, follow these steps:
1.
Log in to your WordPress blog.
When you log in as administrator, WordPress displays the Dashboard, which enables you to administer your blog. If you have other people creating content for the blog, users with editor status can also edit blog entries.
2.
Click the Manage tab.
Your browser refreshes to show all entries posted to the blog. (See Figure 1-11.)
3.
Click the Edit link for the post you want to edit.
WordPress opens the entry on the Write tab.
4.
Edit the message and then click the Save button.
WordPress publishes the edited post.
Figure 1-11:
Manage posts here.
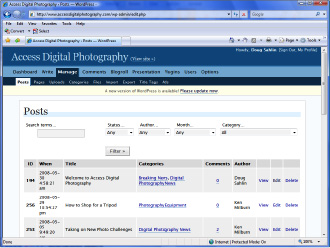
You can also add categories to the blog, modify comments, and do other tasks on the Manage tab. You can add links to the blog through the Blogroll tab (in this version of WordPress; the Links tab in other versions), plus add and manage users through the Users tab.
Exploring other options: Blogger.com
If your client doesn't have PHP capability on his Web server but still wants to go blogging, many online sources can host a blog. The online blog is linked to the blogger's site. Google acquired Blogger.com in 2003. Google has made improvements to the service, and it now features the capability to upload images with blog posts. You don't have to download any software; you do everything online. Blogger.com users can choose from a variety of templates.
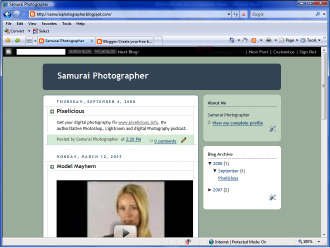
Hosting a blog with Blogger.com is a three-step process. You create an account, name your blog, and then choose a template. After choosing a template, you or your client can begin posting words of wisdom â or a reasonable facsimile thereof. Figure 1-12 shows Doug's blog at blogspot.com.
Figure 1-12:
A free blog linked to an author's Web site.
Creating a Web Site from a Blog
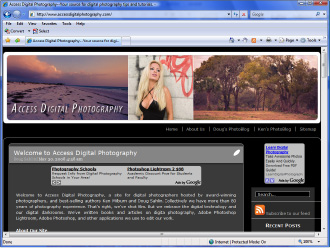
When Doug and a fellow photographer decided to create a Web site to post digital photography, Photoshop, and Photoshop Lightroom tutorials, they decided to use a WordPress blog for the site. The blog makes it possible for site contributors who don't know HTML to add tutorials to the site. After setting up the blog, Doug added links to the blog that enabled viewers to visit different pages and other linked blogs. He also signed up for a Google AdWords account to monetize the site. Google AdWords pays the site owner when an ad is clicked through. The blog is shown in Figure 1-13.
Managing spam
The biggest problem with blogs is spam. When users find a blog, they think it's a place where they can post anything with links to everything from counterfeit Rolex watches to porn Web sites. Your first defense against spam in a WordPress blog is two-pronged:
⢠Require that an administrator approve a comment before it's posted.
⢠Require that the person posting the comment add her name and e-mail address.
Figure 1-13:
Create a full-fledged Web site from a blog.
Another option is for WordPress to notify an administrator by e-mail when a comment is posted. You choose these options in the Discussion section of the Options tab (see Figure 1-14).
Another powerful option for preventing spam is to use one of the built-in plug-ins: namely, the Akismet plug-in. This plug-in searches posted comments for any known spam words (think Viagra), and quarantines the posts for a site administrator to review. You need to set up an account at WordPress.org, which is free. When you enable the Akismet plug-in, you're prompted to enter your WordPress API (Application Programming Interface) key, which you can retrieve by logging into your account at WordPress.org. Trust us: As your blog becomes more popular, it will become a target for spammers. The Akismet plug-in does a remarkable job of thwarting spam, as shown in Figure 1-15.
Extending WordPress
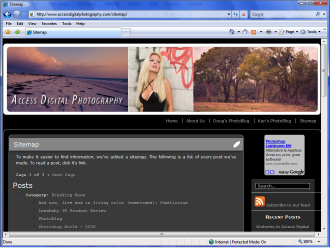
When Doug set up the site, he searched the 'Net for plug-ins to extend the blog. He wanted the blog to be recognized by search engines, easily administer Google AdWords, create a sitemap, and much more. He found the plug-ins here:
http://wordpress.org/extend/plugins/
Figure 1-16 shows the sitemap automatically generated and updated with a WordPress plug-in.
Figure 1-14:
Set user commenting options in the Discussion section.
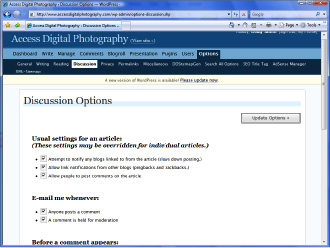
Figure 1-15:
Put a stop to spam on your blog.
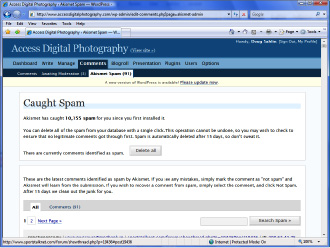
Figure 1-16:
Make life easier with WordPress plug-ins.
Photoblogs
WordPress is an extremely versatile application. With the right template, you can get the look you're after. Photographers like to post their work online, but many aren't conversant with HTML editing. If you're contacted by a photographer who wants to be seen online, consider the one-two punch of a regular blog that's linked to a
photoblog.
You can find photoblog templates for the WordPress application by typing
WordPress photoblog template
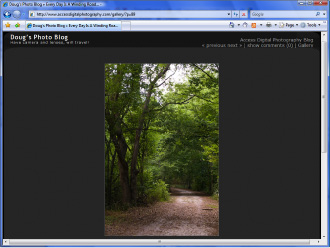
in your favorite search engine. Figure 1-17 shows Doug's photoblog, which is linked to
www.accessdigitalphotography.com
.
Figure 1-17:
A photoblog that's easy on the eyes.
Chapter 2: Podcasting Site
In This Chapter
Pondering the podcast
Creating a user-friendly podcast site
Checking out recording equipment
Perusing recording software
Podcasts are very popular. A
podcast
is an Internet broadcast that anyone with a computer can access. Podcasters run the gamut from people who have something that they want to get off their minds, to aspiring entertainers who want to be noticed, to corporations that want to educate their clients. If you have a client who wants to get the word out with a podcast, you need to create a site that's user friendly and that can be maintained by someone who may not have a lot of technical knowledge about creating and updating Web sites.
Doug loves photography and wanted to create a podcast to educate fellow photographers and share his enthusiasm about the subject and the applications he uses to edit his work. In this chapter, we dissect Doug's podcast site
http://www.pixelicious.info
.
 This is a book about Web design, not about podcasting. However, many Web designers create podcasts to inform clients. If you're interested in creating your own podcast and want to read more, we can recommend two books:
Podcasting For Dummies,
2nd Edition, by Tee Morris, Chuck Tomais, and Evo Terra, and
Expert Podcasting Practices For Dummies,
by Tee Morris, Evo Terra, and Ryan Williams; both published by Wiley.
About Podcasts
Think of a podcast as on-demand information or entertainment in an audio or a video format. Some people think that podcasts are associated with the iPod device, which can be used to view or listen to podcasts. However, podcast actually stands for Personal On-Demand (broad)cast. As the name implies, the medium can be listened to whenever the end user wants to. As this chapter is being written, the 2008 Democratic Convention and 2008 Republican Convention have concluded. People who want to hear what the candidates have to say but didn't get to watch the broadcasts can download the speeches in the form of podcasts from iTunes, which is undoubtedly the most popular software for listening to digital media. The application is cross-platform, and can be downloaded free from the Apple Web site (
www.apple.com/itunes/download
). After installing the application on a computer, a user can download podcasts and other digital media directly from the iTunes store. Audio podcasts are saved as MP3 files, and video podcasts are saved as MP4 files.
Creating the Podcast Site
When Doug decided to do a podcast, he knew that at some point in time, he'd need other photographers to chip in and post podcasts. Therefore, the site had to be user friendly for contributors who didn't know how to post podcasts to the Web. The solution was a WordPress blog. Doug tweaked a template, and created a header and logo in Photoshop. He modified the template to include the header (see Figure 2-1).
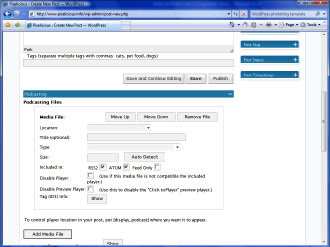
Figure 2-1:
Podcasting for fun and profit.
While still in the planning stages, Doug read many books about podcasting. These books showed him what he needed to play audio and video media and incorporate them in a post. The user-friendly application Doug decided on is PodPress (
www.mightyseek.com/podpress
). PodPress is a free plug-in that makes child's play of adding podcasts to a blog post. The application is added to the WordPress plug-ins folder at the blog Web site. Post authors can write the show notes for the blog, and then click the Add Media File button in the Podcasting section. (Refer to Figure 2-1.)
After selecting a media file that's been uploaded to the site, the plug-in can detect the file size and duration of the podcast. The user can then use the default image for the player or modify the URL to an image that's been uploaded to the site (see Figure 2-2).
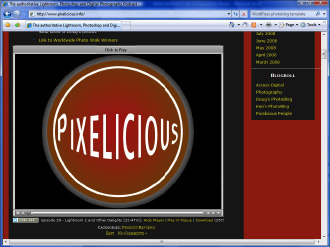
PodPress also supplies a player for the podcast. This free plug-in saves hours of work. The plug-in also makes it possible to monitor the number of downloads for each podcast. Figure 2-3 shows a published post with an embedded podcast.
Figure 2-2:
Add a player for the podcast and detect the file size and duration.
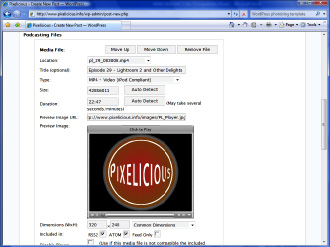
Figure 2-3:
Click to play the podcast.
Recording Hardware
If you're going to record, get the best microphone you can afford. If you're recording voice, you don't need a mixer or preamp. Several microphones are available that can operate directly from one of your computer's USB ports. Here are a couple of solutions that will give you good sound quality without breaking the bank.
Zoom H2
The Zoom H2 microphone is a handheld recording powerhouse with four microphones in an incredibly small package. The device can record 16- or 24-bit sound files with a frequency of 96/48/44.1 kHz uncompressed in the WAV format or in the MP3 format with a sample rate of up to 320 Kbps.
The device enables you to change the sound format, frequency, and sample rate via menu commands. Buttons on the front of the recorder enable the user to switch microphone configurations. The unit can record a 90-degree pattern using two microphones from the front of the unit, which is ideal for recording your own voice; a 120-degree pattern using two microphones from the rear of the unit, which is ideal for recording a group of people; or four microphones for 360-degree surround sound.
The incredible sound quality is a great way to incorporate interviews in your podcast or to create a podcast from a remote location, such as a convention or show. The Zoom H2 can also double as a USB microphone. Simply plug in the supplied USB cable to the microphone, use a menu command to connect the H2 as an audio input device, and then use your computer recording software to record your podcast. In fact, Doug has used the Zoom H2 to record podcasts. For field recordings, the unit uses SD (SanDisk) memory cards.
The unit ships with a 512MB SD card, ear buds, a small tripod, windscreen, USB cable, power adapter, and a handle that can be used to connect the device to a microphone stand. As of this writing, the list price of the Zoom H2 (see Figure 2-4) is $199.
Find online information for the Zoom H2 at
www.samsontech.com/products/productpage.cfm
Blue Microphones Snowball
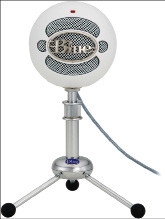
Professional podcasters and radio personalities use condenser microphones to get sweet rich vocals. However, most condenser microphones need phantom power to work. The Snowball, from Blue Microphone (see Figure 2-5), is white and round (just like a snowball), but it's powered by your computer's USB port.
Figure 2-4:
Use the Zoom H2 for field and computer recordings.
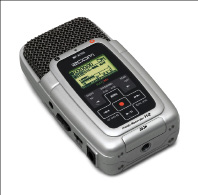
Figure 2-5:
The Snowball is a condenser microphone ideally suited for computer recording.
The Snowball is a professional-quality, condenser microphone with two polar patterns:
omnidirectional
(360 degree) and
cardioid,
which records sound from the front of the microphone. The cardioid pattern is ideal for podcasting when you have to deal with background noise such as computer fans. There is also a cardioid pattern with a â10 decibel (dB) attenuator if you're recording in a noisy environment. The microphone records 16-bit sound with a sample rate of 44.1 kHz.
The microphone is plug and play. Connect the Snowball to a microphone stand using the thread mount at the bottom of the unit, connect the USB cord to the microphone, and then to your computer. It's that simple. The Snowball works with either Macintosh (OS X; USB 1.0 or 2.0; with a minimum of 64MB RAM) or Windows (XP Home Edition or XP Professional; USB 1.0 or 2.0; with a minimum of 64MB RAM) OS. As of this writing, the Snowball has a list price of $159.
Find more online about the Snowball at
Blue Microphones Snowflake
The Snowflake from Blue Microphone Snowflake is an ideal recording solution for road warriors. It's small. Just toss it in your laptop case, and it's readily available when you need to record on the road. You can place the microphone on a flat surface or clip it to your laptop. The Snowflake is a professional-quality, condenser microphone in an incredibly small package. The microphone has a cardioid pattern, which means the device picks up sound in front of the microphone. With this microphone, you record 16-bit sound with a sample rate of 44.1 kHz.