Building Web Sites All-in-One For Dummies® (67 page)
Read Building Web Sites All-in-One For Dummies® Online
Authors: Claudia Snell

Panels not cast from wood
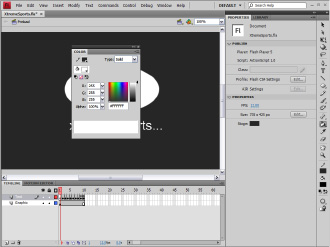
You use panels to do a lot of your work in Flash. The three panels on the right side of the interface are the Property inspector, the document Library, and the Tools panel. You open other panels using commands on the Window menu. When you use a menu command to open a panel (for example, WindowâColor), it appears in the workspace as a floating panel. (See Figure 1-4.) The Flash interface is customizable. If you don't like the default layout, choose another preset. You can also modify any preset workspace to suit your working preferences.
 Many of the panel names are self explanatory, whereas others require a little clarification. You can use Flash Help (F1) or pick up a copy of the tremendously helpful and infinitely amusing
Flash CS4 For Dummies
by Ellen Finkelstein and Gurdy Leete (Wiley).
Figure 1-4:
Panels can be docked or can float in the workspace.
Inspecting the Property inspector
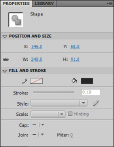
Objects have properties. It's a Flash law. When you create an object, such as the lowly and infinitely rotund oval with the Oval tool, you don't have to take what you get. You can change the properties of the oval by using the Property inspector. Figure 1-5 shows the Property inspector as it's configured when an oval is selected. Notice you can change the width, height, x coordinate, y coordinate, stroke, fill, and more. Talk about your useful inspectors.
Figure 1-5:
The Property inspector at work, sans monocle and magnifying glass.
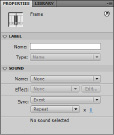
You also use the Property inspector with other objects. Keyframes also have properties. As we mention previously, keyframes are used in animation. You can set several parameters for animation by selecting a keyframe and then opening the Property inspector. (See Figure 1-6.) Notice the options that add sound to a keyframe and give the keyframe a label. A keyframe with a label â isn't that like giving it a name? Yikes!
Figure 1-6:
The Property inspector is used when creating an animation.
Getting comfortable with Flash
Flash is big, huge, vast. Even if you learn just half the bells and whistles in the application, Flash will never be half-vast. But we digress. One chapter just isn't long enough to learn all that Flash has to offer. To do so, you have to get your fingers a little greasy â get under the hood, so to speak. However, the next sections show you the fundamentals for creating a new document, an object, and then an animation. Buckle up and enjoy the ride.
Creating a Flash document
When you launch Flash CS4 for the first time, the first thing you see is a welcome screen that gives you options to create new documents or view tutorials. We generally look at welcome screens once, and click anything that piques our curiosity. The next time we launch Flash and the pesky critter appears, we mark the Don't Show Again check box to make the welcome screen exit stage left. Forever.
When you launch Flash, the first thing you want to do is create a document. The interface is pretty, but it won't do you a bit of good without a document. You can create several types of documents. In this section, we show you how to create a basic document with the default document size, frame rate, background color (refrigerator white, which is boring), and so on. It's a good place to start, but you generally need to modify the document to suit the Web page in which the Flash movie will be embedded. We're also assuming that you disabled the welcome screen and are using Flash like the frequent Flash fliers.
To create a Flash document, follow these steps:
1.
Launch Flash and choose File
â
New.
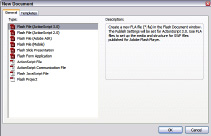
The New Document dialog box appears (see Figure 1-7).
Figure 1-7:
It's time to create a new document.
2.
Click Flash File.
For a Flash document you're creating for the Web, choose one of the first two options. ActionScript 3.0 was introduced with Flash CS3. It's a robust language, but is not appropriate for casual Flash users. We also don't have the space to give you a proper introduction to ActionScript 3.0. For the purpose of this exercise, create a Flash File (ActionScript 2.0).
Flash creates a new document with the default document size of 550 x 400 pixels, the default frame rate of 24 fps, an appliance-white background color, and the default publishing parameters. You can easily change any or all of these parameters via the Property inspector.
3.
Open the Property inspector.
The default location of the Property inspector is on the right side of the interface. If the Property inspector isn't visible in the workspace, open it by doing any of the following:
⢠Click Properties on the title bar of the Property inspector.
â¢
Choose WindowâProperties.
â¢
Press Ctrl+F3 (Windows) or
Ã
+F3 (Mac).
4.
In the Size section, click the Edit button.
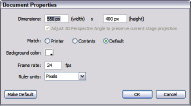
The Document Properties dialog box appears (see Figure 1-8).
Figure 1-8:
Set document properties here.
5.
Type the desired values in the width and height fields.
The default document size is 550 pixels by 400 pixels. If you're creating a small animation for a banner, you may end up with a document size of 150 x 90, or something similar. If you're creating a Flash Web site optimized for a 1025 x 768 desktop, you'll create a document that's 955 x 600 pixels.
6.
Select an option in the Match section:
⢠Choose
Printer
to set the Stage size to the maximum printable area, which is determined by the paper size minus margins as specified in the Page Setup dialog box (Windows) or the Print Margins dialog box (Mac).
⢠Choose
Contents
to set the Stage by putting equal space around the contents on all sides. Before choosing this option, align all elements at the upper-right corner of the Stage.
⢠Choose
Default
to set the Stage size to that specified in Step 5. Use this option when you're creating Flash for the Web.
7.
Click the Background Color swatch.
Flash opens the Swatches panel shown in Figure 1-9.
8.
Select the desired background color.
You can choose a color by clicking a swatch. The colors in the default palette are from the Web-safe, 216-color palette. Alternatively, you can enter the hexadecimal value for the color in the text field. This determines the background color of the Flash movie as well as the background color of the HTML document in which the Flash movie is embedded.
9.
Back in Document Properties, type the desired frame rate in the Frame Rate field.
The default frame rate of 24 fps works well for most Flash movies. If you're streaming video to an audience that has a high-speed cable connection, you can specify 30 fps and deliver beautiful full-motion video.
Figure 1-9:
Please, pick anything but white.
