Building Web Sites All-in-One For Dummies® (63 page)
Read Building Web Sites All-in-One For Dummies® Online
Authors: Claudia Snell

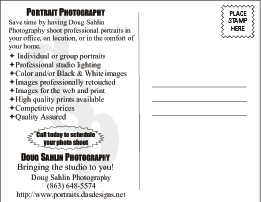
Figure 4-7:
Use material from the Web site to drive home a point.

Complement your style
When you design promotional material to promote a business that's driven by a Web site, the style of the promotional material should be similar to the style of the Web site. The printed material should look as though it were pulled right from the Web design. Fortunately, this is a fairly easy task if you design the graphic elements of your Web site using the Adobe Creative Suite, which as of this writing is Version 4, or CS4. This powerhouse application enables the same elements you designed for the Web site in Photoshop to be used in other applications â such as Adobe InDesign (page layout application) or Adobe Illustrator.
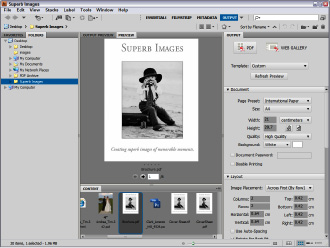
All applications hinge around Adobe Bridge, which is available from InDesign, Illustrator, and Photoshop. Adobe Bridge (see Figure 4-8) enables you to choose saved items and open them in their host application. You can then modify the item for the application in which you'll use it. For example, you can resize a photo for use in a poster you're creating in Adobe Illustrator or for use in a brochure you're creating in InDesign. This capability to quickly access assets designed for the Web site in other applications lets you create printed material with the same style as your Web site.
When the time was right to create a brochure, Doug took advantage of the interoperability of Adobe Creative Suite applications. After consulting with his marketing guru, he created the graphic design for the brochure in Adobe InDesign, using high-resolution versions of images from the Web site. The brochure emphasized the portrait photography side of the business. The images for the brochure were picked from the portrait section of his Web site. Adobe Bridge made it easy to see the images ahead of time.
Figure 4-8:
Use Adobe Bridge to access Web site assets from Adobe CS applications.

The InDesign Place command (FileâPlace) places the image in the design. The Place command is very powerful because it allows you to shrink the original image to fit into a specific portion of your design. If you later decide to increase the size of the image, you can do so with no degradation. When you lay out a brochure using InDesign, you can take advantage of the powerful Text Wrap panel to wrap text around images in the design. (For all the ins and outs of using InDesign, check out
InDesign CS4 For Dummies
by Galen Gruman, Wiley.)
Creating Fast-Loading, Beautiful Photos
Photos are an integral part of any Web site. The trick is to display photos that look great and load quickly. You can always tell when you're at a site that wasn't created by a professional designer because the images are either huge and load slowly, or they load quickly but look bad. The next few sections show you how to resize and then optimize your images for the Web.
Resizing your photos for the Web
If you're working with images supplied by your client or images from a clip art disk, chances are that you're dealing with high-resolution images suitable for print. High-resolution images have large file sizes. The combination is totally unsuitable for display on a Web site. Granted, you can control the size at which the image is displayed by entering the desired width and height in the
tag. The file size is still the same, though, and the image will load slowly.
Images for the Web need a resolution of 72 pixels per inch (ppi). Some designers insist on 96 ppi, but this is more than you need. Images with a resolution of 72 ppi are sufficient for all modern computer monitors. Images for print have a resolution of 150 ppi or greater.
In addition to resolution, your next concern is image size. The size of the image is determined by where the image will reside. If you're posting the image inline with text, you size the image smaller than you would size an image for a photographer's gallery. Also consider the desktop size of your audience. Keep in mind that many people are still surfing the 'Net with an 800 x 600 pixel desktop size, which (with a maximized browser) has an available display area of 760 x 420 pixels. If you resize an image with
portrait orientation
(an image that's taller than it is wide) to 600 pixels in height, people with an 800 x 600 desktop size will have to scroll to see the entire image. When you resize images for inline display, a good practice is to never exceed 200 pixels in width or height.
If the image is displayed as a
splash image
(the main image on a page) on a home page or in an image gallery, we recommend never exceeding an area of 600 x 360 pixels. Granted, this gives the advantage to
landscape
(wider than tall) images, but the available display area in a Web browser is also wider than it is tall. You can resize images by using Fireworks or Photoshop CS4, as shown in the following steps.
To resize images in Fireworks, follow these steps:
1.
Choose Modify
â
Canvas
â
Image Size.
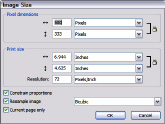
The Image Size dialog box (see Figure 4-9) appears.
2.
Enter a value of 72 in the Resolution field.
This doesn't change the print size, but it does reduce the pixel dimensions of the image.
Figure 4-9:
Resizing an image in Fireworks.

3.
Enter the desired width or height in the Pixel Dimensions section.
You can enter either value because the option to constrain proportions is selected by default. We advise that you never deselect the Constrain Proportions check box because the image will be distorted.
_fmt.jpeg) Downsizing
Downsizing
(reducing in size) an image is okay, but when you try to
upsize
(enlarge) a small image, you're asking the image-editing application to increase the size of each pixel in the document. Image degradation is the unhappy result of trying to upsize an image.
4.
Click OK.
Fireworks resizes the image to the desired dimensions.
To resize an image in Photoshop, follow these steps:
1.
Choose Image
â
Image Size.
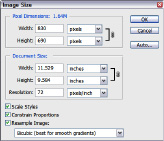
The Image Size dialog box (see Figure 4-10) appears.
Figure 4-10:
Resizing an image in Photoshop.

2.
Enter a value of 72 in the Resolution field.
This doesn't change the document size, but it does reduce the pixel dimensions of the image.
3.
Enter the desired width or height in the Pixel Dimensions section.
You can enter either value because the option to constrain proportions is selected by default. We advise that you never deselect the Constrain Proportions check box because the image will be distorted.
4.
Click OK.
Photoshop resizes the image.
Enlarging images with Alien Skin Blow Up
If you have clients who present you with small, low-resolution images that need to be enlarged, consider investing in the Blow Up plug-in made by Alien Skin Software (
www.alienskin.com/blowup/index.html
). Blow Up 2 works with Photoshop Elements 4.0.1 through Photoshop Elements 7 (Windows), and Photoshop CS2 9.0.2 or later. Adobe Photoshop Elements 6 is the latest release for Macintosh users. Doug has used the plug-in extensively to enlarge (blow up) client photos and his own images. The results are truly amazing. The manufacturer claims you can enlarge a good-quality image four times (1,600 percent) without jagged edges, halos, or artifacts. The plug-in comes complete with an instruction booklet and can be used with a Macintosh PowerPC G5 processor running Mac OS X 10.4.11 or later, or with an Intel Pentium 4 processor (or compatible) running the Windows 2000, Windows XP, or Windows Vista operating system. You can download a fully functional demo with a 30-day expiration at
www.alienskin.com/downloads/getmail1.asp
.
Using professional optimization techniques
As long as you begin with a high-quality image, you can resize and optimize a photo for the Web in Adobe Photoshop or Fireworks. Optimizing an image in Fireworks is covered in Chapter 3 of this minibook. Photoshop CS4 also has a stout optimization algorithm. You can optimize images in the GIF format or the JPEG format.