Building Web Sites All-in-One For Dummies® (71 page)
Read Building Web Sites All-in-One For Dummies® Online
Authors: Claudia Snell

Saving Flash documents in the same folder as the other assets for the Web site is typically a good idea. Flash files are saved with the
.fla
extension. You can modify the FLA file at any time by reopening it. All the files you import and objects you create are saved with the file.
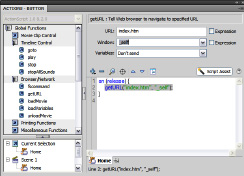
Figure 1-23:
The
getURL
action in action.
Publishing your file and adding it to your page
When you finish your menu in Flash, you publish it as a Flash movie. The default publishing options publish the Flash movie embedded in an HTML document. However, you plan to use the menu in an HTML document with other items. Therefore, publish the file as follows:
1.
Choose File
â
Publish Settings.
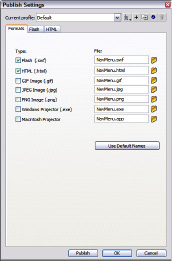
The Publish Settings dialog box appears. (See Figure 1-24.) The default settings publish the file as a Flash SWF movie embedded in an HTML document. However, for a navigation menu that you want to add to an HTML document, all you need is the Flash movie.
2.
Deselect the HTML option and then click OK.
3.
Choose File
â
Publish.
Flash publishes the file as a SWF movie.
After you publish the navigation menu as an SWF file, you're ready to add it to your Web pages. In Dreamweaver CS4, follow these steps:
1.
Create the document in which you want to add the Flash navigation menu.
2.
Position your cursor where you want to add the menu.
Figure 1-24:
The Publish Settings dialog box.
3.
Choose Insert
â
Media
â
SWF.
The Select File dialog box appears.
4.
Select the SWF file and then click OK.
5.
In the Object Tag Accesibility Attributes dialog box that Dreamweaver displays, fill in the desired attributes and then click OK.
Dreamweaver inserts the Flash movie in your Web page.
6.
Press F12 to test the file in your default browser.
Dreamweaver displays the Web page in your default browser.
Flash as an Animation Tool
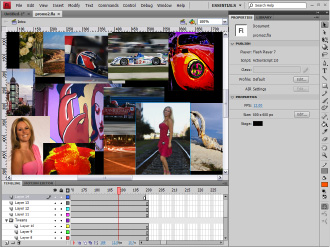
In addition to creating nav menus with Flash, you can use the application to create impressive animations. Recently Doug needed to create a presentation for his photography business. He wanted something cool and interactive, so he used Flash. The first part of the presentation was an animated intro in which images danced across the screen and then stopped to create a collage. Figure 1-25 shows the end of the animation when all the images align as a collage. Notice the multiple layers. One layer has a sound track, whereas the other layers have motion tween animations. The start of each animation is staggered so that the images fly in at different times. Because this was not a complicated animation, the frame rate was changed to 12 fps.
Figure 1-25:
You can create impressive animations with Flash.
As you can see, quite a bit was involved in creating the animation. The animation dovetails into the actual presentation. Doug used quite a few high-resolution images to create the animation and presentation. The file size of the published movie is 2MB, clearly too large for the Web, but not too large for a computer or CD presentation. If Doug deletes a few images and optimizes the others for Web viewing, the animation would be a reasonable size for use on the Web.
Create a Flash Presentation
When Doug decided to create a presentation for his photography business, he used Flash. He began the presentation with an animation of images (as discussed in the previous section). After the animation plays, a menu and a splash screen load. The menu contains links that load other content into the main Flash movie. A bit of ActionScript wizardry was involved. One of the portfolio slide shows from the presentation is shown in Figure 1-26.
Figure 1-26:
The menu for an interactive Flash present-ation.
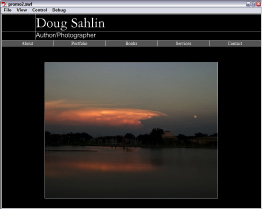
Each button on the menu loads another Flash movie into a target movie clip in the main movie. Working in this manner enables a designer to manage a lot of content using ActionScript. If all the content loads at once, the file size of the movie becomes too large, even for a CD presentation.
Doug wanted to distribute the presentation on business card CDs. He could have published the file as a
Flash Projector file,
which is a self-contained executable file complete with the Flash Player. However, a Projector file displays Macromedia Flash Player 10 in the title bar, and that's where he wanted to display the business name. The answer was an application known as SWF Studio V3.5. The application converts an SWF file into a customizable, self-executing Projector file. You can add an expiration date to the file after which time it won't play. You can also determine what text displays in the title bar. Auto-run is another feature you can add to your presentation. The end result looks like a custom application created solely for his business. You can download a trial version of SWF Studio V3.5 from
www.northcode.com
.
Exploring the Many Tricks of Flash
No discussion of Flash would be complete without mentioning the power of ActionScript.
ActionScript
is a scripting language similar to JavaScript. When you sprinkle liberal doses of ActionScript into your Flash movies, you take your designs to the next level. ActionScript comes with a bit of a learning curve. The good thing about ActionScript, though, is you don't have to master each and every action to get the job done. With a basic knowledge of ActionScript, you can rummage through the Actions panel and learn the actions you need to get the job done. Figure 1-27 shows a design that is powered by ActionScript.
The banner across the top of the site moves from side to side. The direction of movement depends on where the user's cursor is. If the cursor is on the right side of the site, the banner moves from left to right. When the user moves his cursor to the other side, the banner reverses direction. The speed at which the banner moves is determined by how far the cursor is from the middle of the design. When the user moves his cursor toward the center of the design, the banner slows to a crawl and then stops.
Figure 1-27:
A Flash Web design powered by Action-Script.

Chapter 2: Using Sound
In This Chapter
Discovering audio formats for the Web
Working with Flash, QuickTime, RealMedia, and Windows Media audio
Audio tips and tricks
Some people think Web sites are just pretty pictures and text. That's all changed, though. You can add sound to a Web site without breaking a sweat. When you add sound in a Web-friendly format to a Web site, the sound streams into the user's browser. The user must have the proper plug-in to hear the audio content. In this chapter, we show you a thing or two about sound. After reading this chapter, you can create Web sites that can be seen and heard.
Exploring Audio Formats for the Web
Audio for Web sites is saved in formats that enable the sound to stream into the visitor's browser. Streaming sound is similar to an interlaced picture that loads in stages. With streaming sound, the sound begins as soon as enough of it downloads into the user's browser to play without interruption. The most popular audio formats for the Web are
â¢
AIFF:
The AIFF (Audio Interchange File Format) sound format was once exclusively for Macintosh users but can now be shared cross-platform. This format uses the
.aif
and
.aiff
extensions and it's played through the Apple QuickTime Player.
â¢
Flash:
You can import audio into a Flash document, optimize it, and then publish the document as an SWF file. Add the published file to a Web page, and you've got sound, baby.
â¢
QuickTime:
The Apple QuickTime player can play video and audio files. The player recognizes the AIF, AIFF, and MOV sound formats.
â¢
MP3:
The MP3 audio format is a derivative of the MPEG video format. The MP3 sound format combines excellent fidelity with relatively small file sizes and is the favorite format for audio podcasts.
Copyright issues
The person who creates the recording (or the recording company) owns the copyright for songs and recordings. If you use a copyrighted song or recording on a Web site you're designing, you are in violation of the copyright laws. You might be able to obtain a license from the copyright owner. Another option is to obtain royalty-free songs or recordings. You can find these by typing
royalty-free recordings
in your favorite search engine. Some office supply stores sell royalty-free music collections. Or, if you're the really adventurous and artistic type, you can create your own background sounds using a program such as ACID Pro (Windows) or GarageBand (Mac). Both applications enable you to create music by mixing and matching royalty-free music loops.
â¢
RealMedia:
RealMedia multimedia content has been around for some time. Each version of the player gets more sophisticated. You can save sound files in the RealMedia
.rm
format and embed the RealMedia Player in a Web page to play them.
â¢
Windows Media Player:
You can embed Windows Media Player in a Web page and play the WMA and MP3 sound formats.
Adding Flash Audio to a Page
Flash audio is the perfect solution when your client wants background music on a Web page. With Flash audio, you can compress music by using the popular MP3 format and then choosing a data rate that assures good-quality sound and a quick-loading file. The next sections cover how to create Flash audio and add it to a Web page.
Creating Flash audio
Creating Flash audio isn't rocket science, but you do need a copy of Flash. You do, that is, unless you're fortunate enough to have a client who sends you the sound file in the SWF format. To create Flash audio, follow these steps:
1.
Create a new Flash document.
Accept the default frame rate (24 fps), choose a color that matches the Web page into which you're adding the sound, and specify a size of 1 pixel x 1 pixel.
2.
Choose File
â
Import
â
Import to Library.
The Import to Library dialog box appears.
3.
Select the sound and then click Open.
Flash imports the sound to the document Library.
4.
Select the first keyframe.
You only have one, so it shouldn't be hard to find.
5.
Open the Property inspector.
6.
Choose the imported sound from the Sound drop-down menu.
The filename of the sound file appears in the Name text field.
7.
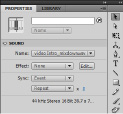
Accept the default Sync options of Event and Repeat, but change the value of the last option to 0 (zero).
These settings play the sound once. If you have a quiet background sound, you might want to change the second option to Loop and then enter the number of times you want the sound to repeat. After you add a sound to a keyframe, your Property inspector should resemble Figure 2-1.
Figure 2-1:
Add sound to a keyframe â the only keyframe.
_fmt.jpeg) A word of caution is in order here. If the song is too loud or doesn't suit all audiences, looping the sound is a surefire way to have part of your intended audience escape by clicking the Back button.
A word of caution is in order here. If the song is too loud or doesn't suit all audiences, looping the sound is a surefire way to have part of your intended audience escape by clicking the Back button.
8.
Choose Window
â
Library.
The document Library opens.
9.
Select the sound file, right-click (Windows) or Control-click (Mac), and then choose Properties from the contextual menu.
The Sound Properties dialog box appears.
10.
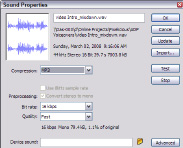
Choose MP3 from the Compression drop-down menu.
The Sound Properties dialog box reconfigures, as shown in Figure 2-2.
Figure 2-2:
Modify the sound properties.
11.
Choose an option from the Bit Rate drop-down menu.
The default option of 16 Kbps works well for simple background music with one or two instruments. However, if you use more complex music to entertain your viewers (or your client is a diva, opera star, or rock musician), you need to specify a higher bit rate to get a better-quality sound. When you exceed 20 Kbps, preprocessing converts stereo sound to mono. If desired, you can convert the sound to stereo by deselecting the Convert Stereo to Mono check box. A higher bit rate does increase the file size, so you can't go too far unless you have a sound clip less than 30 seconds in duration.
 If you import an MP3 sound file, a check box appears in the dialog box with the option to use the imported MP3 quality. The Bit Rate options appear if you deselect this option.
12.
Choose an option from the Quality drop-down menu.
The default option Fast renders the file quickly. However, you get better-quality sound if you choose Medium or Best. The latter options take a while longer to render the sound.
13.
Click the Test button to preview the sound clip with the current compression settings.
If the sound isn't to your liking, choose a higher bit rate.
14.
After modifying the sound to suit your Web page, click OK.
The new settings are applied to the sound.
15.
Publish the document as a SWF file.
Editing sound for fun and profit
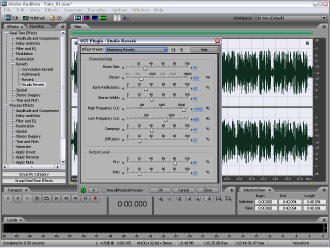
If you do a lot of work in Flash with soundtracks or add soundtracks to many of your Web pages, consider investing in a sound-editing application, with which you can apply special effects, such as reverb and echo, to a sound to equalize the volume (and much more). You can also use a good sound editing application to create voice-overs for a video track, record a podcast, and so on. Another definite bonus is the capability to save the sound in just about any format available today. Sony Sound Forge and Adobe Audition are two of the better sound editing applications. The following illustration shows reverb being added to a sound in Adobe Audition 3.0.
Adding sound to a Web page
After you publish your Flash sound, you're ready to add it to your Web page. Remember, this file is infinitesimally small, as in really, really tiny. No one will see the file, so you can tuck it in just about anywhere. Adding the file above the header section of the document is generally a good idea. Honestly, who's going to notice an extra pixel, especially when it's the same color as the background? These steps show you how to add the sound file.
1.
In Dreamweaver, open the Web page to which you'll add the sound.
2.
Position your cursor where you want to add the sound.
You can put the sound anywhere that's a blank space â say, above the header or below the fold (you know, the stuff you can't see in the browser window and need to scroll to).
3.
Choose Insert
â
Media
â
SWF.
The Select File dialog box appears.
4.
Select the soundtrack SWF file and then click OK.