Building Web Sites All-in-One For Dummies® (89 page)
Read Building Web Sites All-in-One For Dummies® Online
Authors: Claudia Snell

Feeding Them Your Content: RSS
If you set up a blog or a wiki for a client, you can create an RSS (really simple syndication) feed to notify subscribers when new information is posted. Subscribers can use an online RSS feed service or download an RSS feed reader to keep track of desired RSS feeds. Either method notifies a subscriber when you update the RSS feed. RSS delivers information to RSS feed readers through an XML document, known as an
RSS feed,
a
Webfeed,
an
RSS stream,
or an
RSS channel.
The RSS feed notifies users when newly released content is added. The type of notification differs depending on the vehicle reading the stream.
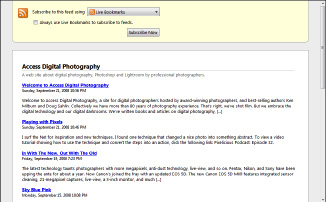
Some people don't like to be hassled with auxiliary software. This type of Web site visitor prefers to do everything through a browser. When those visitors visit a site with an RSS feed, they see an RSS icon. When the icon is clicked, they see a page that contains the most recent posts. If they click the Subscribe to This Feed button in Internet Explorer (IE) 7. The feed can be saved in the default Feeds folder or in a folder specified by the user. After the Subscribe Now button is clicked, Internet Explorer checks the feed on a regular basis and notifies the user when a new post is added to the site.
The feed shown in Figure 5-8 enables the user to peruse the newest headlines or all headlines. If a user finds a headline that piques his interest, he can click the headline link to read the article from the Web site hosting the RSS feed.
Figure 5-8:
I'm gonna subscribe to this feed. Now.

The popular Firefox browser offers different options for subscribing to a feed. When someone visits a blog with a feed, an RSS icon appears to the right of the address window. If the site has an
Atom feed
â The Atom feed format uses XML data to propagate feeds from a Web site â the user can subscribe by clicking the icon. If the user prefers to use a different blog aggregator, he can specify this by choosing ToolsâOptionsâFeeds, and then choosing the desired
feed aggregator
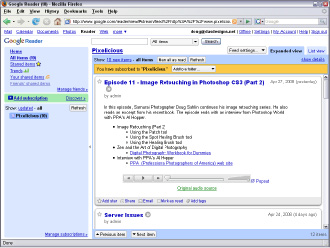
â also known as a feed reader. Figure 5-9 shows a podcast hosted by a blog as displayed in the Google Reader.
Figure 5-9:
Read me, baby.

Using an online feed reader
Many people prefer to use online RSS feed reading services instead of downloading and installing an RSS feed reader. An
online RSS feed reading service
enables you to track feeds through something you're already familiar with: namely, a Web browser. Many online services are available. We've explored three online RSS feed reading services: Bloglines (
www.bloglines.com
), Google, and Pluck (
www.pluck.com
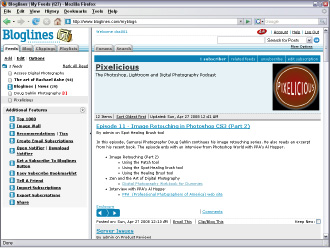
). If you haven't explored the wonderful world of RSS feeds, you can subscribe to each service free. Figure 5-10 shows an RSS feed as it appears in Bloglines. Clicking the name of the blog transports the user directly to the blog site in a new browser window. Clicking the title of the post displays the entire post in a new browser window from the URL of the post.
Figure 5-10:
Reading a blog post, using the Bloglines online RSS reader.

 You can also subscribe to a feed through Yahoo!.
Creating an RSS feed
To broadcast an RSS feed, you create an XML (eXtensible Markup Language) document. Even if you're not familiar with XML, you can create an RSS feed in no time flat with a word-processing application, such as Notepad. The document needs the following tags:
â¢
â¢
â¢
http://www.dasdesigns.net/blog
http://www.dasdesigns.net/blog/?p=21
To add an item to an RSS feed, open a browser and navigate to the URL for the blog post you're adding. Then, it's a simple matter of cutting and pasting the title, link, and description for the new item. For the description, you can use the first few sentences from the blog post. The first lines of a blog post should be interesting enough to pique a visitor's curiosity and make her want to read the rest of the post. Each post is a new item with a title, link, and description, as shown in Listing 5-2.
Listing 5-2: An RSS Feed with Multiple Posts
http://www.dasdesigns.net/blog
http://www.dasdesigns.net/blog/?p=20
You can use Listing 5-1 as a template for your own RSS feed. As long as you create a carbon copy of the first three tags, you can fill in the blanks. In fact, to show you how nice we are, we'll leave you a template (see Listing 5-3) from which to work.
Listing 5-3: An RSS Feed Template
After you create your feed, save it as an XML document. We call this one
feed.xml
. Upload the document to the
root
directory of your blog. You're now ready to start feeding the masses, so to speak.
 For those who don't like manually typing the code shown in the previous examples, there is another way of creating an RSS feed: the free application called RssPublisher. You can download it from
www.rsspublisher.com
. The application consists of three tabs: Feed, Headlines, and Publish. On the Feed tab, you enter the information about your feed. On the Headlines tab, you enter the title, description, and link to each post you want to feed to the public. The Publish tab enables you to publish the feed directly to the Web site hosting the blog, to your local machine, or to both.
Many blog applications create feeds. For example, the latest version of WordPress generates a blog feed that can be accessed by IE 7. If you really want to err on the side of caution, you can use the online service FeedBurner (
www.feedburner.com
). After creating a FeedBurner account, you can
burn
â FeedBurner speak for adding your site to their list of feeds â a feed. This Google service is free and invaluable if you're hosting a podcast on a blog. Use the FeedBurner feed address (updated automatically from your site feed whenever you add a new post) when submitting your podcast to iTunes, and your feed will have all the required iTunes tags and other required nomenclature. As an added bonus, you can use FeedBurner to view detailed statistics about your feed, as shown in Figure 5-11.