Building Web Sites All-in-One For Dummies® (43 page)
Read Building Web Sites All-in-One For Dummies® Online
Authors: Claudia Snell

3.
In the Property inspector, click Detach from Original.
An alert box opens, warning you that you won't be able to affect this section of code by editing the library item after detaching.
4.
Click OK to detach the item, or click Cancel if you change your mind.
Note:
You can also choose to edit a library item by selecting it and clicking Open in the Property inspector. To select the library item, just click anywhere in the library item code or click it in the Design view window.
An additional function you can perform by selecting an instance of a library item is Recreate. If you click the Recreate button in the Property inspector, Dreamweaver creates a new copy of the library item. If the LBI file (a Dreamweaver library item) already exists, a dialog box opens, warning you that you're about to overwrite the original.
Adding Functionality with Dreamweaver Behaviors
Dreamweaver
behaviors
are pieces of prebuilt, client-side JavaScript.
Client-side
refers to scripts that are executed by the browser on the user's machine; comparatively,
server-side
scripts are executed by the server.
Behaviors allow Web designers to add functionality quickly and easily. Dreamweaver comes with several behaviors included. You can further customize Dreamweaver by downloading and adding more behaviors.
Two popular behaviors are
â¢
Open Browser Window:
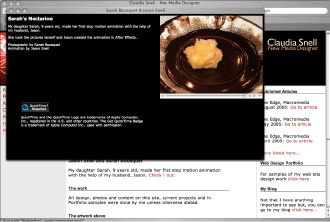
A link opened via JavaScript allows for some customization and can also receive other commands via JavaScript. We give you instructions on how to use this behavior later in this section. When this code is added to a link, the linked file opens in a new browser window. (See Figure 6-9.)
Figure 6-9:
Opening a browser window via a JavaScript behavior.

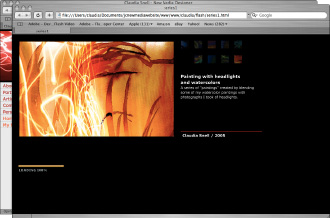
This is a little different from simply opening a link in a new window via HTML, which is shown in Figure 6-10:
www.sample.com
target=”_blank”>LINKED TEXT
â¢
Pop-up message:
A
pop-up message
is a dialog box that pops up and gives your users instructions or other information. (See Figure 6-11.) Pop-up messages (or
alerts,
as some people call them) can be very helpful and useful, but be careful to use them only when they're the best solution. Users tend to get annoyed by pop-ups and alerts, so you should avoid them unless they're conveying important information. Information about how to implement and work with pop-up messages appears later in this section.
Other functionality available through the Behaviors panel includes functions for DHTML (dynamic HTML) and rollover effects.
Figure 6-10:
Using target=”_blank” to open a second browser window.

Figure 6-11:
A pop-up window, also called an alert.

_fmt.jpeg) One thing to keep in mind when you use behaviors is that browsers support JavaScript in different ways. Some functionality that works fine in one browser doesn't work in other versions â or can work differently in other browsers. Before you start to use behaviors, decide what browsers and versions you want to support. You can then set up the Behaviors panel to show only the behaviors that work for your targeted browser(s). In the same menu that appears when you click the Add Behavior button (the plus sign at the top of the panel) is the Show Events For option. If you choose that menu item, a list of available browsers is displayed. Scroll to the one you'd like to target and click it. Behaviors become available or unavailable immediately, depending on your selection.
One thing to keep in mind when you use behaviors is that browsers support JavaScript in different ways. Some functionality that works fine in one browser doesn't work in other versions â or can work differently in other browsers. Before you start to use behaviors, decide what browsers and versions you want to support. You can then set up the Behaviors panel to show only the behaviors that work for your targeted browser(s). In the same menu that appears when you click the Add Behavior button (the plus sign at the top of the panel) is the Show Events For option. If you choose that menu item, a list of available browsers is displayed. Scroll to the one you'd like to target and click it. Behaviors become available or unavailable immediately, depending on your selection.
For more behaviors, click Get More Behaviors (which is also available through the Add Behavior menu). When you choose that menu item, Dreamweaver launches a browser and browses to the Dreamweaver Exchange Web site (as long as you're connected to the Internet, that is). If not, it asks you to connect. You can then select, download, and load new behaviors into Dreamweaver.
Including the Open Browser Window behavior
To include the Open Browser Window behavior in your code, follow these steps:
1.
Highlight the item you'd like to use as a trigger.
The trigger should be an image or bit of text; you need to have a link on the page so the user can make the window open.
2.
If the Behaviors panel isn't open, you can access it by choosing Window
â
Behaviors.
3.
In the Behaviors panel, click the Add Behavior button (the plus sign at the top).
4.
From the pop-up menu, choose Open Browser Window.
5.
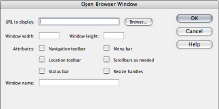
Make changes in the Open Browser Window dialog box that appears. (See Figure 6-12.)
a. Type the URL you would like to open in the URL to Display text box, or click the Browse button and browse to the file within your site that you'd like to open.
b. Set the window width and height to customize the size. Just enter the numbers; the unit of measure is pixels. So, if you'd like your window to be 500 pixels wide and 400 pixels high, enter
500
in the width box and
400
in the height box.
You can set the size to any size you'd like.
c. Enable the check boxes of the attributes you'd like to select.
Attributes further affect the features and appearance of the new browser window, such as whether scroll bars appear in the new window, whether the user can resize the window, and so on.
d. Type a name in the Window Name text box.
Give the new window a name that can be referred to by other JavaScripts you might want to implement.
A benefit of using a window name is that you can prevent multiple new windows from opening by using the same name in other instances of the open browser window script within your site. If a visitor clicks an instance, a new window opens. When he clicks another instance that targets the same window, the new content replaces the old content.
There's another benefit of using this method of opening another browser window: You can control that window via JavaScript that calls that new window by the name you give it. A downside is that a few users don't allow JavaScript to run in their browsers. It is possible that they could miss out on your content.
Figure 6-12:
The Open Browser Window dialog box.

6.
Click OK.
Dreamweaver inserts code into the head section of your Web page that makes the behavior work. Dreamweaver also inserts some code at the location that you highlighted in Step 1. This code is there to trigger the behavior that is placed in the head.
 If you want to reuse the code on multiple pages or if you'd like to keep your pages clean, you can cut and paste the JavaScript from the head of the document into an external JavaScript file by following these steps:
1.
Choose File
â
New from the Dreamweaver menu bar.
2.
In the New Document dialog box, choose Category
â
Blank Page
â
JavaScript.
3.
Click Create.
4.
Save the new file to your local Web site folder.
If you don't have a folder called Scripts in the site folder, create one:
a. Choose File
â
Save As from the Dreamweaver menu bar.
b. Browse to the folder that holds your local Web site.
c. Click New Folder.
d. Name the folder Scripts.
e. Save the new JavaScript file with a Web-legal name. (See Book II, Chapter 2 for information about Web-legal names.)
5.
Look for code that looks like the following in the head section of your HTML document: