iOS Programming: The Big Nerd Ranch Guide, 3/e (Big Nerd Ranch Guides) (69 page)
Read iOS Programming: The Big Nerd Ranch Guide, 3/e (Big Nerd Ranch Guides) Online
Authors: Aaron Hillegass,Joe Conway
Tags: #COM051370, #Big Nerd Ranch Guides, #iPhone / iPad Programming

The
UIMenuController
is typically responsible for showing the user an
“
edit
”
menu when it is displayed; think of a text field or text view when you press and hold. Therefore, an unmodified menu controller (one that you don’t set the menu items for) already has default menu items that it presents, like
Cut
,
Copy
, and other familiar friends. Each item has an action message wired up. For example,
cut:
is sent to the view presenting the menu controller when the
Cut
menu item is tapped.
All
UIResponder
s implement these methods, but, by default, these methods don’t do anything. Subclasses like
UITextField
override these methods to do something appropriate for their context, like cut the currently selected text. The methods are all declared in the
UIResponderStandardEditActions
protocol.
If you override a method from
UIResponderStandardEditActions
in a view, its menu item will automatically appear in any menu you show for that view. This works because the menu controller sends the message
canPerformAction:withSender:
to its view, which returns
YES
or
NO
depending on whether the view implements this method.
If you want to implement one of these methods but
don’t
want it to appear in the menu, you can override
canPerformAction:withSender:
to return
NO
.
{
if (action == @selector(copy:))
return NO;
// The superclass' implementation will return YES if the method is in the .m file
return [super canPerformAction:action withSender:sender];
}
We’ve only scratched the surface of
UIGestureRecognizer
; there are more subclasses, more properties, and more delegate methods, and you can even create recognizers of your own. This section will give you an idea of what
UIGestureRecognizer
is capable of, and then you can study the documentation for
UIGestureRecognizer
to learn even more.
When a gesture recognizer is on a view, it is really handling all of the
UIResponder
methods, like
touchesBegan:withEvent:
, for you. Gesture recognizers are pretty greedy, so they typically don’t let a view receive touch events or they at least delay the delivery of those events. You can set properties on the recognizer, like
delaysTouchesBegan
,
delaysTouchesEnded
, and
cancelsTouchesInView
, to change this behavior. If you need finer control than this all-or-nothing approach, you can implement delegate methods for the recognizer.
At times, you may have two gesture recognizers looking for very similar gestures. You can chain recognizers together so that one is required to fail for the next one to start using the method
requireGestureRecognizerToFail:
.
One thing you must understand to master gesture recognizers is how they interpret their state. Overall, there are seven states a recognizer can enter:
- UIGestureRecognizerStatePossible
- UIGestureRecognizerStateBegan
- UIGestureRecognizerStateChanged
- UIGestureRecognizerStateEnded
- UIGestureRecognizerStateFailed
- UIGestureRecognizerStateCancelled
- UIGestureRecognizerStateRecognized
Most of the time, a recognizer will stay in the possible state. When a recognizer recognizes its gesture, it goes into the began state. If the gesture is something that can continue, like a pan, it will go into and stay in the changed state until it ends. When any of its properties change, it sends another message to its target. When the gesture ends (typically when the user lifts the finger), it enters the ended state.
Not all recognizers begin, change, and end. For gesture recognizers that pick up on a discrete gesture like a tap, you will only ever see the recognized state (which has the same value as the ended state).
Finally, a recognizer can be cancelled (by an incoming phone call, for example) or fail (because no amount of finger contortion can make the particular gesture from where the fingers currently are). When these states are transitioned to, the action message of the recognizer is sent, and the state property can be checked to see why.
The three built-in recognizers we did not implement in this chapter are
UIPinchGestureRecognizer
,
UISwipeGestureRecognizer
, and
UIRotationGestureRecognizer
. Each of these have properties that allow you to fine-tune their behavior. The documentation will show you the way.
Finally, if there is a gesture you want to recognize that isn’t implemented by the built-in subclasses of
UIGestureRecognizer
, you can subclass
UIGestureRecognizer
yourself. This is an intense undertaking and outside the scope of this book. You can read the
Subclassing Notes
in the
UIGestureRecognizer
documentation to learn what’s required.
Right now, the
TouchDrawView
clears its lines whenever the user double taps. Keep this same functionality but have a gesture recognizer perform the recognition of the double tap instead of
touchesBegan:withEvent:
. Make sure you remove the following code from
touchesBegan:withEvent:
.
[self clearAll];
return;
}
There is a bug in the application. If you tap on a line and then start drawing a new one while the menu is visible, you’ll drag the selected line and draw a new line at the same time. Fix this bug.
Piggy-back off of the pan gesture recognizer to record the velocity of the pan when you are drawing a line. Adjust the thickness of the line being drawn based on this speed. Make no assumptions about how small or large the velocity value of the pan recognizer can be. (In other words, log a variety of velocities to the console first.)
Have a three-finger swipe upwards bring up a panel that shows some colors. Selecting one of those colors should make any lines you draw afterwards appear in that color. No extra lines should be drawn by putting up that panel – or at least any lines drawn should be immediately deleted when the application realizes that it is dealing with a three-finger swipe.
Instruments
In
Chapter 4
, you learned about using the debugger to find and fix problems in your code. Now we’re going to look at other tools available to iOS programmers and how you can integrate them into your application development.
When you build an application, you can ask
Xcode
to analyze your code. The static analyzer then makes educated guesses about what would happen if that code were to be executed and informs you of potential problems. It does this without executing the code.
When the static analyzer checks the code, it examines each function and method individually by iterating over every possible
code path
. A method can have a number of control statements (
if
,
for
,
switch
, etc.). The conditions of these statements will dictate which code is actually executed. A code path is one of the possible paths the code will take given these control statements. For example, a method that has a single
if
statement has two code paths: one if the condition fails and one if the condition succeeds.
Open
TouchTracker.xcodeproj
.
Right now,
TouchTracker
doesn’t have any code that offends the static analyzer. So, we will introduce some code that does. In
TouchDrawView.m
, implement the following method.
{
int count;
// Check that they are non-nil before we add their counts...
if (linesInProcess && completeLines)
count = [linesInProcess count] + [completeLines count];
return count;
}
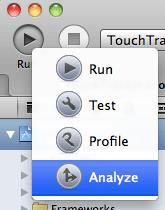
To start the static analyzer, click and hold the
Run
button in the top-left corner of the workspace. In the pop-up window that appears, choose
Analyze
(
Figure 21.1
). Alternatively, you can use the keyboard shortcut: Command-Shift-B.
Figure 21.1 Using the static analyzer

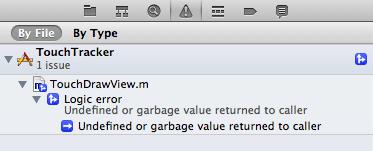
Analysis results appear in the issue navigator. You will see one
Logic error
in your code at the return point of
numberOfLines
. The analyzer believes there is a code path that will result in an undefined or garbage value being returned to the caller. In English, that means it is possible that the variable
count
will not be given a value before it is returned from
numberOfLines
.
Figure 21.2 Analyzer results

The analyzer can show us how it came to this conclusion. Click the disclosure button next to the analyzer result to reveal the detailed information underneath it. Click the item underneath the disclosure button. In the editor area, curvy blue lines will appear inside the
numberOfLines
method (
Figure 21.3
). (If you don’t see line numbers in the gutter, you can turn them on by selecting
Preferences
from the
Xcode
menu. Choose the
Text Editing
tab and click the checkbox
Show Line Numbers
.)
Figure 21.3 Expanded analysis

The code path shown by the analyzer lines is as follows:
- The variable
count
is created and not initialized.
- The
if
statement fails, so
count
does not get a value.
- The variable
count
is returned without being assigned a value.
You can fix this issue by initializing
count
to zero.
{
int count = 0;
// Check that they are non-nil before we add their counts...
if (linesInProcess && completeLines)
count = [linesInProcess count] + [completeLines count];
return count;
}
Analyze this code again, and no issues will be reported now that
count
is always initialized with a value.
When you analyze your code (which you will do on a regular basis because you are a smart programmer), you’ll see issues other than the one described here. Many times, we see novice programmers shy away from analyzer issues because of the technical language. Don’t do this. Take the time to expand the analysis and understand what the analyzer is trying to tell you. It will be worth it for the development of your application and for your development as a programmer.