The Art and Craft of Coffee (18 page)
Read The Art and Craft of Coffee Online
Authors: Kevin Sinnott

Press Pot/French Press/Melior
We refer to this method as press pot, though it’s also called the French press or the Melior. A drip coffee brewer (page 101) pours hot water down through grounds, and a vacuum brewer (described later in this chapter on page 113) shoots hot water up through grounds. The press works by keeping water around the grounds still—also known as steeping. This seems to produce a different extraction and flavor. No one knows whether the still water causes different oils to come forth or whether it just reacts differently and changes the taste. But almost everyone agrees that the press “just tastes different.” Many who evaluate coffees for a living claim the press comes closest of all methods to matching the cupping taste experience (see
chapter 2
, page 47 for more on cupping).
Materials
Kettle
Fresh water, 6 ounces (180 ml) for every 2 tablespoons (10 g) whole bean coffee
Stovetop
Glass or stainless-steel press pot, including metal filter assembly, usually attached to the lid (the plunger)
Digital scale
Grinder set to coarse
Fresh coffee, 2 tablespoons (10 g) ground per 6 ounces (180 ml) water
Kitchen timer or clock
Spoon
A press pot’s plunger usually consists of a metal screen over a solid metal piece and a rod that screws into them, which allows you to drive the filter down through the hot brewed coffee. This gets threaded through a metal or plastic cap that fits over the glass cylinder. Most presses come preassembled and with simple instructions on dismantling and reassembling.
Expert Notes on Press Pot Brewing
Here are a few tips about press pot brewing:
• Do not stir press pot coffee after brewing to even out its strength. Instead, evenly distribute the coffee across serving cups. Pour a small amount into one cup, then into another, then into another. Repeat to put equal-strength coffee in each cup.
• Facilitate extraction by plunging the press up and down to agitate the grounds during steeping.
• Expect some grounds in every cup. It’s part of the press experience and some aficionados like it. To reduce the amount, pour brewed coffee slowly.
• Brew small batches of press pot coffee if the press will likely sit out for a time. The press coffee cools rapidly, and there is no way to preserve the heat (unless you have an insulated metal model).
• Keep the filters clean. Instead of rinsing or placing the fully assembled plunger filter into the dishwasher, disassemble it each time. Grounds and hard-to-see oils accumulate quickly, particularly between the mesh filter and the hard metal plate that holds it in place, as well as in any crevices. You don’t want so-called “seasoning” of these metal parts, so squeaky clean it is.
Instructions
1.
Fill the kettle with appropriate volume of water. For example, for four 6-ounce (180 ml) cups, heat 3 cups (720 ml) of water plus an additional 8 ounces (240 ml) for scalding the press pot and evaporation. Heat on medium heat until it reaches a boil.
2.
In the meantime, assemble the press plunger (if you have dismantled it for cleaning).
3.
Grind 2 tablespoons (10 g) whole bean coffee coarsely for each 6-ounce cup (180 ml) and set aside.
4.
Preheat the press pot by scalding it with 4 ounces (120 ml) hot water.
5.
Swirl the water and then discard it.
6.
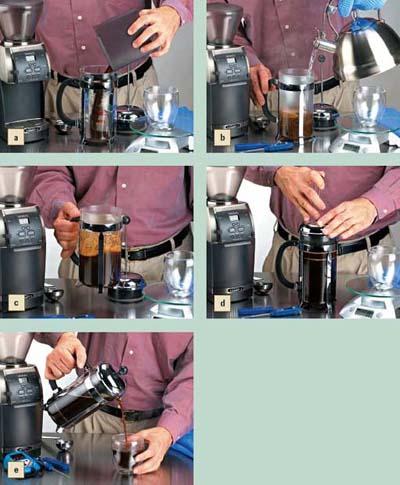
Add the ground coffee to the empty pot
(a)
.
7.
Pour about half of your hot water over the grounds
(b)
. With fresh coffee, foam will form and swell. Let the foam rise and fall
(c)
.
8.
Set your timer to 4 minutes. Pour the remaining hot water into the pot.
9.
Place the plunger cap on the cylinder. Depress the plunger just enough so that the top of the grounds are held under the water. Start the timer. Once each minute, agitate the grounds (by swirling, pressing the plunger up and down, or stirring) to prevent clumping and to ensure maximum extraction
(d)
.
10.
At the 4-minute mark, slowly but firmly depress the plunger fully.
11.
Pour the coffee slowly to keep sediment in the cups to a minimum
(e)
and evenly distribute it among the cups.
Press Pot/French Press/Melior Tutorial

Neapolitan Flip/Drip Maker
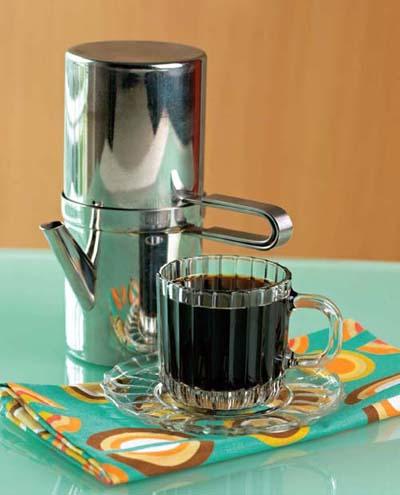
This unit consists of a water reservoir, a filter with screw top, and a carafe all in one neat, assembled package. The Neapolitan brewer is sometimes called a reversible drip, which explains its method. How does it work? Assemble the pieces and place the water-heating half (with spout upside down) on the heat. Once the water almost reaches boiling, turn the whole brewer upside down so it can function as a drip brewer.
Neapolitan brewers are often mistaken for stovetop espresso or Moka machines (which we discuss in
chapter 6
), but the only pressure in these machines is gravity. A hole in the side just above the water line counts on the fact that boiling water rises. The droplet it spits out signals you to flip. A combination of its stainless steel mesh filter and grounds held in a tight space throughout the brew give coffee brewed in a Neapolitan a richness, with some sediment, and a flavor profile akin to a press pot.
Materials
Three-piece brewer, consisting of water reservoir, coffee filter, and serving pitcher
Digital scale
Fresh whole bean coffee, 2 tablespoons (10 g) per 6 ounces (180 ml) water
Grinder set to percolator (coarse) grind
Fresh water, 6 ounces (180 ml) for every 2 tablespoons (10 g) whole bean coffee
Stovetop
Heat-safe glove or oven mitt
< A flip drip brewer works just like its name suggests: by heating the water to the start of boiling and flipping it over to allow the water to drip through a filter into the pitcher half. It is simple, and it results in a very rich, full-bodied couple of cups of coffee.
Flip/Drip, Coarse Grounds
The flip drip machine offers a powerful tasting cup, unusual considering its use of coarse grinds and its fairly quick contact time. If coffee comes out too strong or has more than a couple of grounds, grind even coarser. Some texts about this method specify fine grind, but I’ve found that coarse works far better.
Instructions
1. Disassemble the brewer.
2. Measure out whole bean or ground coffee. If using whole bean, grind coarse.
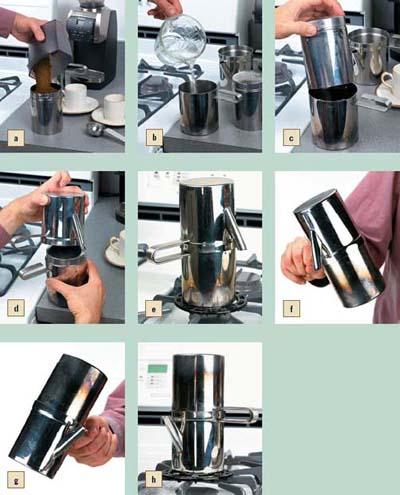
3. Unscrew the cap on the filter section and fill with 2 tablespoons (10 g) coarse ground coffee
(a)
. Smooth the grounds so they lie flat, but do not press them down. Replace the cap.
4. Fill the brewer’s water reservoir up to one-quarter inch (6.35 mm) from the small hole
(b)
. Allowing this clearance will compensate for water expansion.
5. Place the filter inside the reservoir
(c)
.
6. Connect the brewer’s serving pitcher half (the part with the spout) to the other half
(d)
.
7. Place the assembled brewer on a burner
(e)
. On a gas stove, don’t allow the flame to extend beyond the brewer’s width. Instead, compensate by centering it on a portion of the flame.
8. When a droplet of water appears at the small hole, turn off the heat. Wearing an oven mitt, grab the handle and flip over the unit
(f, g, h)
. Place it back on the stove.
9. When the bottom half of the brewer fills, your coffee is ready.
Neopolitan Flip/Drip Maker Tutorial

Vacuum Brewer
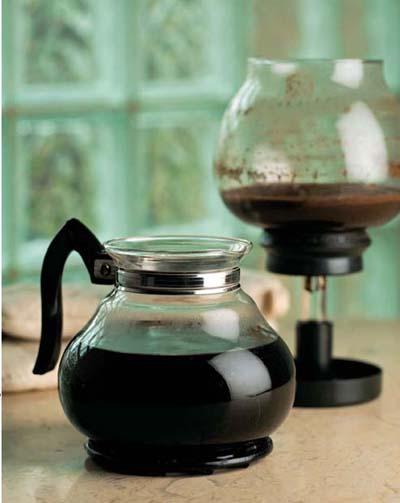
The vacuum brewer, which resembles an hourglass, consists of a water reservoir, a filter, and a brewing upper bowl with a long stem. It involves heating water in its bottom half, shooting hot water up through the grounds, and agitating grounds during contact time. A vacuum created as the water bowl cools draws filtered, brewed coffee into the lower bowl. The top half is removed before serving the pot of coffee. It is unique among brewing styles because water doesn’t touch the grounds until it is hot enough to brew adequately. Agitation during extraction ensures thorough mixing of grounds and water. The vacuum’s pull efficiently drains the finished brew from the grounds.
It does have a couple of trouble spots. The glass upper bowl stems are prone to snapping when hot, which is when you’re most likely to place stress on them. Also, vacuum brewing is relatively high-maintenance, is messy, and requires significant cleanup and manual timing.
That said, it uses the finest grind of any non-espresso method. Some ancient supermarket coffee grinders have a “glass,” “vacuum,” or “fine” setting designed for the vacuum’s relatively short contact time. Once you learn and master this method, it’s easy to get hooked. It may become your favorite, particularly for entertaining.
Materials

