The Art and Craft of Coffee (21 page)
Read The Art and Craft of Coffee Online
Authors: Kevin Sinnott

Roast is certainly a factor in bitterness. For less bitter espresso, experiment with lighter roast coffees. A middle ground exists between a light roast’s sharp acidity and a dark roast’s bitterness amidst its caramel notes. Someone who drinks espresso straight may find satisfaction there.
Foam
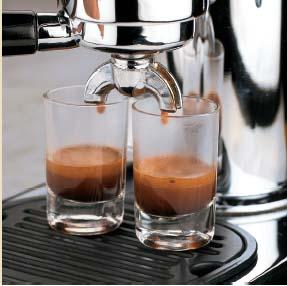
In addition to its taste, a successful espresso shot is judged visually, primarily by the layer of brownish foam on top called the crema (pronounced Krem-uh)—espresso’s equivalent to a diamond ring’s stone. It should appear strong and beautiful. The crema also indicates a viscosity, or creaminess, of the entire beverage, part of its appeal.
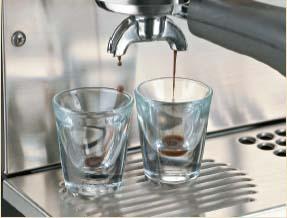
If the grind is too fi ne, the espresso shot barely drips out.
If purchasing an espresso machine, keep in mind the following industry specs:
• 200˚F (93˚C) water temperature.
• Seven grams (1/4 oz) fine ground coffee per one-ounce (30 ml) serving. Most machines come with their own appropriately sized spoons.
• Nine atmospheres pressure (132 pounds per square inch). This indicates how much pressure the manufacturer of the machine has put into the water as it goes through the coffee.
• Twenty-five to thirty seconds of extraction time
As you become more immersed as an espresso hobbyist, you will no doubt find passionate enthusiasts who prefer different variables and manufacturers that cater to different experiences. Some variables, such as extraction time, are user-controlled. In other words, play with them until they suit your taste.
The crema indicates the espresso’s strength, beauty, and creaminess.
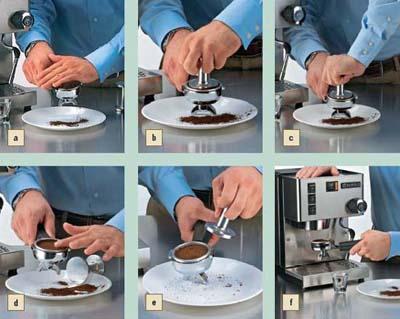
Tamping the Grounds
Proper tamping of the grounds (leveling them in the head or group) will make or break a shot, even if you have the correct grind. Here’s how to do it:
1. Fill the group (or head) with coffee. Level off the grinds with your hand
(a)
.
2. Grasp the top of the tamper firmly
(b)
. Rotate your arm inward
(c)
.
3. Begin tamping. Apply even pressure to pack the grounds.
4. Using your finger, polish the edges of the group to remove all excess grounds
(d)
.
5. Inspect the coffee to make sure it is smooth
(e)
.
6. Place the group sideways into the machine and turn the handle to seat it properly
(f)
.
Tamping the Grounds Tutorial
Expert Notes from a Barista
Espresso-making—and its terminology—can be confusing, so we asked a barista at a well-known retail espresso chain to offer some tips about three issues: extraction time, tamping, and bitterness.
Extraction time: This is simply the amount of time it takes for the water to filter through the grinds and into the cup. Some take only twenty seconds. Others require thirty seconds. Experiment to determine how long works for each coffee and let your taste buds be your guide. Machine, grind, and bean quality will likely play a much larger role than extraction time alone.
Tamping pressure: Tamping is the process of leveling the coffee in the filter head. To do this, use a tool called a tamper. Some espresso makers suggest tamping at forty pounds of pressure. In other words, the force you use puts about forty pounds of pressure on the coffee. Tamping at twenty pounds is low, but it likely won’t make or break your espresso outcome. It takes practice to understand the force necessary to tamp at certain pressures. Be consistent with your tamping because identical grinds tamped at two different pressures will taste different. Try not to overtamp (e.g., with fifty pounds or more).
Espresso bitterness: In a quality shot, very little bitterness should come through (though you do want some). Sweetness is more frequently one of the most apparent qualities. That said, if a shot tastes too bitter, it likely is. Throw it away.
Espresso Maker Guide
Once the exclusive province of wealthy urbanites and bad–credit risk over-reachers, espresso machines are now available at most price levels. European manufacturers have been particularly innovative in developing inexpensive mechanisms that deliver brewing pressure without costly industrial-grade pumps. Some new entry-level machines do a good job of delivering a palatable one-ounce (30 ml) shot or serving of espresso. The trouble is that the enemy of good is great, and for great espresso, none but the highest-end consumer machines (some might even call them “pro-sumer” machines) can deliver the absolute best espresso.
The following is an espresso machines rough guide in ascending order. I do not endorse any one brand or model, as they change often.

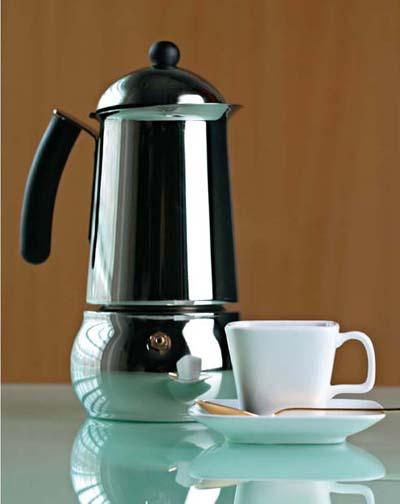
Stovetop Moka
This machine is really a hybrid espresso/drip machine. It doesn’t generate enough pressure to develop a crema, but it often rivals low-end espresso machines, at a fraction of the cost. Something about them says “artsy” and “non-conformist” and that the owner is an individualist. It even says you don’t like to pay money for appliances that don’t make any better coffee.
Advantages: Low cost, good flavor, required bitterness
Disadvantages: Cleanup, no crema, no milk foam
Materials
Three piece Moka maker
1 cup (240 ml) water
7 grams (1/4 oz) coarse ground coffee for a 1-ounce (30 ml) single shot or 14 grams (1.2 oz) for a double (two 1-ounce [30 ml] shots)
Stovetop or other heat source
Instructions
1. Fill the bottom of the maker with water to just under the steam-release hole
(a)
.
2. Fill the filter with coarse ground coffee
(b)
.
3. With your hand, smooth the top of the coffee in the filter. Don’t try to press the coffee but smooth it instead. This is called polishing the dose
(c)
.
4. Screw on the top half of brewer.
5. Turn the stovetop on low flame and brew until water comes out of the steam-release hole
(d)
.
6. Serve the Moka immediately
(e)
.
Stovetop Moka Tutorial

< The stovetop Moka is a hybrid brewer that brews coffee that sits somewhere between true espresso and strong drip coffee. For many, it is an almost perfect compromise in the cup, and it is easy to make.
Stovetop Espresso Machines
What’s the difference between a Moka and a stovetop espresso machine? Oh, it’s about 30 dollars. Sorry for the bad joke, but really, there often isn’t much difference. A well-designed stovetop espresso machine will produce a bit more pressure—and subsequently more crema—although nothing like the best shot.
Advantages: Reasonable cost, slightly better espresso character than a stovetop Moka
Disadvantages: Cleanup, little or no crema, no milk foam
Electric Steam Espresso
This machine looks like a home espresso machine should. It has a steam wand, a device that’s not used to brew coffee but rather to steam and froth milk. Because the majority of people drink espresso in cappuccinos and lattes, you may consider getting one of these if you’re on a budget (and don’t really want espresso as much as a strong milk-frothed café latte drink). The coffee can taste quite good, but as espresso, it lacks the tight foam of a well-made commercial shot and the creamy tight bubbles associated with the best cappuccino or latte art.
Advantages: Decent retail price, some companies’ innovations produce surprisingly good near-espresso
Disadvantages: The majority of steam machines overextract and make bitter espresso-style drinks, okay milk foam